Body Shape Calculator
- Last formula update:
Decimal & Rounding Policy
- Convert each measurement to inches before comparing body shape thresholds.
- Use the exact conversion 1 inch = 2.54 centimeters.
- Keep unrounded values for ratios, inverse solving, and category decisions.
- Display numeric results with at most 10 decimal places; never round the shape decision.
- Apply the first matching shape rule in its specified order.
Valid range
- Bust, waist, high hip, and hips must each equal 20–500 cm after conversion.
- Editable proportion ratios must be greater than zero and within 0.05–20.
- Inverse solving requires exactly one unknown measurement in the selected ratio.
- The solved measurement must also fall within 20–500 cm.
- All four valid circumferences are required for a body shape result.

Brinelle Lumquell
Reviewers:
Cavarine Pexmont
Yeldric Vossbourne
Check our editorial policy
September 28, 2026
1.0.0
Initial calculator and formula release.
Our engineers are here to help you get it right.
Body Shape Calculator: What Can It Tell You Before You Buy Clothes?
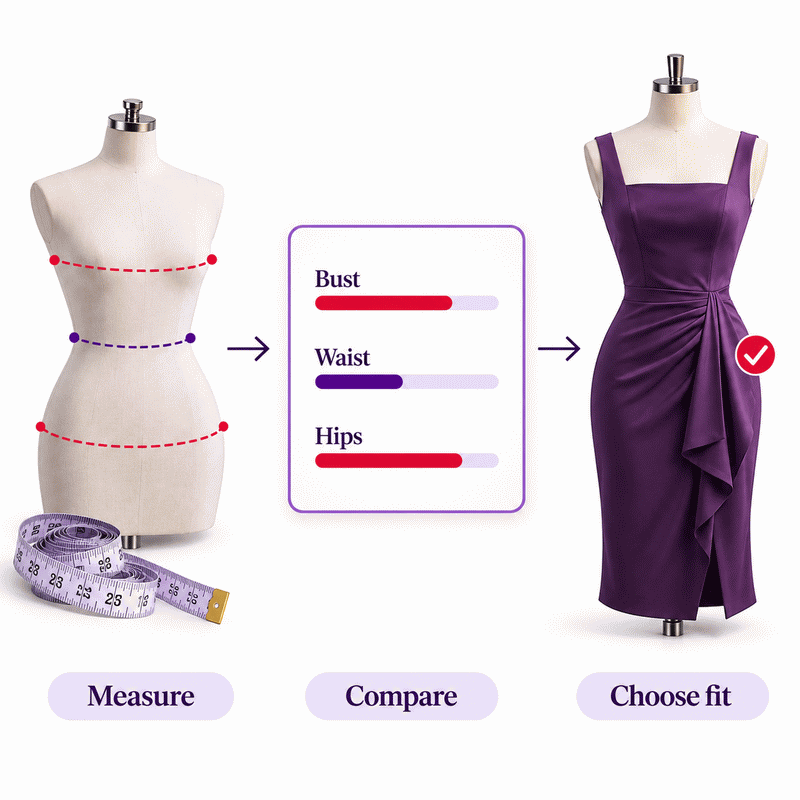
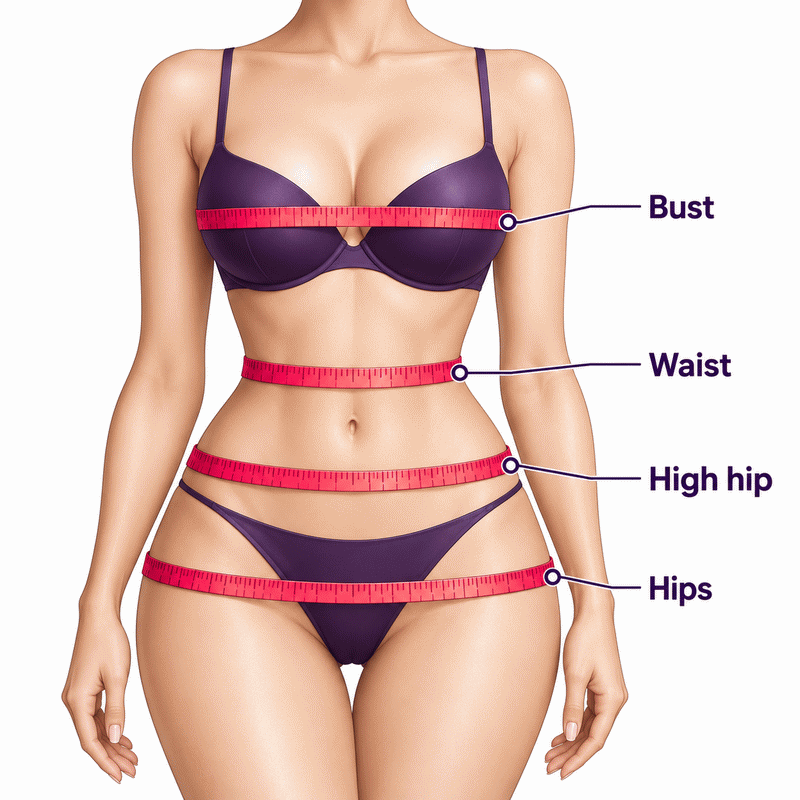
Body Shape Calculator results turn four tape measurements into a practical fit starting point. Measure bust, natural waist, high hip, and full hips. Keep the tape level and repeat any reading that seems unusual. The high hip is the upper curve; the full hip is the widest point below the waist.
- The result describes an apparel proportion category, not a clothing size or health finding.
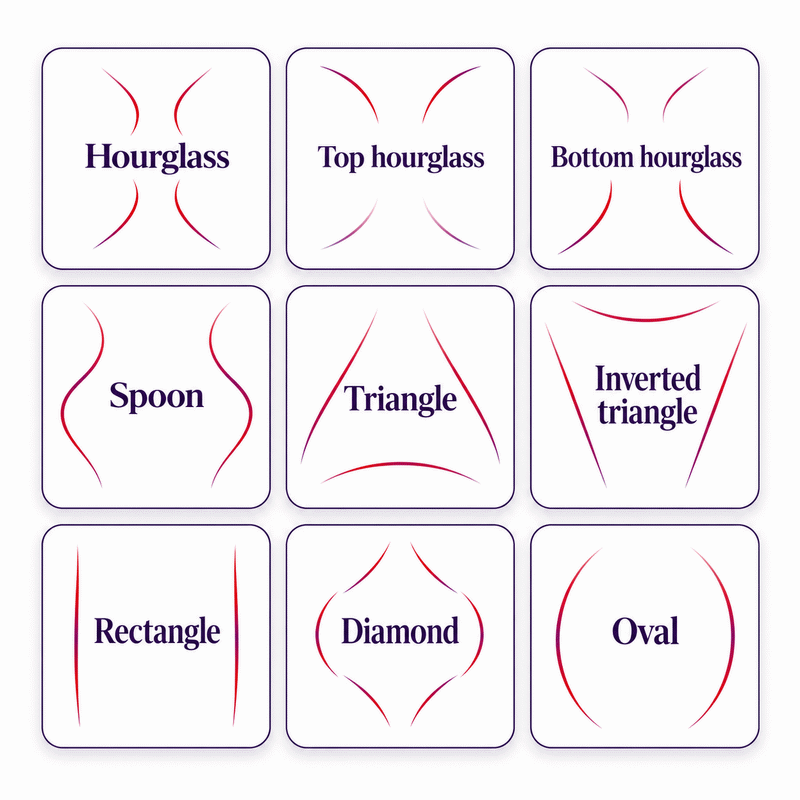
- The tool can distinguish hourglass variations, spoon, triangle, inverted triangle, rectangle, diamond, and oval patterns.
- A borderline label may change after a small measurement difference. Recheck the tape placement first.
- If no category matches, the measurements can still guide a fit decision.
- Compare your measurements with the seller’s body-size and garment charts before ordering.
- Check the tightest likely area first; a different cut can solve a problem that a larger size cannot.
The Body Shape Calculator also shows proportions that help you inspect a surprising result. Use the label to decide which cuts to examine, then let the garment’s measurements, fabric, and your comfort make the final choice. A maker can use repeated measurements to investigate fit complaints, while a shopper can use them to ask a precise question about a dress, jacket, or pair of trousers.
Assumptions used in this calculator
- Measurements describe circumferences rather than front-view widths.
- Bust is measured around the fullest part of the chest.
- Waist is measured at the narrowest relaxed torso.
- High hip is measured around the upper hip curve.
- Hips are measured around the widest point below the waist.
- The tape stays level without compressing the body.
- All four measurements come from the same measurement session.
- Each selected unit converts its own circumference independently.
- Shape thresholds are compared in inches after conversion.
- Categories describe apparel proportions rather than health status.
- The first matching classification rule determines the result.
- A selected ratio can solve one unknown linked measurement.
- Some valid measurements fall outside the classification rules.
Results are rounded for display.
Internal calculations use full precision.
Formulas Used in Body Shape Calculator :
Cu is a measured circumference in its selected unit; ku is centimeters per selected unit; C is that circumference in inches. B, W, Q, and H are bust, waist, high hip, and hips in inches. R denotes a dimensionless proportion, and Δ denotes an inch difference. Rules are checked from top to bottom.
Convert a circumference to inches
Waist-to-hip proportion
Bust-to-hip proportion
High-hip-to-waist proportion
Bust minus hips
Bust minus waist
Hips minus waist
Hourglass
Bottom hourglass
Top hourglass
Spoon
Triangle
Inverted triangle
Rectangle
Diamond
Oval
If no rule matches, the result is Outside classification rules. An editable ratio solves one unknown linked circumference by rearranging its displayed ratio equation.
Variables & Definitions
View a complete list of all variables used in this calculator, including definitions and units
Body Shape Calculator Variables and Measurement Units
| Symbol | Meaning | Unit | Use |
|---|---|---|---|
| Cu | One entered circumference | Selected length unit | Converted before classification |
| ku | Centimeters per selected unit | cm per unit | Unit conversion factor |
| C | That circumference after conversion | in | Compared with inch thresholds |
| B | Bust circumference | in | Upper-body comparison |
| W | Waist circumference | in | Waist comparison and ratios |
| Q | High hip circumference | in | Upper-hip proportion |
| H | Hip circumference | in | Full-hip comparison |
| RWH | Waist divided by hips | Dimensionless | Editable proportion and inverse solving |
| RBH | Bust divided by hips | Dimensionless | Editable proportion and inverse solving |
| RQW | High hip divided by waist | Dimensionless | Shape rule and inverse solving |
| ΔBH | Bust minus hips | in | Upper-to-lower difference |
| ΔBW | Bust minus waist | in | Bust-to-waist difference |
| ΔHW | Hips minus waist | in | Hip-to-waist difference |
Unit Conversion Table
Body Shape Calculator — Unit Conversion Table
| Unit Group | Unit Name | Symbol | Equivalent in cm | Used For |
|---|---|---|---|---|
| Popular Units | Centimeter | cm | 1 cm | Bust, waist, high hip, hips |
| Popular Units | Inch | in | 2.54 cm | Bust, waist, high hip, hips |
| Scientific Units | Millimeter | mm | 0.1 cm | Bust, waist, high hip, hips |
| Scientific Units | Meter | m | 100 cm | Bust, waist, high hip, hips |
Example Calculation
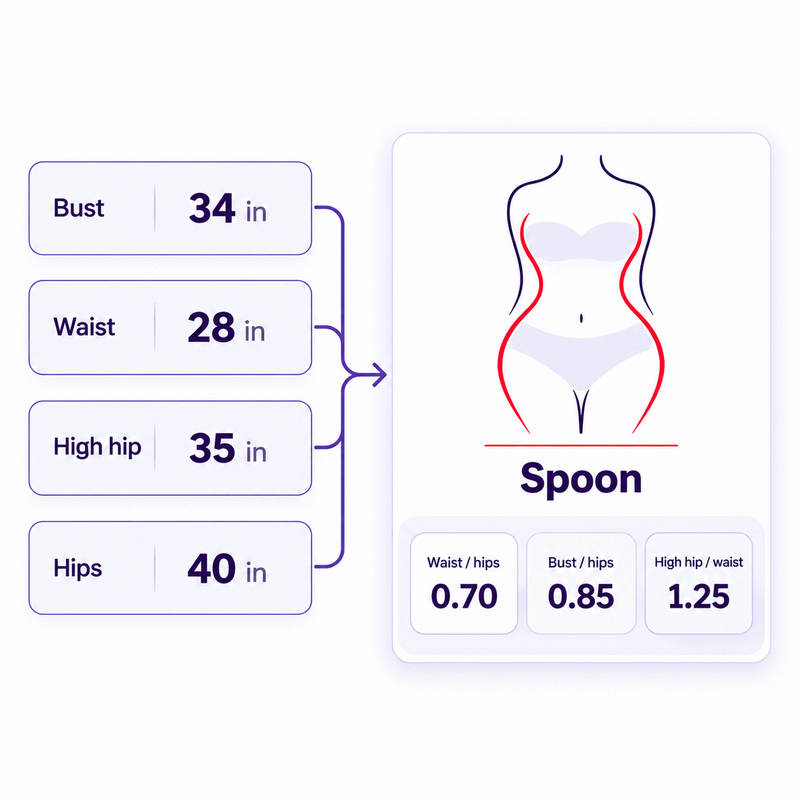
Bust 34 in · Waist 28 in · High hip 35 in · Hips 40 in
Hips − bust = 40 − 34 = 6 in; hips − waist = 40 − 28 = 12 in.
High hip ÷ waist = 35 ÷ 28 = 1.25.
6 ≥ 2, 12 ≥ 7, and 1.25 ≥ 1.193.
The hip circumference exceeds the bust by six inches.
The bottom-hourglass rule fails because the high-hip ratio is above 1.193.
The spoon rule is the first match; this label describes apparel proportions.
Bust 90 cm · Waist unknown · High hip 92 cm · Hips 100 cm
Set the editable waist / hips result to 0.75.
Waist = (waist / hips) × hips = 0.75 × 100 = 75 cm.
High hip / waist = 92 / 75 ≈ 1.2266666667.
The ratio supplies a unique waist because the hip circumference is known.
All four measurements then permit an ordered shape classification.
A shape name by itself cannot uniquely recover a missing measurement.
Results are rounded for display.
Internal calculations use full precision.
Calculations Disclaimer
Body Shape Calculator: Why Does Clothing Fit in One Place but Pull in Another?
A dress fits your waist, yet the hip seam feels tight. The Body Shape Calculator helps describe that mismatch through your readings. It gives a useful starting point before you compare cuts and size charts. It cannot choose a garment for you. It can help you ask a better question: where does this item need more room?
Clothing sizes compress several body readings into one label. That label belongs to the brand and its pattern. Your own body shape can differ from its fit model. A skirt may match your waist and still lack hip room. A shirt may clear the bust while the shoulder line sits too far out. The size printed on the tag cannot explain either problem.
Read the fit problem before the shape name
Start with the place where clothing binds, gaps, or shifts. A firm hip seam points you toward hip and upper-hip dimensions. A gaping waistband calls for a closer look at the waist-to-hip relationship. A jacket that pulls across the chest needs a bust and shoulder check. The result supplies context for these observations; it does not erase them.
A body-shape group describes a pattern of circumferences. It is a broad fit vocabulary, not a score. People with the same group can wear very different sizes. People who wear the same size can receive different groups. A model in one size cannot predict your fit. The product page may suggest otherwise.
Use the label to narrow your first choices. Then inspect the brand’s chart for the item you want. Compare the body readings it lists with yours. If the brand provides finished item dimensions, use those too. A fabric’s stretch, a lining, and the intended shape can all affect comfort. The outcome is a more informed fitting decision, not a promise of a perfect purchase.
Give yourself a clear next action
If one area regularly dictates your size, note it beside your readings. You may need another cut, fabric, or a small alteration. A useful result sends you back to the product details with a specific fit question. It should make shopping calmer rather than turn a body into a rigid label.
How Do You Measure the Four Places That Shape the Result?
You measure twice and get two different answers. That happens easily when the tape climbs at the back or slides to another landmark. A repeatable method matters more than squeezing out another decimal place. Use a flexible tape, stand naturally, and keep it level around the body. Ask someone to help if you cannot see the tape’s path behind you.
Find bust, waist, upper hip, and full hip
Measure the bust around its fullest point. Keep the tape snug, but leave room to breathe normally. Wear the same type of fitted bra when you measure for that garment. A different bra may change the reading and the item fit you expect.
Find your natural waist at the narrowest relaxed part of your torso. Avoid pulling in your stomach. Do not force the tape to your navel if your waist sits elsewhere. A trouser waistband may sit higher or lower than this landmark. The body reading and the garment waistline serve different purposes.
Take the high-hip reading around the upper hip curve. For the full hip, move the tape to the widest point below your waist. These are separate girths. Do not use the widest hip value twice. That removes the upper-hip clue. The upper curve can also matter for a fitted skirt or trouser yoke.
Repeat the reading without changing the method
Check that the tape stays parallel to the floor. Keep it close to the skin without pressing into it. Measure over thin clothing or on the body. Use the same approach each time. Stand without twisting to read the number. Take a second reading after relaxing your arms and posture. If the two readings disagree, correct the tape path before trusting either result.
Record the date and the clothing context beside your readings. Bodies, clothing, and reading habits change. A fresh set is useful before an important order, especially after a fit change. You do not need to treat every small difference as a meaningful change in shape. Consistent landmarks let you tell a true change from a tape error.
The calculator accepts each girth independently. This helps if an old note uses inches and a newer note uses centimeters. Still, make sure every number represents the correct body site. A neat unit conversion cannot repair a waist value entered into the high-hip field. Check the labels before relying on the result.
What Do the Shape Labels Actually Describe?
A result looks clear until you try to picture what it means. The groups summarize how the bust, waist, upper hip, and full hip relate. They are useful when talking about pattern shapes and clothing lines. They omit posture, shoulder width, height, and how fabric drapes. Treat the name as the first sentence of a fit discussion.
Balanced bust and hips can still lead to different fits
Hourglass describes a marked waist with bust and hips that sit close to one another. Top hourglass gives more emphasis to the bust. Bottom hourglass places more emphasis on the hips. Its upper-hip pattern differs from spoon. These details point to where a fitted dress may need more room. A shape-themed item will not fit everyone with that label.
Spoon and triangle both emphasize the hips. Their waist and upper-hip patterns differ. Inverted triangle emphasizes a larger bust relative to the hips under this tool’s rules. Rectangle describes comparatively small differences around the torso. None of these labels says whether your shoulders are narrow or broad. The calculator does not measure them.
Waist-dominant profiles need careful language
Diamond and oval extend the vocabulary for some readings where the waist exceeds the hips. The distinction depends on how the bust compares with the waist. These names describe a pattern, not a diagnosis or a visual judgment. They can help a maker notice where a garment needs ease. An outside-rules result means no defined pattern matched all four values.
Some groups share everyday nicknames. A shop may call triangle “pear,” while another guide may merge several lower-body patterns. Names are less useful than the actual readings behind them. When a brand’s chart is available, the chart should guide the size choice. The result can guide which cuts you inspect first.
Look for overlap instead of a perfect shape
A group cannot capture every curve. Your shoulder line, torso length, and preferred ease may change how you like a garment. If a recommended cut feels wrong, trust the fit you observe. Use the tool to form a fit guess. Test it against the chart and the item. There is no requirement to dress according to a label.
Why Might the Result Disagree With a Mirror or Another Calculator?
You enter the same body into two tools and see different words. That can be unsettling, but the tools may be asking different questions. One may use shoulders; another uses the bust. One may need the high hip; another may not. A tool with fewer groups has to place more people into broad groups. A different result is a reason to compare methods, not a verdict on your body.
Small input changes matter near a boundary
Imagine a tape that slips slightly lower at the waist. The entered value changes, even though your body has not. A group near a cutoff can move to a neighboring label. Recheck each landmark first. Then compare the readings behind the new label. If the number stays consistent, the change reflects the rule set’s boundary.
The tool checks its rules in a fixed order. Some patterns overlap in everyday language, so the first satisfied rule determines the label. Four valid readings can also fall outside the defined groups. That outcome is honest: a forced label would sound certain while hiding an imperfect fit. The body shape remains useful even when the name does not fit. A word is less useful than the four values behind it. Keep those values in view. A word is less useful than the four values behind it. Keep those values in view.
Visual impression uses facts the form does not collect
A mirror shows height, posture, shoulders, clothing, and perspective. The calculator sees girths entered in four boxes. These are different views of the same person. Wide shoulders may shape your outline. Bust and hip values may tell another story. A structured jacket can change the outline again.
Use the result for the purpose it serves: comparing girth patterns for apparel. For a jacket shoulder problem, measure and inspect the shoulders too. If you want a health assessment, use appropriate clinical advice. A shape label cannot answer either question by itself.
Make a surprising result testable
Check the field order first. Then retake the four readings with the same tape and posture. Compare bust with hips. Then compare upper hip with waist. If the group stays the same, note which item area has caused past fit issues. That practical check is more useful than searching for a prettier label.
How Can Your Result Improve a Clothing Purchase?
You like a dress, but its size label says little about your fit. Start with the body-size chart. Check finished garment sizes if available. Match the most restrictive area first. A shape label cannot fix a dress that binds at the hips.
Choose the limiting fit area, then assess the cut
For a fitted top, bust and shoulder fit often need separate attention. For trousers, compare the waist, upper hip, full hip, rise, and fabric stretch. For a close dress, consider all three torso areas. These are item questions. The tool highlights where your shape may differ from the brand’s pattern.
Do not assume that a larger size solves every mismatch. It may relieve a tight hip and create a loose waist. A cut with more hip room, a different waist construction, or tailoring could work better. A top may fit the bust yet hang loose below. Look for the pattern change that addresses the actual problem.
Reviews can help when they include readings, fabric behavior, and the size purchased. A review that only says “true to size” has limited value without context. Product photos may reveal seam placement, but lighting and pose can hide tension. Check the return terms before ordering an unfamiliar brand. A small amount of fit research can spare a costly return. A color or print does not change the cut. Look at seams, pockets, and where the fabric gives. If no chart exists, ask the seller for sizes before buying.
Use a decision path you can repeat
Measure your body. Find the likely tight spot. Check the chart and cut. Then decide whether you prefer a relaxed fit, a closer fit, or an alteration. Keep your readings available for the next purchase. A clear fit choice gives the result its value.
AxiCalculator lets you enter four values and review the shape group. You can revisit the readings before choosing a different item. Use the tool to frame a fit question. Let item details settle the purchase. A useful chart makes that choice easier to check. The goal is fewer guesses and a fit that feels right to you.
What Can a Maker or Fit Specialist Learn From the Same Measurements?
A sample item fits a model, then causes repeat complaints at the upper hip. A single size label will not explain the pattern. A maker can compare the same four sites across measured testers. The comparison may show where a sample lacks room. It may also expose a grading issue.
Use shape language to ask a pattern question
A label can suggest an area worth checking. A lower-body-emphasis result may prompt a closer look at hip distribution. A waist-dominant result may prompt a different waist and abdomen allowance. A label cannot define a new pattern block. Two people in one group can differ greatly. A professional still needs the item’s pattern, fabric, ease, and fitting feedback.
Keep readings tied to a consistent method. A shifted upper-hip landmark can spoil comparisons across testers. Record the body site, date, and reading conditions. Ask fit testers where the item binds or shifts. Fit feedback may reveal sleeve, rise, or length issues beyond this tool. Note the change you test and the response it gets. A short record can guide the next sample. This keeps the next review focused. One fitting cannot prove a cut works in every size. Recheck the block when you change the fabric.
Make the calculation useful without overstating it
The displayed ratios can support a conversation with a customer or patternmaker. These values are easier to revisit than “runs small.” Share links can carry your readings. Treat those links as personal fit notes. Exports help compare sessions. A label is still far from a body scan.
Shoppers should compare the measured areas with the chosen item. Makers should test a pattern change during a fitting. Both paths respect the limits of a short calculator. They also make the result more useful than a decorative shape graphic.
Return to the question that matters
Which part of this item needs to fit differently? Measure that area. Check the chart, then choose a cut with room. Review your body shape with AxiCalculator before your next order. Save your values. Let the fit decision come from your readings and the item in front of you.
Frequently Asked Questions
Should I measure again before buying a fitted garment?
What if a size chart uses only bust, waist, and full hips?
Can siblings with similar measurements receive different results?
Does a result change how I should feel about my body?
How should a patternmaker compare samples across testers?
Why can changing the upper-hip landmark alter an apparel study?
Can a customer service team use a shared calculator link as a fit record?
Our engineers are here to help you get it right.