Pixels to Inches Converter
- Last formula update:

Decimal & Rounding Policy
- Calculations use full internal precision and are not rounded during intermediate steps.
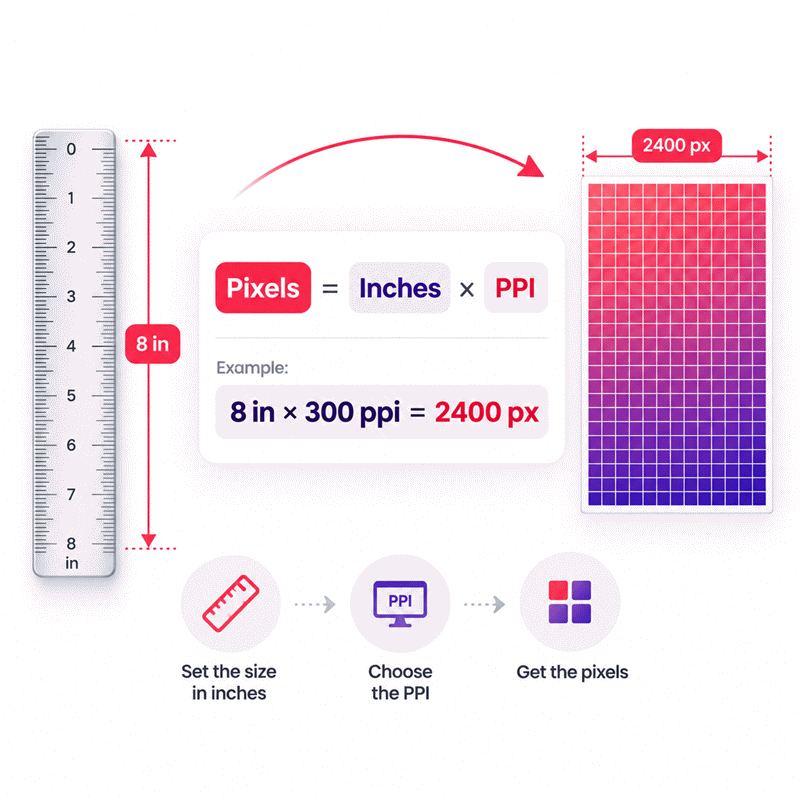
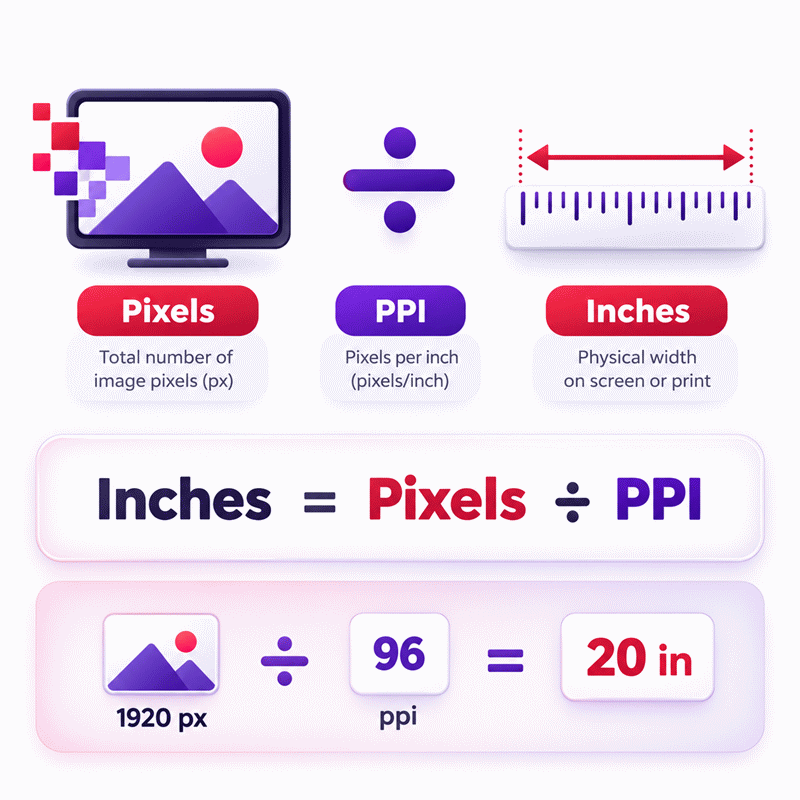
- Pixels to inches are calculated as Inches = Pixels / PPI, while Pixels = Inches × PPI.
- Results are displayed with only the decimal places needed for a clear and practical value.
- When rounding is required, values are rounded to a maximum of 6 decimal places using standard mathematical rounding.
- Trailing zeros are removed, so values such as 11.250000 are displayed as 11.25.
- For example, 1 pixel at 96 PPI equals 0.010417 inches, while 1080 pixels at 96 PPI equals 11.25 inches.
Valid range
- Physical size: Enter any positive, finite length value greater than 0; the value is determined by Inches = Pixels / PPI.
- Pixels: Enter any positive, finite pixel value greater than 0; the value is determined by Pixels = Inches × PPI.
- Pixel density (PPI): Enter any positive, finite PPI value greater than 0; the value is determined by PPI = Pixels / Inches.
- Zero, negative, non-numeric, infinite, or mathematically undefined values are outside the valid range.
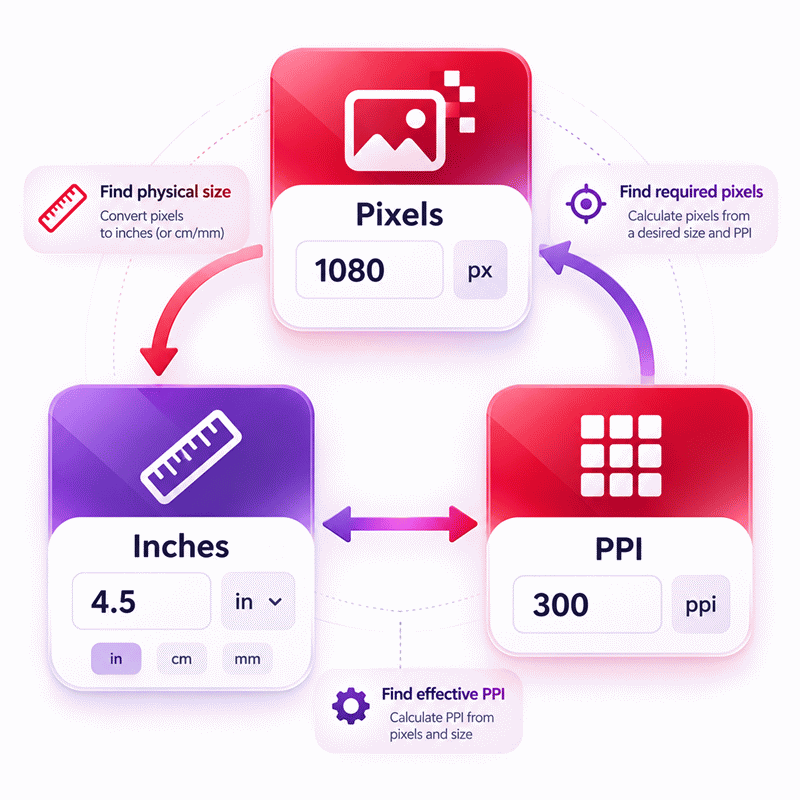
- Any two valid parameters can be entered to calculate the third parameter automatically.

Felovyn Quarnwick
Reviewers:
Meravie Quellmont
Herixon Vosswick
Check our editorial policy
September 6, 2026
1.0.0
Initial calculator and formula release.
Our engineers are here to help you get it right.
How Does a Pixels to Inches Converter Calculate Physical Image Size?
Pixels to Inches Converter calculations connect pixel dimensions with physical size through pixel density, measured in pixels per inch. The key relationship is simple: physical size in inches equals the pixel count divided by PPI. Because pixels do not have one universal physical size, the correct PPI value is essential for meaningful print and image-size calculations.
- Convert pixels to inches by dividing pixels by PPI.
- Calculate pixels by multiplying inches by PPI.
- Find PPI by dividing pixels by physical size in inches.
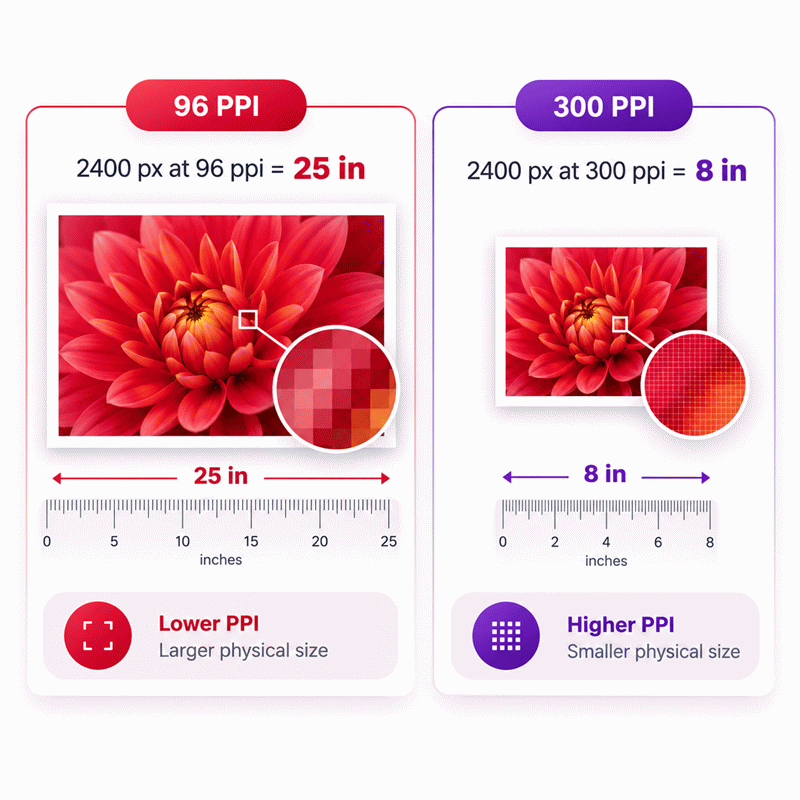
- Higher PPI produces a smaller physical size when pixels remain unchanged.
- Lower PPI produces a larger physical size from the same pixel count.
- Image PPI should not be confused with printer DPI or CSS pixels.
- Changing PPI without resampling can change physical size without changing pixel dimensions.
- Print quality also depends on source detail, viewing distance, and final output size.
The Pixels to Inches Converter also supports reverse solving, so any missing value can be calculated when the other two values are known. This makes the tool useful for image preparation, print planning, graphic design, display analysis, and production checks.
Assumptions used in this calculator
- Pixel count is treated as a positive finite raster dimension.
- Physical size represents one linear dimension, not image area.
- Pixel density is assumed uniform across the measured dimension.
- PPI must be known or derivable from the other values.
- Physical size is calculated using pixels divided by PPI.
- Pixels are calculated using physical size multiplied by PPI.
- PPI is calculated using pixels divided by physical size.
- Length units are normalized to inches before core calculations.
- Density units are normalized to pixels per inch before calculations.
- Unit conversion does not change the underlying physical quantity.
- Results assume the entered PPI accurately represents the intended medium.
- Display and print dimensions may differ when effective PPI changes.
- Precision-critical applications should independently verify dimensions and device specifications.
Results are rounded for display.
Internal calculations use full precision.
Formulas Used in Pixels to Inches Converter :
1. Physical Size Unit Normalization
2. Pixel Density Unit Normalization
3. Pixel, Physical Size, and PPI Relationship
- P = number of pixels, measured in px.
- Lu = physical size entered in the selected length unit.
- Cu = conversion factor from the selected length unit to inches.
- Lin = normalized physical size in inches.
- Ru = pixel density entered in the selected density unit.
- Du = conversion factor from the selected density unit to pixels per inch.
- Rppi = normalized pixel density in pixels per inch.
The same core relationship is rearranged internally when pixels, physical size, or pixel density is the unknown value. Calculations retain full internal precision, and rounding is applied only to the displayed result.
Variables & Definitions
View a complete list of all variables used in this calculator, including definitions and units
Pixels to Inches Converter Variables and Units
| Symbol | Variable | Description | Unit | Role |
|---|---|---|---|---|
| P | Pixels | Total number of pixels across the measured image or display dimension. | px | Editable or calculated value |
| Lu | Selected Physical Size | Physical length entered or displayed in the user's selected length unit. | in, cm, mm, ft, m, or um | Editable display value |
| Cu | Length Conversion Factor | Factor used to convert the selected physical size unit into inches. | in per selected unit | Unit normalization factor |
| Lin | Physical Size in Inches | Normalized physical length used internally in the pixel-to-inch calculation. | in | Base calculation value |
| Ru | Selected Pixel Density | Pixel density entered or displayed in the user's selected density unit. | ppi, px/cm, or px/mm | Editable display value |
| Du | Density Conversion Factor | Factor used to convert the selected pixel density unit into pixels per inch. | ppi per selected density unit | Unit normalization factor |
| Rppi | Pixel Density in PPI | Normalized pixel density representing the number of pixels per physical inch. | ppi | Base calculation value |
Unit Conversion Table
Physical Size Unit Conversion Table
| Unit Group | Unit Name | Symbol | Equivalent in Inches | Used For |
|---|---|---|---|---|
| Popular Units | Inch | in | 1 in | Base physical size used in the core calculation |
| Popular Units | Centimeter | cm | 0.3937007874 in | Metric image, screen, and print dimensions |
| Popular Units | Millimeter | mm | 0.03937007874 in | Small print, graphics, and precision dimensions |
| Popular Units | Foot | ft | 12 in | Large-format physical dimensions |
| Scientific Units | Meter | m | 39.37007874 in | Large metric physical dimensions |
| Scientific Units | Micrometer | um | 0.00003937007874 in | Very small physical dimensions and technical measurements |
Pixel Unit Conversion Table
| Unit Group | Unit Name | Symbol | Equivalent in Pixels | Used For |
|---|---|---|---|---|
| Popular Units | Pixel | px | 1 px | Raster image and digital display dimensions |
Pixel Density Unit Conversion Table
| Unit Group | Unit Name | Symbol | Equivalent in PPI | Used For |
|---|---|---|---|---|
| Popular Units | Pixels per Inch | ppi | 1 ppi | Base pixel density used in the core calculation |
| Scientific Units | Pixels per Centimeter | px/cm | 2.54 ppi | Metric pixel density measurements |
| Scientific Units | Pixels per Millimeter | px/mm | 25.4 ppi | High-density metric measurements and technical applications |
Example Calculation
A 2880-pixel dimension at 220 pixels per inch produces a physical size of approximately 13.090909 inches. The calculation divides the pixel count by the pixel density. Changing the PPI changes the resulting physical size even when the pixel count remains unchanged. Full precision can be retained internally while the displayed result is rounded only for readability.
In reverse solving, the physical size and pixel density can be entered while the pixel count remains unknown. Multiplying 6.75 inches by 240 pixels per inch gives 1620 pixels. The same relationship can solve any one of the three variables when the other two valid values are known. Unit values are normalized before calculation so changing compatible units does not change the underlying physical quantity.
Results are rounded for display.
Internal calculations use full precision.
Calculations Disclaimer
Pixels to Inches Conversion at a Glance
A file can look perfect on screen yet print at the wrong size. That problem usually starts with missing pixel-density context. A Pixels to Inches Converter solves this gap before production begins. The Pixels to Inches Converter connects pixel count with physical size through PPI. This gives users a practical way to predict real dimensions.
Pixels alone do not describe a fixed physical length. A pixel is part of a digital image grid. Inches describe a physical measurement. PPI connects these two systems. Without that connection, the physical size remains uncertain.
This matters for photographers, designers, printers, developers, and content teams. It also matters when preparing artwork for physical products. A wrong assumption can create unexpected scaling. It can also reduce visible image quality after printing.
Pixel Count → Pixel Density Context → Physical Size → Better Output Decisions
The most useful workflow starts with the values you already know. You may know the pixel count and target density. You may instead know the required physical size. Sometimes you know the pixels and final width. A flexible calculator should support all three situations.
This is where reverse solving becomes valuable. The calculator should not force one fixed input direction. It should identify the missing value from two known values. This approach reduces manual work and lowers calculation risk.
There is another important detail. Screen size and print size are not always equivalent. A digital image can appear large on one display. The same image may appear smaller on another display. Screen density and display scaling affect what users see.
Printed output creates another layer of complexity. The available pixels are spread across a physical surface. More pixels inside each inch usually preserve finer image detail. Fewer pixels per inch spread the same image across more space.
That difference can surprise users. A high-resolution file can support several physical sizes. The selected PPI changes the intended physical dimensions. The source pixel dimensions may remain completely unchanged.
For fast decisions, start with the intended use. Screen design, photography, and print production have different needs. Do not choose a density value only because it sounds high. Choose it because it matches the final output.
AxiCalculator keeps this relationship visible instead of hiding it. That makes the result easier to understand and verify. Users can compare dimensions before exporting, printing, designing, or ordering physical output.
How Pixels, Inches, and PPI Work Together
A common problem begins with a simple image specification. A client sends pixel dimensions but requests an inch measurement. The numbers seem complete, yet one critical detail is missing. Pixel density determines how those pixels occupy physical space.
What a Pixel Represents in Digital Images
A pixel is a sample within a digital image grid. It does not carry a fixed physical width. Its physical appearance depends on where the image is displayed or printed.
This distinction prevents many conversion mistakes. Two files may contain the same pixel width. Their intended physical dimensions can still differ. The assigned or effective PPI explains that difference.
Image pixels should also not be confused with physical screen elements. A display has its own hardware pixel density. Operating systems can also apply scaling. Browser layouts add another layer through CSS measurements.
This means one number can represent several different contexts. The word “pixel” needs a purpose before physical size becomes meaningful. That purpose may involve print, screen design, image editing, or web layout.
Why PPI Determines Physical Image Size
PPI means pixels per inch. It describes how many image pixels occupy each physical inch. A higher PPI places more pixels into the same physical distance. A lower PPI spreads them across more space.
This relationship creates an important trade-off. Increasing physical size can reduce effective pixel density. Reducing physical size can increase effective density. The pixel data itself may remain unchanged.
That is why print planning should begin before final production. A file can contain enough pixels for one print size. The same file may become unsuitable at a much larger size.
The target viewing distance also matters. Small prints are often viewed closely. Large displays are often viewed from farther away. The best density therefore depends on real viewing conditions.
Why Pixels Do Not Have a Fixed Physical Size
It is tempting to treat pixels like centimeters or millimeters. That shortcut creates unreliable physical measurements. Pixels describe digital sampling, while inches describe physical distance.
The missing bridge is density. Without PPI, a pixel count has no unique print size. The same image can be assigned several physical dimensions.
Here is the useful mental model:
Same Pixels + Higher PPI → Smaller Physical Size
Same Pixels + Lower PPI → Larger Physical Size
This simple relationship explains many confusing image-size changes. It also helps users detect unrealistic print settings quickly.
PPI vs DPI vs CSS Pixels: What Actually Changes the Result?
A design can fail even when every visible number looks correct. This often happens because PPI, DPI, and CSS pixels get mixed together. They are related to digital output, but they are not interchangeable.
PPI Describes Image Pixel Density
PPI belongs to digital image density and physical image size. It tells you how densely image pixels fill each inch. This value is central when predicting print dimensions from pixel dimensions.
A photo can keep the same pixel count while changing its assigned PPI. In that case, the intended physical dimensions change. The original pixel grid may remain untouched.
This is important during image editing. Users sometimes assume a changed PPI creates extra real detail. That is not automatically true. Real source detail depends on the original image information.
DPI Describes Printer Output Differently
DPI usually refers to dots produced by printing hardware. Those dots are not identical to image pixels. A printer may use several ink dots to represent one image area.
This distinction matters before ordering professional printing. A printer specification can mention a high DPI value. That number does not automatically define the required image PPI.
For safer decisions, keep image density and printer capability separate. First confirm the image has suitable pixel data. Then confirm the printing process can reproduce the intended detail.
Why 96 CSS Pixels Do Not Always Equal One Physical Inch
Web developers often encounter a familiar relationship between CSS pixels and inches. That relationship belongs to CSS layout rules. It should not be treated as universal screen hardware density.
A browser can render the same CSS layout on different devices. Those devices may have very different physical pixel densities. Display scaling can also change perceived element size.
CSS Reference Pixels vs Device Pixels and Image Pixels
CSS pixels are layout units used by browsers. Device pixels belong to physical display hardware. Image pixels belong to the raster image itself.
These three concepts can overlap in a workflow. They should still remain separate during measurement. Mixing them can produce a result that appears mathematically clean but physically wrong.
This is especially important for interface mockups and screenshots. A screenshot has image pixel dimensions. Its physical display size depends on the device and scaling conditions.
How Changing PPI Affects Print Size Without Changing Pixel Count
A designer may reduce the intended print size and see PPI increase. Nothing mysterious happened to the original pixel count. The same pixels were simply assigned to less physical space.
The reverse also happens. A larger physical output spreads those pixels farther apart. Effective PPI then decreases.
This relationship is one of the fastest quality checks available. It shows whether a requested print size may stretch available image data too far.
Common Pixel-to-Inch Conversion Mistakes That Change Results
A small assumption can create a large production error. The most costly mistakes often happen before printing begins. They usually involve context rather than difficult mathematics.
Treating Every Pixel as the Same Physical Size
The first mistake is assuming every pixel has a fixed inch value. That ignores density completely. The physical size depends on how many pixels occupy each inch.
This mistake often appears when users copy a fixed conversion ratio. That ratio may work in one context. It can fail badly in another context.
Always identify whether the task involves images, CSS, displays, or printing. The correct interpretation becomes much clearer after that decision.
Confusing Image Resolution with Image Quality
A high pixel count can support useful detail. It does not guarantee a sharp image. Blur, compression, noise, and poor focus can remain visible.
Increasing a density setting also cannot recreate lost source detail. Software may create additional pixels through resampling. Those pixels are estimates based on existing data.
For important work, inspect the actual image at useful magnification. Do not rely only on resolution metadata.
Ignoring the Final Physical Output
Users often inspect pixels but forget the final size. This becomes risky when artwork moves from screen to print.
A social graphic may look excellent on a monitor. Enlarging it for signage may expose visible softness. The effective density falls as the physical size grows.
Ask one question before approving production: how large will people actually see this image?
Why Viewing Distance Can Change the Decision
Viewing distance changes how much detail the eye can notice. A small print invites close inspection. A large sign may be viewed from several meters away.
This means the highest possible PPI is not always necessary. The useful target depends on the output and viewing conditions.
Assuming More PPI Is Always Better
Higher density can improve detail within the same physical size. However, unnecessary density can also increase file requirements. It may provide little visible benefit for some uses.
The better goal is suitable density, not maximum density. Match the image data to the final task. This gives a more practical balance between quality and file size.
Forgetting Automatic Print Scaling
Print software can quietly change physical size. Options such as “fit to page” may override intended dimensions. Printer drivers may also apply scaling.
This creates a frustrating situation. The calculated size can be correct while the printed result differs. Always review the final print settings before production.
For paid printing, request a proof when scale is critical. That small check can prevent an expensive reprint.
Choosing the Right Pixel Density for Screens, Print, and Production
The difficult question is rarely how to calculate a size. The harder question is which density makes sense. The answer depends on how the finished image will be used.
For Digital Displays and Screen-Based Work
Screen workflows should focus on required pixel dimensions first. Physical inches often have less importance for responsive interfaces. Different devices can display the same image at different physical sizes.
This is why screen graphics should not rely on print assumptions. Device density, browser scaling, and responsive layouts can change presentation.
When creating web graphics, prioritize the actual pixel dimensions required by the layout. Also consider higher-density displays when image sharpness matters.
For Photography and Standard Prints
Photo printing requires a closer link between pixels and physical dimensions. Fine detail matters because prints may be viewed nearby.
Before ordering, check the source pixel dimensions. Then compare them with the planned physical size. This reveals the effective density before money is spent.
Do not rely on file labels alone. A file marked with a high PPI can still lack enough pixels. Actual pixel dimensions provide the essential starting point.
For Posters, Banners, and Large Displays
Large-format work creates a different challenge. Very large prints can require enormous pixel dimensions at close-view density.
Fortunately, many large displays are viewed from farther away. This can reduce the density needed for an acceptable visual result.
The correct choice should follow the production provider’s requirements. Printing technology, material, and viewing distance all affect the final decision.
Before Paying for Large-Format Production
Check the finished dimensions and expected viewing distance. Confirm the required image format. Ask whether the provider applies automatic scaling.
Also confirm crop, bleed, and aspect-ratio requirements. These details can affect usable pixels before printing begins.
Do not upscale blindly to satisfy a number. Inspect the image after any resampling. Fine edges and text deserve special attention.
For Product Graphics and Packaging
Packaging artwork creates another type of risk. Dimensions can be fixed by a physical die line. Images must fit that physical space without losing essential detail.
Scaling one image across several package sizes can change effective density. A file suitable for a small label may not suit a large panel.
Check each final physical placement independently. This is safer than assuming one master image fits every product size.
AxiCalculator Workflow for Reliable Pixel-to-Inch Decisions
The biggest risk is not difficult arithmetic. It is using the right numbers for the wrong purpose. A clear workflow prevents that mistake.
Start with the Final Use, Not the Numbers
First decide whether the result supports print, screen, or layout work. This single decision removes much confusion.
For print, physical dimensions are important. For web layouts, CSS behavior may matter more. For image editing, pixel dimensions and PPI must stay clearly separated.
Next identify the two values you actually know. Do not invent the missing value. Let the calculator derive it from valid information.
Use Reverse Solving When the Requirement Comes First
Many real tasks begin with a required output size. The available pixel count may be unknown. Other tasks begin with an existing image and target size.
Reverse solving supports both directions. This makes the tool useful during planning, not only after artwork exists.
A print buyer can start with a required physical width. A designer can start with an existing pixel width. Both users can reach the missing measurement without rebuilding the workflow.
Check the Result Against Real Production Conditions
A calculated dimension is one part of a larger decision. The final output still depends on actual production conditions.
For printed work, confirm the provider’s requested image density. Check whether cropping changes usable pixel dimensions. Review any bleed or trim requirements separately.
For digital work, consider responsive sizing and device scaling. Do not treat a physical-inch result as guaranteed screen size.
For image editing, check whether resizing also resamples the image. This setting can change the pixel count itself.
A Faster Decision Path
Use this sequence when time matters:
- Identify the final use.
- Confirm the available pixel dimensions.
- Confirm the intended physical size or density.
- Calculate the missing value.
- Check image quality at the intended output size.
- Confirm production settings before final export.
This workflow reduces uncertainty before expensive output begins. It also makes communication easier between designers and production teams.
AxiCalculator is designed to make that decision process faster. The tool keeps pixels, physical size, and density connected. Reverse solving removes unnecessary manual rearrangement. Compatible units support different working environments.
The result should guide a decision, not replace visual inspection. A mathematically suitable image can still contain visual defects. A technically modest density can also work well in the right setting.
The safest approach combines calculation with real output requirements. Check what the image contains. Check how large it will appear. Check how people will view it.
That final check is easy to skip. It is also where many costly errors begin. Use AxiCalculator before resizing, exporting, printing, or approving production. A few seconds of verification can prevent hours of correction.
Frequently Asked Questions
Should I trust the PPI value stored inside an image file?
Does cropping an image change its pixels-to-inches result?
Can upscaling make a low-resolution image suitable for a larger print?
Do vector graphics need pixels-to-inches conversion before printing?
How should I calculate physical size when horizontal and vertical pixel densities differ?
How do I determine the minimum pixel dimensions for a fixed engineering or print specification?
Why can two professional applications report different physical sizes for the same image?
Engineering Resources
Our engineers are here to help you get it right.