Board and Batten Calculator
- Last formula update:
Decimal & Rounding Policy
- All measurements are calculated with full internal precision to reduce cumulative rounding errors.
- Displayed decimal results use up to 2 decimal places, while unnecessary trailing zeros are omitted for readability.
- Board, batten, trim, and furring-row quantities are shown as whole numbers because partial physical pieces or rows are not valid layout counts.
- When a minimum whole-piece quantity is required for complete wall coverage, the calculated count is rounded up to the next whole number.
- Material-length calculations use the unrounded measurement values and calculated counts before the final result is formatted for display.
- Unit conversions are performed before display rounding, so changing units does not change the underlying physical measurement.
Valid range
- Wall width and wall height: Enter finite values greater than 0; both dimensions must describe the same wall section.
- Wall area: Must be greater than 0 and remain mathematically consistent with wall width multiplied by wall height.
- Board width: Enter a value greater than 0 and smaller than the usable wall width.
- Board spacing: Enter 0 or a positive value; spacing must allow at least one board to fit across the wall width.
- Number of boards: Use a whole number of at least 1; calculated requirements are rounded up when partial boards would occur.
- Number of battens: Use a whole number of 0 or greater; the count depends on the selected board layout and edge treatment.
- Rows of furring strip: Use a whole number of at least 2 so the wall has valid horizontal support rows.
- Number of trims: Use a whole number of 0 or greater; a typical full-width top-and-bottom layout uses 2 trims.
- Door and window counts: Enter whole numbers of 0 or greater; dimensions become required whenever the corresponding count is greater than 0.
- Door and window dimensions: Enter finite values greater than 0, and keep the total opening area smaller than the gross wall area.
- Board, batten, furring-strip, and trim material: Calculated or reverse-entered material lengths must be finite and 0 or greater.
- All dimensional values: Use only compatible length or area units; zero, negative, non-finite, or dimensionally incompatible values are invalid where positive dimensions are required.

Reviewers:
Elvarine Jexmont
Fenrick Zorquell
Check our editorial policy
August 12, 2026
1.0.0
Initial calculator and formula release.
Our engineers are here to help you get it right.
How Does a Board and Batten Calculator Help You Plan an Accurate Layout?
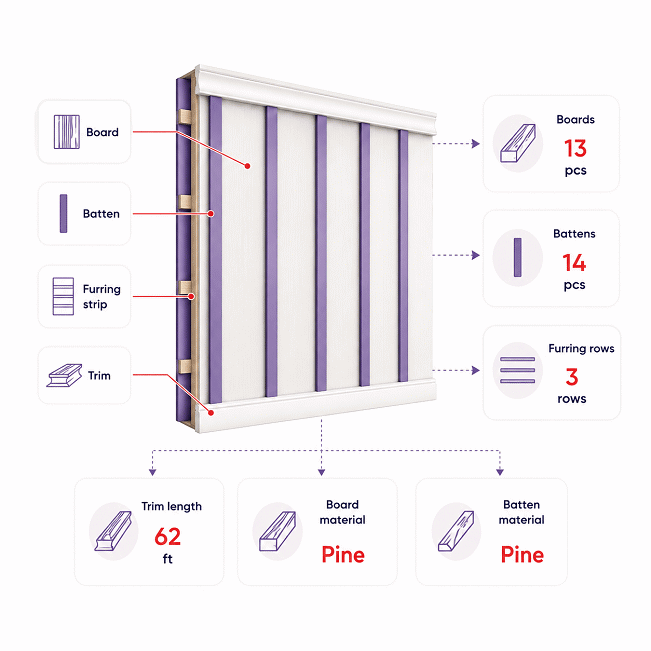
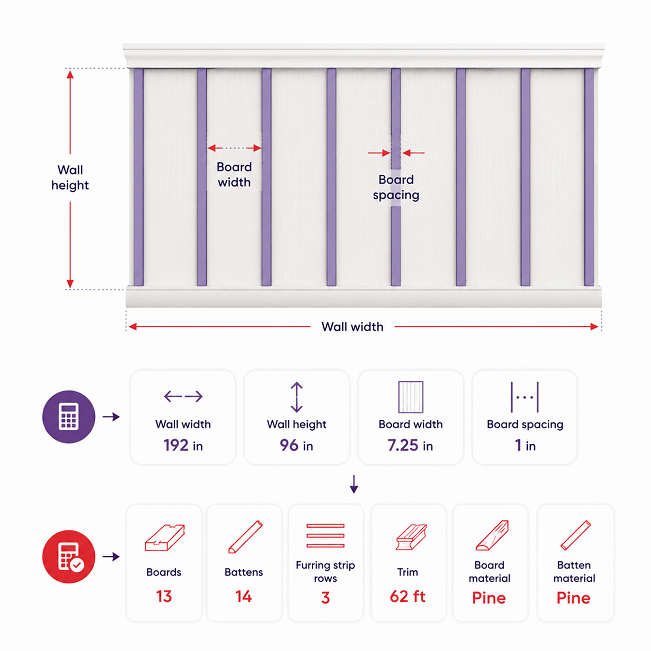
Board and Batten Calculator planning starts with accurate wall dimensions, board width, spacing, openings, and the intended edge layout. These values help determine the board count, batten count, wall coverage, furring requirements, trim needs, and estimated linear material before cutting or purchasing begins.
- Measure the finished wall width and treatment height before choosing the layout.
- Use the actual board face width rather than relying only on nominal lumber size.
- Plan doors, windows, outlets, corners, and fixed trim before locking the spacing.
- Choose edge treatment early because it can change the visible batten arrangement.
- Use reverse solving when a known result must determine a missing wall or layout value.
- Check interior and exterior projects separately because their installation needs differ.
- Treat calculated linear material as a planning quantity, not automatically as the final stock purchase count.
The Board and Batten Calculator is most useful when measurement, visual balance, material planning, and site conditions are reviewed together. Confirm the final pattern on the wall before cutting, then use the calculated quantities to build a practical purchase and installation plan.
Assumptions used in this calculator
- Wall surfaces are treated as rectangular unless openings are entered separately.
- Entered wall dimensions represent finished installation boundaries, not rough framing dimensions.
- Board width means the actual installed face width of each board.
- Board spacing represents the clear horizontal gap between adjacent vertical boards.
- Door and window openings are assumed rectangular for area adjustments.
- Repeated doors or windows are assumed identical within each entered opening group.
- Material reductions for openings use proportional wall-area adjustment, not detailed cut optimization.
- Battens are assumed to follow the selected seam and edge treatment.
- Furring calculations assume a consistent vertical support interval across the wall.
- Trim runs are assumed full-width unless the project requires custom segmented trim.
- Calculated linear material excludes product-specific waste, kerf, defects, and stock optimization.
- Exterior installation requirements must follow applicable product instructions and local building codes.
- Reverse-solved values are planning results and require field verification before installation.
Results are rounded for display.
Internal calculations use full precision.
Formulas Used in Board and Batten Calculator:
Variables and Base Units
1. Unit Normalization
Length values are normalized to metres and area values to square metres before calculations are performed.
2. Gross Wall Area
3. Door and Window Opening Area
4. Net Wall Coverage Factor
The total opening area must remain smaller than the gross wall area.
5. Number of Boards
The ceiling operation ensures that a partial required board becomes one complete board.
6. Number of Battens
7. Displayed Furring-Strip Rows
8. Purchasable Furring-Strip Rows
This whole-row count is used for furring-strip material rather than the displayed rounded row count.
9. Vertical Board or Batten Material Length
Use N = Nb for board material and N = Nba for batten material.
10. Horizontal Furring or Trim Material Length
Use N = Np for furring-strip material and N = Nt for trim material.
Reverse Calculation and Rounding Rules
Editable calculated fields are solved by algebraically rearranging the same equations above, so no separate duplicate reverse formulas are required. Continuous measurements remain unrounded internally, board requirements use ceiling rounding, displayed furring rows use nearest-whole-number rounding, purchasable furring rows use ceiling rounding, and unit conversion is completed before the displayed value is formatted.
Calculation Scope
This calculator estimates geometry, layout counts, and linear material quantities only. No price, labor cost, material unit price, tax, currency conversion, or project-cost equation is used in the calculation model.
Variables & Definitions
View a complete list of all variables used in this calculator, including definitions and units
Board and Batten Calculator Variables and Measurement Definitions
| Symbol | Variable | Definition | Base Unit | Role | Valid Rule |
|---|---|---|---|---|---|
| xb | Base-unit value | Measurement after conversion to the calculator base unit. | m or m² | Calculated | Finite and dimensionally compatible. |
| xu | Selected-unit value | Numeric measurement entered or displayed in the selected unit. | Selected unit | Input or output | Finite and valid for the selected dimension. |
| ku | Unit conversion factor | Factor used to convert a selected unit to its base unit. | Conversion factor | Calculated | Positive and dimensionally compatible. |
| W | Wall width | Horizontal width of the wall section receiving the board-and-batten layout. | m | Primary input | Greater than 0. |
| H | Wall height | Vertical height of the wall section receiving the siding or decorative layout. | m | Primary input | Greater than 0. |
| B | Board width | Horizontal face width assigned to each vertical board. | m | Primary input | Greater than 0. |
| S | Board spacing | Clear horizontal spacing between adjacent boards in the selected layout. | m | Primary input | 0 or greater. |
| Ag | Gross wall area | Total rectangular wall area before subtracting doors or windows. | m² | Calculated or reverse-editable | Greater than 0. |
| Ao | Opening area | Combined rectangular area occupied by all entered doors and windows. | m² | Calculated | 0 or greater and less than Ag. |
| Nd | Number of doors | Total number of equal-size doors included in the wall calculation. | pcs | Optional input | Whole number of 0 or greater. |
| Hd | Door height | Height of each door included when the door count is greater than zero. | m | Conditional input | Greater than 0 when Nd > 0. |
| Wd | Door width | Width of each door included when the door count is greater than zero. | m | Conditional input | Greater than 0 when Nd > 0. |
| Nw | Number of windows | Total number of equal-size windows included in the wall calculation. | pcs | Optional input | Whole number of 0 or greater. |
| Hw | Window height | Height of each window included when the window count is greater than zero. | m | Conditional input | Greater than 0 when Nw > 0. |
| Ww | Window width | Width of each window included when the window count is greater than zero. | m | Conditional input | Greater than 0 when Nw > 0. |
| F | Net wall coverage factor | Proportion of gross wall area remaining after entered openings are removed. | Ratio | Calculated | Greater than 0 and no greater than 1. |
| Nb | Number of boards | Whole number of vertical boards required across the wall width. | pcs | Calculated or reverse-editable | Whole number of at least 1. |
| Nba | Number of battens | Whole number of battens associated with the selected board layout. | pcs | Calculated or reverse-editable | Whole number of 0 or greater. |
| p | Furring interval | Fixed vertical interval used by the calculator to determine furring-strip rows. | 0.6096 m | Fixed parameter | 0.6096 m, equivalent to 24 in. |
| Nr | Displayed furring-strip rows | Whole-number row count shown as the furring-strip layout result. | rows | Calculated or reverse-editable | Whole number of at least 2. |
| Np | Purchasable furring-strip rows | Whole-row count used internally to estimate required furring-strip material length. | rows | Calculated | Whole number of at least 2. |
| Nt | Number of trims | Whole number of full-width trim runs included in the material estimate. | pcs | Input or reverse-editable | Whole number of 0 or greater; default is 2. |
| N | Applicable piece count | Generic count used in the shared vertical or horizontal material-length equation. | pcs or rows | Calculated parameter | Uses the applicable board, batten, furring, or trim count. |
| Lv | Vertical material length | Total linear material length for vertically installed boards or battens. | m | Calculated or reverse-editable | 0 or greater. |
| Lh | Horizontal material length | Total linear material length for horizontal furring strips or trim runs. | m | Calculated or reverse-editable | 0 or greater. |
| ε | Floating-point tolerance | Small numerical tolerance used before ceiling operations to avoid false rounding caused by floating-point precision. | Dimensionless | Fixed parameter | 10-12. |
Unit Conversion Table
General Length Unit Conversion Table
| Unit Group | Unit Name | Symbol | Equivalent in Meters | Used For |
|---|---|---|---|---|
| Popular Units | Meter | m | 1 m | Wall width, wall height, openings, and material lengths |
| Popular Units | Foot | ft | 0.3048 m | Wall width, wall height, openings, and material lengths |
| Popular Units | Centimeter | cm | 0.01 m | Wall width, wall height, openings, and material lengths |
| Popular Units | Inch | in | 0.0254 m | Wall width, wall height, openings, and material lengths |
| SI Units | Millimeter | mm | 0.001 m | Wall dimensions, openings, and precise material measurements |
| Imperial / US Units | Yard | yd | 0.9144 m | Large wall dimensions and material lengths |
Board Width and Spacing Unit Conversion Table
| Unit Group | Unit Name | Symbol | Equivalent in Meters | Used For |
|---|---|---|---|---|
| Popular Units | Centimeter | cm | 0.01 m | Board width and board spacing |
| Popular Units | Inch | in | 0.0254 m | Board width and board spacing |
| Popular Units | Millimeter | mm | 0.001 m | Precise board width and board spacing |
| SI Units | Meter | m | 1 m | Large board dimensions or spacing values |
| Imperial / US Units | Foot | ft | 0.3048 m | Large board dimensions or spacing values |
| Imperial / US Units | Yard | yd | 0.9144 m | Unusually large layout dimensions when required |
| Oil & Industrial Units | Mil | mil | 0.0000254 m | Very fine industrial dimensional measurements |
Wall Area Unit Conversion Table
| Unit Group | Unit Name | Symbol | Equivalent in Square Meters | Used For |
|---|---|---|---|---|
| Popular Units | Square Meter | m² | 1 m² | Gross wall area |
| Popular Units | Square Foot | ft² | 0.09290304 m² | Gross wall area in Imperial / US projects |
| SI Units | Square Centimeter | cm² | 0.0001 m² | Small wall sections and precise area measurements |
| SI Units | Square Millimeter | mm² | 0.000001 m² | Very small area measurements |
| Imperial / US Units | Square Inch | in² | 0.00064516 m² | Small wall sections and opening areas |
| Imperial / US Units | Square Yard | yd² | 0.83612736 m² | Large wall surface measurements |
Example Calculation
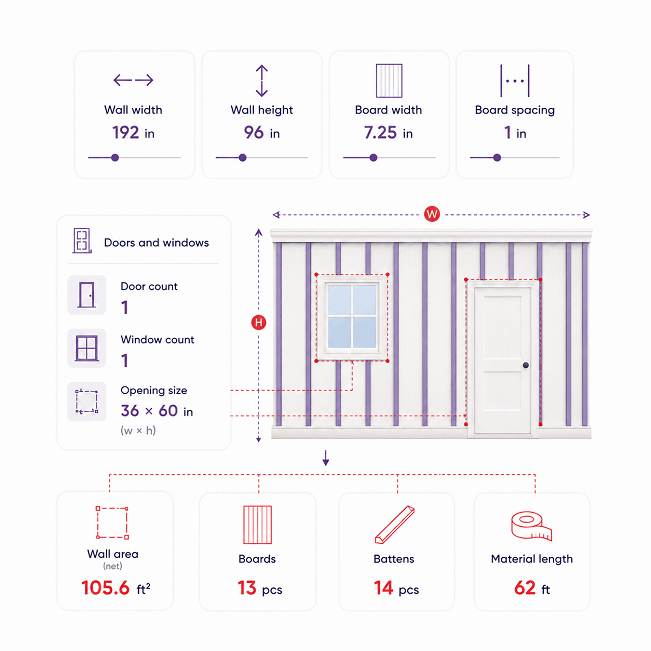
Ag = 7.2 × 3.0 = 21.60 m²
Ao = (1 × 2.1 × 0.9) + (2 × 1.2 × 1.0) = 4.29 m²
F = (21.60 − 4.29) ÷ 21.60 = 0.8013888889
Nb = ceil((7.2 + 0.06) ÷ (0.14 + 0.06)) = ceil(36.3) = 37 boards
Nba = 37 − 1 = 36 battens
Nr = round((3.0 ÷ 0.6096) + 1) = 6 rows
Np = ceil(3.0 ÷ 0.6096) + 1 = 6 rows
Board material = 37 × 3.0 × 0.8013888889 = 88.9541666667 m
Batten material = 36 × 3.0 × 0.8013888889 = 86.55 m
Furring-strip material = 6 × 7.2 × 0.8013888889 = 34.62 m
Trim material = 2 × 7.2 × 0.8013888889 = 11.54 m
The wall dimensions are evaluated first, followed by the combined area of all entered doors and windows.
The remaining wall proportion is used as the coverage factor for the linear material estimates.
Board and furring requirements are converted to whole pieces or rows wherever partial physical quantities cannot satisfy the layout.
Displayed material lengths are rounded only after the full-precision calculations are complete.
Nr = round((4.2672 ÷ 0.6096) + 1) = round(8) = 8 rows
Ag = 6.40 × 4.2672 = 27.31008 m²
Ao = (1 × 2.10 × 0.90) + (1 × 1.20 × 1.50) = 3.69 m²
F = (27.31008 − 3.69) ÷ 27.31008 = 0.8648850534
Nb = ceil((6.40 + 0.08) ÷ (0.16 + 0.08)) = ceil(27) = 27 boards
Nba = 27 − 1 = 26 battens
Np = ceil(4.2672 ÷ 0.6096) + 1 = 8 rows
Board material = 27 × 4.2672 × 0.8648850534 = 99.6472125 m
Batten material = 26 × 4.2672 × 0.8648850534 = 95.956575 m
Furring-strip material = 8 × 6.40 × 0.8648850534 = 44.2821147 m
Trim material = 2 × 6.40 × 0.8648850534 = 11.0705287 m
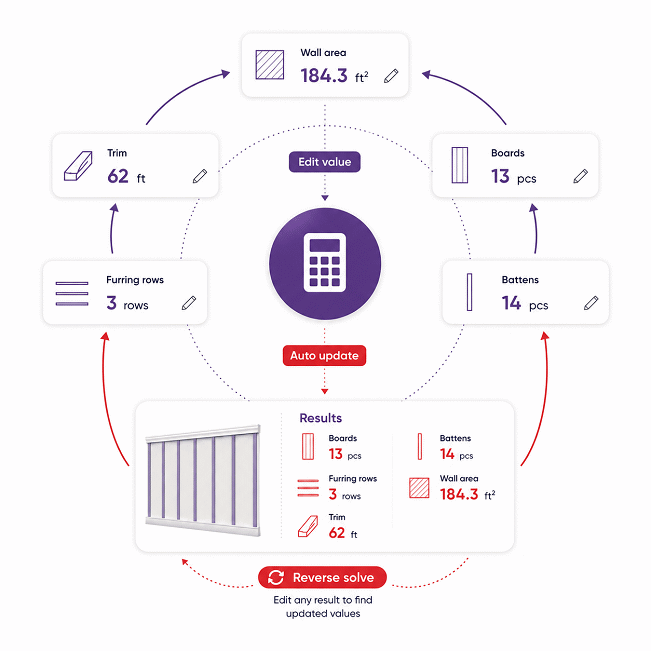
In this reverse-solving case, the user edits the furring-row result while wall height is unknown, so the calculator solves the missing wall height immediately.
Because the forward row calculation rounds to a whole number, several nearby wall heights can produce the same displayed row count; the reverse solver uses the exact interval anchor defined by the calculation model.
The solved height is then passed back through the normal forward equations to update wall area, board count, batten count, furring material, trim material, and all dependent results.
Continuous measurements retain full internal precision, while whole-piece and whole-row quantities are rounded only according to their specific calculation rules.
Results are rounded for display.
Internal calculations use full precision.
Calculations Disclaimer
How to Use a Board and Batten Calculator Without Guessing
A wall can look simple until the first measurement creates a chain of errors. A Board and Batten Calculator helps organize the layout before cutting starts. The tool should support planning, not replace field judgment. Start with the finished wall, not the framing behind it. Measure the exact surface that will receive the treatment. Include finished corners, baseboards, rails, and fixed trim in that decision.
The fastest mistake is measuring only once. Walls can taper, bow, or differ between floor and ceiling. Take several width checks across the planned treatment zone. Use the dimension that matches the finished visual boundary. Then confirm the height where the boards will actually stop. This matters on partial-height walls, stair walls, and rooms with tall baseboards.
What Measurements Matter Before You Plan the Layout?
Wall width, treatment height, board face width, and intended spacing drive the layout. Openings also matter when material quantities are planned. Measure finished door and window dimensions, not rough openings. Record fixed features that cannot move. Common conflicts include outlets, switches, vents, corner trim, and built-in cabinets.
A board sold under a nominal size may have a smaller face width. Measure the piece that will be installed. This avoids a layout that drifts across the wall. Small differences can repeat many times. That repetition makes the final bay look visibly wrong.
Field Measurement Is the First Quality Check
Quick check: mark the first and last visual boundaries before choosing spacing. This simple step exposes corner conflicts early. It also reveals whether the wall should start with a board or gap. A balanced wall usually looks intentional before any material is installed.
Board and Batten Spacing Should Look Balanced, Not Merely Equal
A common problem appears when mathematically equal spacing still looks wrong. Doors, windows, corners, and furniture can change visual balance. The best layout considers the whole elevation. It does not treat wall width as the only design cue.
Start by choosing the layout goal. Some projects begin with a preferred clear gap. Others begin with a desired board count. Both methods can produce a clean result. The better method depends on the room and available material sizes. A narrow wall often benefits from count-first planning. A long wall may suit spacing-first planning.
Target Spacing or Desired Count: Which Choice Is Better?
Use target spacing when the visual rhythm matters most. Use desired count when material quantity or symmetry matters more. Then inspect the last bay before accepting the result. A small spacing change can prevent a narrow end strip. That adjustment often improves the finished wall more than strict target spacing.
Clear Gap and Center Spacing Are Different Measurements
Clear gap describes the open distance between visible pieces. Center spacing measures between the centerlines of adjacent pieces. Do not mix them during layout work. A plan based on one method can shift badly using the other.
Eye check: draw the first three bays and the final bay. If the edges feel crowded, revise the layout. The eye notices inconsistent end conditions quickly. A small early correction can save repeated cuts later.
Edge Treatment Can Change the Entire Batten Pattern
A layout can fail even when every center bay is correct. The cause often sits at the wall edges. Corner trim, end caps, and outside battens change the visible starting point. Decide how the first and last edges will finish before counting materials.
Internal Seams and Outside Edges Need Separate Decisions
Some installations use battens only where internal seams occur. Other layouts also cover the outside boundaries. Those choices create different visual endings. They can also change the total number of visible battens. Do not assume one edge rule fits every project.
Inside corners need special care. Two walls meeting at one corner can create a crowded joint. Outside corners can create the opposite problem. A narrow gap beside thick corner trim may look accidental. Treat the corner detail as part of the layout.
Perfect symmetry is not always possible around fixed features. Visual balance is often more useful. A centered window may deserve equal bays on both sides. A hidden utility corner may not. Prioritize the areas people see first.
Reverse Solving Helps When the Result Is Known Before the Input
Real projects do not always start with every measurement. Sometimes the installer knows the desired row count first. Another project may already have a fixed board quantity. Reverse solving helps connect that known result to a missing dimension.
This feature is useful during design changes. A client may request fewer vertical lines after seeing a mockup. A contractor may need to keep a specific stock quantity. The unknown input can then be adjusted around the known target. That keeps the planning process flexible.
Reverse Solving Is Most Useful During Layout Revision
Use reverse solving when one result becomes a hard project constraint. Examples include fixed board count, fixed trim count, or planned support rows. The calculator should then update connected values in a controlled way. The user should still inspect the final wall visually.
Count-Based Results Can Represent More Than One Physical Layout
Whole-piece results describe discrete choices, not an infinite geometric spectrum. Several nearby dimensions may produce the same visible count. A reverse result should therefore act as a design anchor. It should not be treated as the only possible physical solution.
Engineering insight: reliable design starts by controlling uncertainty before materials are committed.
Interior and Exterior Board and Batten Need Different Planning Logic
A common failure begins when an interior accent-wall method gets copied outdoors. The visual pattern may look similar, but the assembly is different. Interior work often focuses on appearance and trim placement. Exterior work must also manage weather, drainage, fastening, and movement.
Interior Accent Walls Focus on Visual Rhythm and Trim Integration
Interior projects may use an existing smooth wall as the background surface. Battens and rails can create the pattern without full backing boards. Baseboard thickness also matters. A thick batten meeting a thin baseboard can create an awkward projection. Plan that joint before cutting.
Outlets and switches deserve early attention. A batten landing on an electrical box creates avoidable rework. Shift the pattern slightly when needed. Small spacing changes are usually less noticeable than poor trim around an outlet.
Exterior Siding Adds Weather and Fastening Requirements
Exterior systems may include boards, panels, battens, furring, flashing, and weather barriers. The exact assembly depends on the product and wall system. Follow the product installation instructions for fastening and drainage details. Do not let visual spacing override required construction details.
Warranty and Support Depend on the Product System
Before purchase, confirm the written warranty and installation requirements. Check approved fasteners, substrate rules, finish coverage, and maintenance terms. Keep invoices and product labels when warranty support matters. A low purchase price can become expensive after an installation dispute.
Engineering insight: checklists reduce missed steps when several design conditions interact.
Windows, Doors, Corners, and Outlets Are Where Layouts Break
A clean wall can become difficult when the first window interrupts the pattern. Openings affect both appearance and material use. They also create short pieces, trim transitions, and extra cuts. Plan them before ordering the final material quantity.
Different windows should be measured separately. The same rule applies to doors. Using one average size can distort the material plan. It can also hide a problem near the wall edge. Record each opening group with its actual finished size.
Then check how vertical lines meet each opening. A batten landing beside casing may look intentional. A batten cutting through narrow trim may not. Move the layout slightly if that improves the finished elevation.
Some conflicts cannot be removed completely. Choose the least visible compromise. Keep prominent focal areas clean. Allow less critical corners to absorb small layout changes. This approach often produces a better room than rigid symmetry.
Eye check: step back before final cutting. View the wall from the main doorway. The most visible misalignment often appears from that angle. Fix it before the installation becomes permanent.
Material Planning Should Separate Geometry From Purchasing
A calculated material length is not always the shopping quantity. Stores sell fixed stock lengths and packaged products. Real cuts also create offcuts. Defects and damaged pieces can reduce usable stock. Purchasing needs its own planning step.
Linear Material and Stock Quantity Are Different Decisions
Linear material tells you the total installed length. Stock quantity asks how many pieces must be purchased. Those answers can differ. A project with many short cuts may reuse offcuts efficiently. Another project may create unusable scraps despite similar total length.
Build a cut plan before ordering large quantities. Match required pieces to available stock lengths. Keep long pieces for tall runs. Use shorter leftovers where they truly fit. Do not count every offcut as reusable.
Ask suppliers for the usable face size, not only the catalog label. Compare stock lengths against your tallest uninterrupted runs. Check whether matching trim comes from the same product family. Color, texture, and thickness can vary between batches. Ordering the visible system together can reduce mismatch risk.
Price Should Be Compared at the Installed-System Level
Compare more than price per board. Include trim, fasteners, finishing products, backing, and delivery. Exterior systems may add flashing and water-management materials. Labor can also change with stock length and cut complexity.
Buying Checklist Before You Place the Order
Confirm actual board dimensions, stock lengths, finish, and installation method. Check warranty terms and return rules. Confirm lead time for matching replacement material. Save the final layout before requesting supplier quotes. AxiCalculator can help keep that plan consistent during purchasing.
Common Board and Batten Mistakes Usually Start Before the First Cut
The most expensive errors often begin during planning. They stay hidden until installation reaches the final bay. That is why a short pre-cut review has high value. Most problems are easier to fix on paper.
This mistake can shift every repeated bay. Measure the installed face width yourself. Do not assume the label equals the visible width. Confirm samples from the actual material batch when possible.
Ignoring the First and Last Bay
A layout may look perfect in the center and fail at both ends. Always inspect the edge conditions before cutting. Adjust spacing early when one end becomes too narrow.
Outlets, vents, cabinets, and casing can interrupt the best-looking pattern. Mark them on the wall plan first. A small layout change may prevent difficult trim work.
Buying Exactly the Calculated Installed Length
Installed length does not include every purchasing loss. Stock sizes, defects, and unusable cuts can increase demand. Build the purchase list after reviewing the cut plan.
Verify wall boundaries, corner treatment, opening locations, and stock dimensions. Dry-mark the layout before cutting expensive material. Confirm the most visible bays from normal viewing positions. Then lock the plan and begin installation.
Turn the Layout Into a Clear Project Decision
The hardest part is rarely entering numbers. The real challenge is deciding what those numbers mean. A good plan connects wall geometry, visual balance, and material choices. It also leaves room for real site conditions.
Use the calculator early, before purchasing. Revisit it after measuring actual materials. Check the final edge treatment before approving the layout. Then separate installed quantities from the shopping list. This order reduces rework and rushed decisions.
The best result is not the layout with the most exact-looking numbers. It is the layout that fits the wall cleanly. It should work around openings and corners. It should also match the chosen product system.
AxiCalculator is most useful when it becomes part of that workflow. Measure, solve, review, and then buy. That sequence keeps the project easy to explain. It also makes supplier quotes easier to compare.
Save the chosen layout before materials arrive. A printed or shared plan gives installers one clear reference. It also helps during quote review and site changes. When one wall dimension changes, update the plan first. Do not make silent field changes across several walls.
One final rule matters most: never let a repeated pattern hide a bad edge. The center of the wall gets attention. The last bay exposes the quality of the plan.
Frequently Asked Questions
Can I use one board and batten calculation for several walls in the same room?
Should I enter the manufacturer-listed board size or the size I measure on site?
How should I handle walls that are not perfectly square or have a small taper?
Can I use the calculator before I have chosen the exact board product?
How should an engineer check whether a reverse-solved layout is physically unique?
What is the best way to validate a calculated material estimate against a detailed elevation drawing?
How should I account for repeated wall modules when preparing a professional bill of materials?
Engineering Resources
Our engineers are here to help you get it right.