Wall Square Footage Calculator
- Last formula update:
Decimal & Rounding Policy
- Wall square footage calculations use full floating-point precision internally, with no rounding during intermediate steps.
- Length, height, unit conversions, gross wall area, and opening deductions are calculated before any display rounding is applied.
- Final wall footage may display up to 8 decimal places, while unnecessary trailing zeros are automatically removed.
- Decimal length and height inputs are accepted, while the number of doors and windows must remain whole numbers.
- Reverse calculations use the unrounded wall area value to prevent cumulative rounding errors when solving a missing dimension.
- Unit conversions are performed at full precision, so changing units does not alter the underlying physical measurement.
Valid range
- Wall lengths must be finite numbers greater than zero and measured in compatible length units.
- Rectangle mode requires two positive wall lengths that meet at the same room corner.
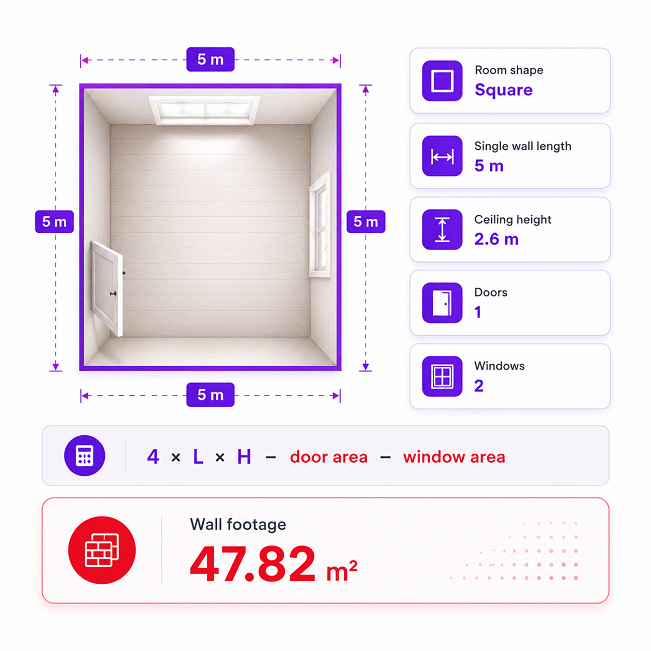
- Square mode requires one positive wall length, which represents all four equal walls.
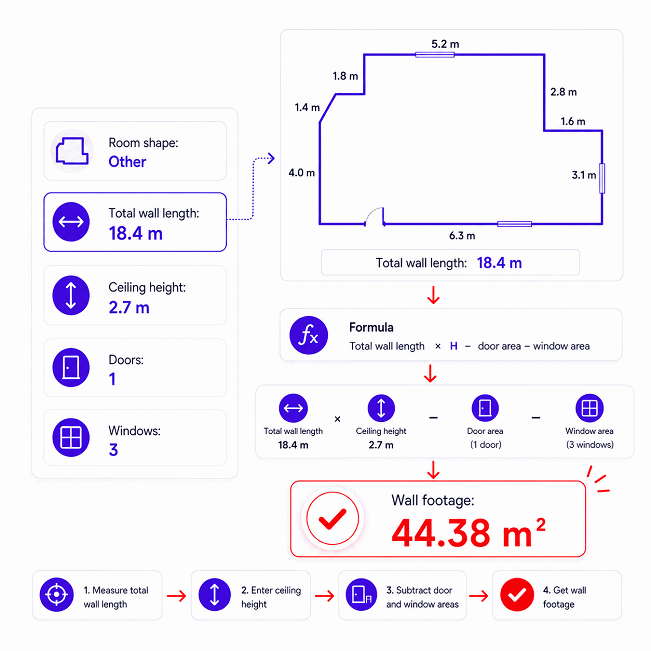
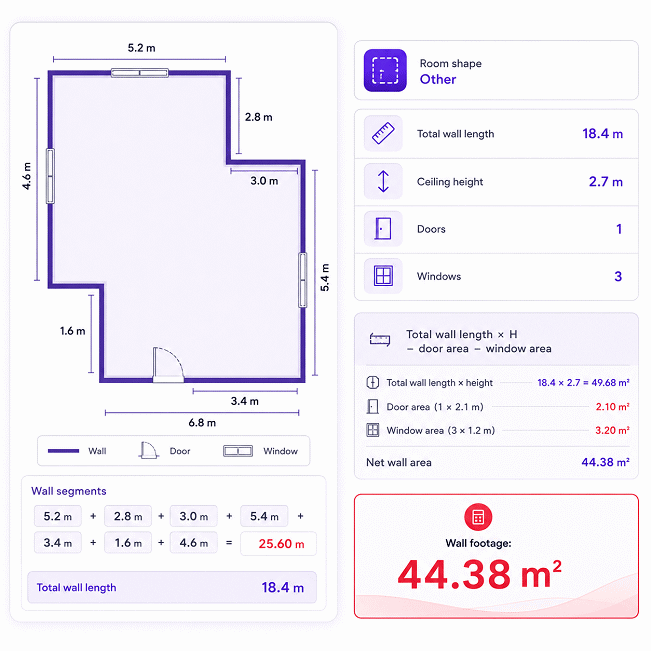
- Other mode requires the positive total measured length of all walls combined.
- Ceiling height must be a finite value greater than zero and use a compatible length unit.
- Door count must be a whole number of zero or greater; each door deducts 21 ft².
- Window count must be a whole number of zero or greater; each window deducts 12 ft².
- Corrected wall footage must remain greater than zero after all door and window deductions.
- For reverse calculation, exactly one required dimension may be unknown while wall footage is entered.
- A reverse-calculated dimension is valid only when the resulting length or height is finite and positive.

Reviewers:
Elvarine Jexmont
Fenrick Zorquell
Check our editorial policy
August 14, 2026
1.0.0
Initial calculator and formula release.
Our engineers are here to help you get it right.
How Does the Wall Square Footage Calculator Help Measure Your Walls?
Wall Square Footage Calculator gives you a fast way to estimate usable wall area from room dimensions, ceiling height, and opening counts. It supports Rectangle, Square, and Other room shapes, so the measurement method follows the actual wall layout instead of forcing every room into one pattern. The Wall Square Footage Calculator also supports reverse solving when one required dimension is unknown and the final wall area is known.
- Choose the room shape that matches the space.
- Measure wall lengths and ceiling height from finished surfaces.
- Use total wall length for irregular or multi-segment rooms.
- Enter door and window counts to reduce the gross wall surface.
- Use net wall area when planning paint, wallpaper, drywall, panels, or cladding.
- Measure unusual or oversized openings separately when higher project accuracy is needed.
- Keep measurements consistent with the real room, especially in older or remodeled buildings.
- Review short wall returns, alcoves, offsets, and recesses before finalizing the estimate.
- Use reverse solving only when one required wall dimension is missing.
- Save or share the result so another person can verify the same inputs.
A reliable wall-area estimate starts with careful measurement. The calculator helps organize those measurements into one clear result, but field verification remains essential before ordering materials or approving a project quantity.
Assumptions used in this calculator
- Walls are assumed vertical, planar, and measured using consistent finished dimensions.
- Ceiling height is assumed uniform across all walls included in the calculation.
- Rectangle mode assumes two pairs of opposite walls have equal lengths.
- Square mode assumes all four walls have the same measured length.
- Other mode assumes total wall length includes every applicable wall segment.
- Each counted door is assumed to occupy exactly 21 square feet.
- Each counted window is assumed to occupy exactly 12 square feet.
- Door and window counts are assumed complete, non-negative, and whole numbers.
- Each opening is assumed to be deducted once from gross wall area.
- Selected units are assumed dimensionally compatible and converted without intermediate rounding.
- Reverse calculation assumes exactly one required wall dimension is unknown.
- Calculated net wall area is assumed positive after all opening deductions.
- Material waste, overlaps, irregular surfaces, and installation allowances are not included.
Results are rounded for display.
Internal calculations use full precision.
Formulas Used in Wall Square Footage Calculator :
1. Unit Normalization
2. Total Wall Length
3. Gross Wall Area
4. Door and Window Area Deduction
5. Net Wall Footage
6. Reverse Calculation for One Missing Dimension
Variable Definitions and Calculation Constants
- xu
- A length value entered or displayed in the selected unit.
- xb
- The same length normalized to the base length unit.
- cu
- The conversion factor from the selected length unit to the base length unit.
- Au
- An area value expressed in the selected area unit.
- Ab
- The same area normalized to the corresponding base area unit.
- L1
- The first wall length for a rectangular room.
- L2
- The second adjacent wall length for a rectangular room.
- L
- The single wall length used for a square room.
- LΣ
- The measured total length of all walls for an Other-shaped room.
- LT
- The total wall length around the room before multiplying by ceiling height.
- H
- The usable ceiling height measured from floor to ceiling.
- Ag
- The gross wall area before door and window deductions.
- Nd
- The number of doors, entered as a non-negative whole number.
- Ad
- The standard area deducted for each door: 21 ft², equal to 1.95096384 m².
- Nw
- The number of windows, entered as a non-negative whole number.
- Aw
- The standard area deducted for each window: 12 ft², equal to 1.11483648 m².
- Ao
- The combined area deducted for all standard doors and windows.
- An
- The calculated net wall footage after all opening deductions.
- An*
- The user-entered target net wall footage used for reverse calculation.
- x
- The single missing wall dimension solved during reverse calculation.
All calculations use full internal precision. Unit conversion occurs before geometry is evaluated, no intermediate result is rounded, and display formatting may show up to eight decimal places with unnecessary trailing zeros removed. Reverse calculation is permitted only when exactly one required wall dimension is unknown, and the solved value must be finite and greater than zero.
Variables & Definitions
View a complete list of all variables used in this calculator, including definitions and units
Wall Square Footage Calculator Variables and Measurement Parameters
| Symbol | Parameter | Definition | Unit / Type |
|---|---|---|---|
| xu | Displayed Length | A length value entered or displayed in the currently selected length unit. | Selected length unit |
| xb | Base Length | The same physical length after normalization to the calculator's base length unit. | m |
| cu | Length Conversion Factor | The conversion factor used to convert the selected length unit to the base length unit. | Conversion factor |
| Au | Displayed Area | An area value entered or displayed in the currently selected area unit. | Selected area unit |
| Ab | Base Area | The same physical area after normalization to the calculator's base area unit. | m² |
| L1 | Wall Length 1 | The first wall length used when the room shape is Rectangle. | Length |
| L2 | Wall Length 2 | The second adjacent wall length used when the room shape is Rectangle. | Length |
| L | Single Wall Length | The common wall length used for all four equal walls when the room shape is Square. | Length |
| LΣ | Total Measured Wall Length | The combined measured length of all walls when the room shape is Other. | Length |
| LT | Total Wall Length | The complete wall length around the room used to calculate gross wall area. | Length |
| H | Ceiling Height | The vertical wall height measured from the floor to the ceiling. | Length |
| Ag | Gross Wall Area | The total wall area before any door or window area is deducted. | Area |
| Nd | Number of Doors | The number of standard doors deducted from the gross wall area. | Whole number |
| Ad | Standard Door Area | The fixed area deducted for each counted door. | 21 ft² / 1.95096384 m² |
| Nw | Number of Windows | The number of standard windows deducted from the gross wall area. | Whole number |
| Aw | Standard Window Area | The fixed area deducted for each counted window. | 12 ft² / 1.11483648 m² |
| Ao | Total Opening Area | The combined area deducted for all counted doors and windows. | Area |
| An | Net Wall Footage | The calculated wall area remaining after all standard opening deductions. | Area |
| An* | Target Net Wall Footage | The user-entered wall footage used as the known result during reverse calculation. | Area |
| x | Unknown Dimension | The single missing wall length or ceiling height solved during reverse calculation. | Length |
Unit Conversion Table
Length and Height Unit Conversion Table
| Unit Group | Unit Name | Symbol | Equivalent in Meters | Used For |
|---|---|---|---|---|
| Popular Units | Meter | m | 1 m | Wall Length and Ceiling Height |
| Popular Units | Foot | ft | 0.3048 m | Wall Length and Ceiling Height |
| SI Units | Centimeter | cm | 0.01 m | Wall Length and Ceiling Height |
| SI Units | Millimeter | mm | 0.001 m | Wall Length and Ceiling Height |
| Imperial / US Units | Inch | in | 0.0254 m | Wall Length and Ceiling Height |
| Imperial / US Units | Yard | yd | 0.9144 m | Wall Length and Ceiling Height |
Wall Footage Unit Conversion Table
| Unit Group | Unit Name | Symbol | Equivalent in Square Meters | Used For |
|---|---|---|---|---|
| Popular Units | Square Meter | m² | 1 m² | Net wall footage |
| Popular Units | Square Foot | ft² | 0.09290304 m² | Net wall footage |
| SI Units | Square Centimeter | cm² | 0.0001 m² | Net wall footage |
| SI Units | Square Millimeter | mm² | 0.000001 m² | Net wall footage |
| Imperial / US Units | Square Inch | in² | 0.00064516 m² | Net wall footage |
| Imperial / US Units | Square Yard | yd² | 0.83612736 m² | Net wall footage |
Example Calculation
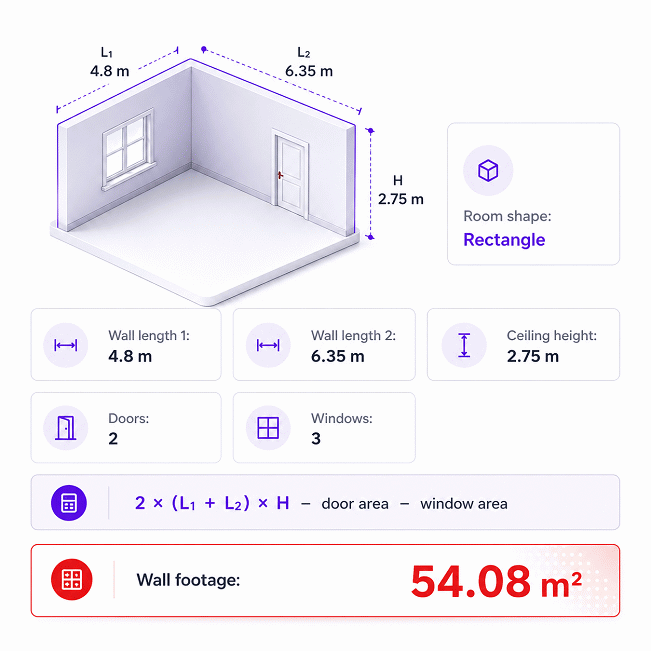
- Total wall length = 2 × (4.8 + 6.35) = 22.3 m
- Gross wall area = 22.3 × 2.75 = 61.325 m²
- Door area = 2 × 1.95096384 = 3.90192768 m²
- Window area = 3 × 1.11483648 = 3.34450944 m²
- Total opening area = 3.90192768 + 3.34450944 = 7.24643712 m²
- Net wall footage = 61.325 − 7.24643712 = 54.07856288 m²
This calculation first determines the total wall length for the rectangular room and multiplies it by the ceiling height. The result gives the gross wall area before openings are removed. Two standard door areas and three standard window areas are then deducted from the gross area. The remaining 54.07856288 m² represents the estimated net wall footage.
- Required gross wall area = 47.25 + 8.3612736 = 55.6112736 m²
- Twice the ceiling height = 2 × 2.85 = 5.7 m
- 55.6112736 ÷ 5.7 = 9.756363789473685 m
- Wall length 1 = 9.756363789473685 − 5.4 = 4.356363789473685 m
- Displayed wall length 1 = 4.35636379 m
- Total wall length = 2 × (4.356363789473685 + 5.4) = 19.51272757894737 m
- Gross wall area = 19.51272757894737 × 2.85 = 55.6112736 m²
- Net wall footage = 55.6112736 − 8.3612736 = 47.25 m²
The target net wall footage is treated as the known result while Wall length 1 remains unknown. Standard door and window deductions are first added back to recover the required gross wall area. The rectangular wall-area relationship is then rearranged to solve the missing wall length. Full internal precision is retained during reverse solving, while the displayed dimension is rounded only for presentation.
Results are rounded for display.
Internal calculations use full precision.
Calculations Disclaimer
How Does a Wall Square Footage Calculator Work?
A wall project often fails before any material reaches the site. The problem usually starts with a weak measurement. A reliable wall square footage calculator turns room measurements into a usable wall-area estimate. It also helps separate total wall surface from areas blocked by openings. This gives the user a clearer value for planning work.
The process is simple from the user’s viewpoint. First, choose the room shape. Next, enter the wall dimensions and ceiling height. Then add the number of doors and windows. The calculator processes those measurements immediately. The final wall area updates as the inputs change.
This workflow matters because floor size does not describe wall surface. Two rooms can have equal floor areas. Yet their wall areas may differ greatly. Ceiling height, room proportions, and openings all affect the result.
What Measurements Are Required Before Calculating Wall Area?
The first challenge is collecting the right measurements. For a rectangular room, measure both main wall directions. For a square room, confirm one wall length carefully. For another room shape, record the complete wall run around the room.
Ceiling height also needs careful measurement. Measure from the finished floor to the finished ceiling. Avoid estimating this value by eye. A small height error affects every wall included in the calculation.
Door and window counts should match the surfaces being measured. Count only openings within those walls. Double-counting an opening can reduce the usable wall area too much.
Before entering anything, walk around the room once. Check corners, recesses, columns, and wall returns. This quick check often prevents a larger mistake later.
Gross Wall Area vs. Net Wall Area: What Changes the Result?
Gross wall area describes the wall surface before openings are removed. Net wall area represents the surface left after applicable deductions. That difference matters during material planning.
A room with many windows may have a large perimeter. However, its usable wall surface can be much smaller. A room with few openings may need far more wall material.
This distinction becomes important for paint, wallpaper, drywall, panels, and cladding. Buying from gross area alone may increase unused material. Buying from an incomplete net value can cause shortages.
The useful goal is not the largest number. The useful goal is the most realistic project number.
How Should You Measure Rectangle, Square, and Irregular Rooms?
A common site problem appears when every room gets measured the same way. That shortcut can create wrong results. Different room shapes need different measurement workflows. The calculator changes its required inputs for that reason.
Start by identifying the actual wall layout. Do not choose a shape because it looks close enough. Look at the full perimeter. Pay attention to recesses and wall offsets. Then choose the matching calculation mode.
Rectangle Rooms: Measure the Two Main Wall Directions
Rectangle rooms are common in bedrooms, offices, and many commercial spaces. Measure one pair of wall directions first. Then measure the second pair. These values describe the room perimeter when opposite walls match.
Do not assume the room is perfectly rectangular in an older building. Measure both directions at finished surfaces. If opposite walls differ noticeably, treat the room more carefully.
A quick diagonal check can also reveal unusual geometry. Large differences may indicate a room that is not truly rectangular.
Square Rooms: Confirm the Room Is Truly Square
A square layout seems easy, but one wrong assumption creates a repeated error. The calculator uses one wall length for this shape. Therefore, all four wall sides should be effectively equal.
Measure more than one wall before choosing Square mode. This takes only a few seconds. It can prevent a repeated dimensional error across the whole room.
Construction tolerances, remodeling, and old partitions can create unequal sides. When that happens, another shape mode may be safer.
Irregular Rooms: Build the Measurement from Wall Segments
Irregular rooms create the most measurement anxiety. They may include offsets, short returns, recesses, or several wall directions. The easiest approach is to treat the perimeter as connected wall segments.
Begin at one clear corner. Move clockwise around the room. Record every wall segment once. Continue until you return to the starting point. This creates a complete measured wall run.
Do not skip short wall sections. Several small sections can create meaningful extra area. This matters most in corridors, retail interiors, stair zones, and remodeled spaces.
What About Alcoves, Recesses, and Offset Walls?
An alcove can look visually minor but still add material demand. Measure each exposed vertical surface that will receive the finish. The same rule applies to recesses and offset walls.
Think like an installer. If material must cover the surface, include that surface. If the surface stays unfinished, exclude it from the measured scope.
How Do Doors, Windows, and Openings Change Usable Wall Area?
A wall may look large until its openings are considered. Doors, windows, service openings, and built-in features reduce usable surface. Ignoring them can distort a material estimate.
The calculator includes door and window counts because these openings often matter. This gives users a fast way to move from total wall surface toward usable wall surface.
However, project accuracy still depends on the building. A large glazed opening may remove much more surface than a small window. A double door can differ greatly from a standard interior door.
Which Openings Matter Most During Material Planning?
Large openings usually deserve the most attention. Wide doors, storefront glazing, sliding doors, and large windows can remove significant surface area. Small openings may have less impact.
The material type also changes the decision. A painter may treat tiny openings differently from a panel installer. A wallpaper installer may need more detailed measurements around trims and edges.
This is why wall area should support project planning, not replace site judgment.
When Should You Measure Every Opening Separately?
Measure openings individually when material cost is high. Do the same when waste must stay low. Large commercial openings also deserve direct measurement.
Custom windows and oversized doors should receive special attention. Their dimensions can differ far from common residential sizes.
Detailed opening measurements are also useful for wall panels. Panel layouts can be sensitive to cut locations and visible joints.
How Does Reverse Wall-Area Solving Help on Real Projects?
Sometimes the known value is not a wall length. A drawing, estimate, or previous takeoff may provide wall area instead. One required dimension may still be missing. This creates a different problem.
Reverse solving allows the calculator to work backward. The user enters a known wall-area result. One required dimension remains empty. The calculator can then solve that missing dimension.
This feature is especially useful during drawing checks. It can also help during estimating reviews. A known quantity can be compared against measured site information.
How Can a Known Wall Area Reveal a Missing Wall Length?
Imagine receiving a room schedule with wall area already listed. The ceiling height is known. One wall direction is also known. However, another wall length is missing.
Instead of rebuilding the entire estimate manually, leave that required wall length empty. Enter the known wall area and other available values. The calculator can determine the missing wall length.
This is useful for checking takeoff records. It can also reveal inconsistencies between drawings and existing measurements.
The solved dimension should still be checked against the real building. A mathematically consistent answer cannot detect every field condition.
How Can Known Wall Area Reveal a Missing Ceiling Height?
Another common problem appears when wall lengths are available but height is missing. This can happen in old quantity sheets or incomplete survey notes.
When the wall layout and known area are available, height can become the missing value. The calculator can solve it from the remaining information.
This provides a fast reasonableness check. A solved height that looks unrealistic warns the user immediately. That signal can expose an incorrect wall measurement or opening count.
Why Should Only One Required Dimension Be Missing?
One missing dimension creates one clear unknown. Two missing dimensions create many possible combinations. That removes the unique solution.
For reliable reverse solving, provide every required value except one. The missing value can then be determined from the known information.
This simple rule keeps reverse results easy to understand and verify.
What Measurement Mistakes Cause Bad Wall-Area Results?
A calculator cannot repair a bad site measurement. This is the most important practical lesson. Fast digital tools still depend on correct physical inputs.
Most wall-area mistakes come from simple actions. A wall gets skipped. A dimension gets entered twice. Height is estimated instead of measured. An opening is counted in the wrong room.
These errors look small during data entry. They become expensive when multiplied across a full project.
Why Small Measurement Errors Can Grow Across a Large Room
Wall dimensions affect a large vertical surface. A small error can repeat across several walls. The effect becomes greater in rooms with high ceilings.
This is why long walls deserve a second measurement. High rooms also deserve extra care. Large commercial spaces should be checked against drawings when possible.
A second measurement often takes less than one minute. Reordering missing material can cost far more time.
How to Check Existing Buildings Before Ordering Materials
Existing buildings rarely behave like perfect drawings. Walls may lean slightly. Corners may not be square. Finished surfaces may differ from structural dimensions.
Measure the surface that will actually receive material. Do not rely only on nominal room dimensions. Check major wall runs directly.
For renovation work, also inspect hidden changes. Previous construction may have added partitions, boxed columns, or filled openings.
Common Wall Measurement Errors to Catch Before Purchase
- Skipping short wall returns beside doors or cabinets.
- Using floor area as a substitute for wall area.
- Estimating ceiling height without measuring the finished surface.
- Counting the same opening more than once.
- Missing recessed walls behind built-in elements.
- Assuming an older room is perfectly rectangular.
- Ignoring changes in height across the same room.
- Measuring drawings without checking their current scale.
A five-minute review can protect an entire material order. That is a useful trade.
How Can Wall Area Improve Paint, Wallpaper, Drywall, and Panel Planning?
Knowing wall area is only the first buying step. The next question is more practical. How much material should the project actually order?
Wall area creates the measurement baseline. Material coverage then turns that baseline into a purchase quantity. These two steps should remain separate.
This distinction prevents false confidence. Two products can cover the same wall area very differently. Product size, installation method, waste, pattern, and coating requirements all matter.
Paint and Coating Planning
Paint planning begins with the surface requiring coating. Wall area gives that starting quantity. The selected product then determines coverage.
Surface condition matters too. Porous walls may consume more coating. Color changes can require extra work. Repairs and primer can also change the material plan.
Check the manufacturer’s current coverage information before purchase. Then compare it with the calculated wall area.
Wallpaper and Decorative Finish Planning
Wallpaper introduces another challenge. Rolls are not purchased only by total area. Pattern repeat and roll width can affect usable coverage.
A wall-area result still provides a valuable starting point. However, final roll quantity should consider the actual product layout.
Large patterns may increase offcuts. Narrow wall sections can also create unexpected waste. Record each important wall width when detailed planning matters.
Drywall, Panels, and Cladding Planning
Sheet materials introduce joint and layout decisions. Total area helps estimate quantity. Yet sheet dimensions control the final count.
A panel installer also considers direction and visible joints. Wall height can influence how many cuts are required. Openings can create reusable offcuts or unusable waste.
For expensive finishes, create a layout before ordering. This can reduce waste more effectively than adding a large safety margin.
Why Material Coverage Should Be Checked Separately
A wall calculator measures the project surface. It does not define a product’s real coverage. That information belongs to the selected material.
Use the calculated area as the project demand. Then evaluate the product separately. This keeps measurement and purchasing decisions clear.
What Is the Best Professional Workflow from Measurement to Purchase?
The safest workflow is short and repeatable. Measure first. Verify next. Calculate after that. Save the result. Only then begin material purchasing.
This sequence removes pressure from the buying decision. The user can focus on measurement before comparing product quantities.
AxiCalculator supports this workflow by keeping the calculation visible and interactive. Results update while the project data changes. The calculation can then be saved or shared for review.
Capture, Verify, Calculate, and Save the Project Record
Start with a clean measurement path around the room. Record every required value once. Check unusual walls before leaving the site.
Next, compare the measurements with available drawings. Large differences deserve investigation. Do not force site dimensions to match old documents.
After calculation, review the result for scale. Ask one simple question. Does this wall area make sense for the room?
Saving the result creates a useful project record. It also helps when another person checks the estimate.
A shared calculation is easier to review than a handwritten total. It shows the inputs behind the result.
Use the Result as a Buying Baseline, Not a Guess
A good estimate changes the purchasing conversation. Instead of asking, “How much should I buy?” the user starts with measured demand.
That number can then be compared with package size or product coverage. This approach makes quotes easier to compare. It also exposes unusual supplier quantities.
Professional buyers can keep measurement and procurement separate. First confirm the project area. Then evaluate brands, pack sizes, lead times, and installation needs.
This creates a cleaner decision trail. It also makes later changes easier to explain.
A Fast Final Check Before You Order Materials
- Confirm the correct room shape was selected.
- Verify every major wall measurement on site.
- Check ceiling height at the finished surfaces.
- Review large doors and windows before purchasing materials.
- Confirm irregular wall segments were not skipped.
- Compare the final area with the room visually.
- Check product coverage using current manufacturer information.
- Save the calculation before placing the order.
The goal is not to make measurement feel complicated. The goal is control. A clear wall-area result removes one major unknown. That makes material planning faster and easier to defend.
Use the Wall Square Footage Calculator when the room changes. Update the measurements instead of rebuilding the estimate. If one dimension is missing, reverse solving can recover it from known project information. This keeps the same calculation workflow useful from early planning through final purchasing.
Frequently Asked Questions
Can I use wall square footage to estimate several finishing materials from one measurement?
Should I recalculate wall area after changing the room layout during renovation?
Can I calculate only the walls that will receive a new finish?
How should I turn calculated wall area into an actual material purchase quantity?
How should an engineer calculate wall area when a room has several ceiling heights?
How should a reverse-solved dimension be checked before using it in a project takeoff?
What should I check when calculator wall area differs from a professional quantity takeoff?
Our engineers are here to help you get it right.