DIY Shed Cost Calculator
- Last formula update:
Decimal & Rounding Policy
- Keep full numerical precision during all shed geometry and cost calculations; never round intermediate values.
- Display shed dimensions, rafter length, floor area, wall area, and roof area with up to 3 decimal places when needed.
- Display material costs and the total shed cost with up to 2 decimal places for clear financial estimates.
- Remove unnecessary trailing zeros so values such as 3.000 display as 3 and 17.700 displays as 17.7.
- Apply rounding only to displayed results, ensuring reverse calculations and unit conversions continue using the full-precision values.
- Use consistent rounding across all roof types, units, area calculations, material costs, and total shed cost results.
Valid range
- Shed width (W): Must be greater than 0 and represent a practical shed width in the selected length unit.
- Shed length (L): Must be greater than 0 and represent a practical shed length in the selected length unit.
- Wall height (H): Must be greater than 0 and should follow practical structural and local building requirements.
- Roof rise (R): Must be 0 or greater; a positive value is used for slanted and gable roofs, while a flat roof has no rise.
- Overhang (O): Must be 0 or greater and should remain within practical roof overhang and local building-code limits.
- Rafter length (S): Must be greater than 0 when entered or calculated and must remain geometrically consistent with the shed dimensions and roof type.
- Floor area: Must be greater than 0 and remain consistent with the shed width and length.
- Wall area: Must be greater than 0 and remain consistent with the shed dimensions, roof rise, and selected roof type.
- Roof area: Must be greater than 0 and remain consistent with the rafter length, shed length, overhang, and roof type.
- Material price per area: Must be 0 or greater for foundation, wall, and roofing materials.
- Component cost: Must be 0 or greater and must equal the applicable calculated area multiplied by its price per unit area.
- Total shed cost: Must be 0 or greater and must equal the combined foundation, wall, and roofing costs.

Reviewers:
Elvarine Jexmont
Fenrick Zorquell
Check our editorial policy
August 17, 2026
1.0.0
Initial calculator and formula release.
Our engineers are here to help you get it right.
How Does the DIY Shed Cost Calculator Help You Plan a Shed?
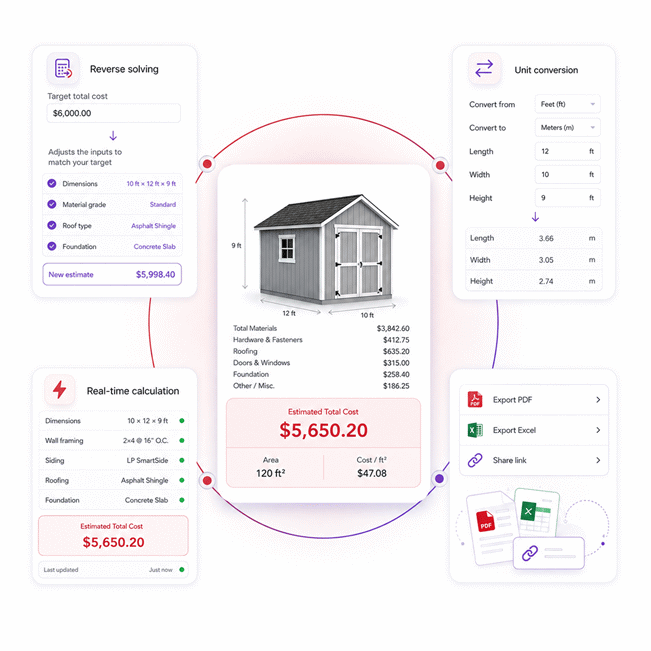
DIY Shed Cost Calculator helps you estimate shed geometry, material areas, and project costs before buying materials. Enter the shed dimensions, select the roof type, and add local material prices to see how design choices affect the budget. The calculator supports flat, slanted, and gable roofs and connects dimensions with floor, wall, roof, and cost results.
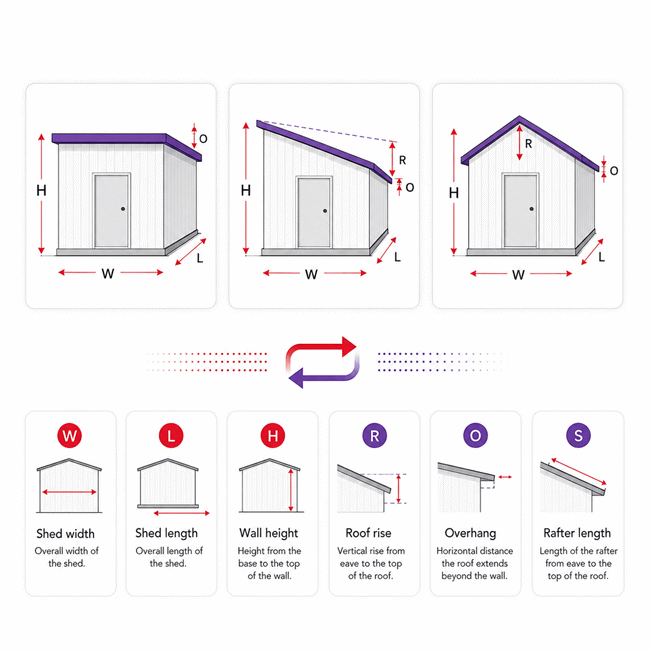
- Calculate shed width, length, wall height, roof rise, overhang, and rafter length.
- Estimate floor area, total wall area, and roof area from the selected geometry.
- Compare foundation, wall, and roofing costs as separate project components.
- Use reverse solving to find unknown dimensions from known areas or related values.
- Test different roof types and dimensions before committing to a final design.
- Identify which part of the shed causes the largest increase in material cost.
- Review hidden expenses such as site preparation, delivery, tools, permits, and finishing.
The DIY Shed Cost Calculator is most useful during early planning, when dimensions and roof choices can still change. Review each calculated component separately, compare alternative designs, and confirm final measurements before ordering materials. This approach creates a clearer budget and reduces costly design or purchasing mistakes.
Assumptions used in this calculator
- Shed dimensions are assumed to be measured accurately before calculation.
- Width, length, height, rise, and overhang use dimensionally compatible units.
- Flat, slanted, and gable roofs follow the calculator’s defined geometric models.
- Roof rise is assumed zero for a flat roof.
- Roof overhang is assumed uniform along the applicable roof edges.
- Wall area includes roof-rise geometry according to the selected roof type.
- Floor area assumes a rectangular shed footprint.
- Material prices are assumed to represent cost per selected area unit.
- Foundation, wall, and roofing costs exclude labor unless included in prices.
- Doors and windows are not deducted from calculated wall material area.
- Waste, fasteners, hardware, taxes, and delivery are not automatically included.
- Local building codes and structural requirements must be independently verified.
- Results are planning estimates and should not replace professional engineering judgment.
Results are rounded for display.
Internal calculations use full precision.
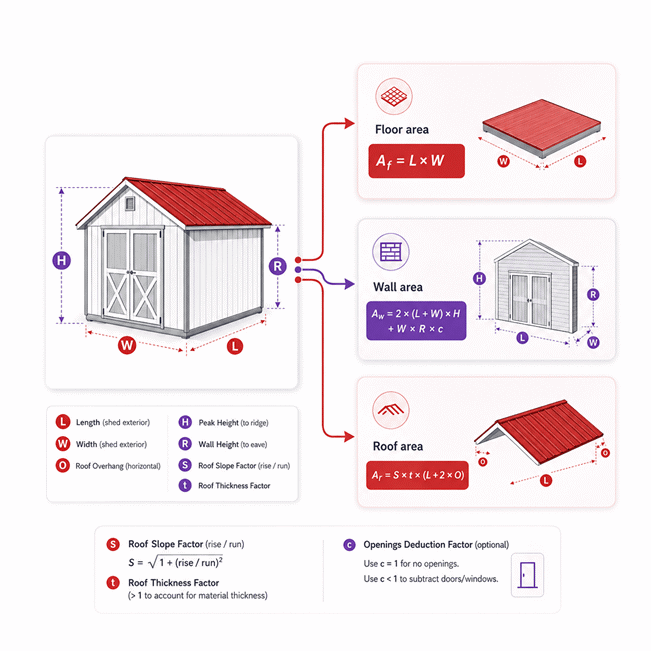
Formulas Used in DIY Shed Cost Calculator:
1. Compatible Unit Conversion
2. Price per Area Unit Conversion
3. Roof-Type Constants
4. Floor Area
5. Total Wall Area
6. Rafter Length
7. Total Roof Area
8. Material Component Cost
9. Total Shed Cost
Variable Definitions
- W = shed width.
- L = shed length.
- H = wall height.
- R = roof rise.
- O = roof overhang.
- S = rafter length.
- Af = floor area.
- Aw = total wall area.
- Ar = total roof area.
- c = roof-type constant.
- t = roof-surface constant.
- Pi = price per unit area for component i.
- Ci = material cost for component i.
- Ctotal = total shed material cost.
- ku and kv = compatible unit conversion factors.
Calculation Rules
- All geometric and cost calculations use full numerical precision before display rounding.
- Reverse calculations solve the same equations for one unknown variable and do not require a separate formula set.
- Only dimensionally compatible units may be converted.
- Area-based prices are converted inversely to their associated area unit conversion.
- Rounding is applied only to displayed values and never to intermediate calculations.
Variables & Definitions
View a complete list of all variables used in this calculator, including definitions and units
DIY Shed Cost Calculator Variables and Measurement Guide
| Symbol | Variable | Quantity Type | Unit | Used For |
|---|---|---|---|---|
| W | Shed width | Length | Length unit | Floor area, wall area, and rafter geometry |
| L | Shed length | Length | Length unit | Floor area, wall area, and roof area |
| H | Wall height | Length | Length unit | Total wall area |
| R | Roof rise | Length | Length unit | Slanted and gable roof geometry |
| O | Roof overhang | Length | Length unit | Rafter length and total roof area |
| S | Rafter length | Length | Length unit | Total roof area |
| Af | Floor area | Area | Square length unit | Foundation or floor material cost |
| Aw | Total wall area | Area | Square length unit | Wall material cost |
| Ar | Total roof area | Area | Square length unit | Roofing material cost |
| c | Roof-type constant | Dimensionless | None | 0 for flat roof; 1 for slanted or gable roof |
| t | Roof-surface constant | Dimensionless | None | 1 for flat or slanted roof; 2 for gable roof |
| i | Material component index | Index | None | Identifies floor, wall, or roof components |
| Pi | Component price per unit area | Price per area | Currency per square unit | Calculating each material component cost |
| Ci | Component material cost | Cost | Currency | Foundation, wall, or roofing cost |
| Ctotal | Total shed material cost | Cost | Currency | Combined foundation, wall, and roofing costs |
| xu / xv | Value in source and target units | Compatible measurement | Selected compatible units | Length and area unit conversion |
| Pu / Pv | Price in source and target area units | Price per area | Currency per square unit | Price-per-area unit conversion |
| ku / kv | Source and target conversion factors | Conversion factor | Dimension-dependent factor | Preserving the same physical quantity during unit conversion |
Unit Conversion Table
Shed Length Unit Conversion Table
| Unit Group | Unit Name | Symbol | Equivalent in Meters | Used For |
|---|---|---|---|---|
| Popular Units | Foot | ft | 0.3048 m | Width, length, height, rise, overhang, rafter length |
| Popular Units | Inch | in | 0.0254 m | Small dimensions and roof overhang measurements |
| Popular Units | Yard | yd | 0.9144 m | Large shed dimensions |
| Scientific Units | Meter | m | 1 m | Metric shed dimensions and roof geometry |
| Scientific Units | Centimeter | cm | 0.01 m | Detailed metric dimensions and overhang measurements |
| Scientific Units | Millimeter | mm | 0.001 m | Fine metric measurements |
Shed Area Unit Conversion Table
| Unit Group | Unit Name | Symbol | Equivalent in Square Meters | Used For |
|---|---|---|---|---|
| Popular Units | Square Foot | ft² | 0.09290304 m² | Floor, wall, and roof area |
| Popular Units | Square Inch | in² | 0.00064516 m² | Small surface-area measurements |
| Popular Units | Square Yard | yd² | 0.83612736 m² | Larger construction surface areas |
| Scientific Units | Square Meter | m² | 1 m² | Metric floor, wall, and roof area |
| Scientific Units | Square Centimeter | cm² | 0.0001 m² | Detailed metric surface measurements |
| Scientific Units | Square Millimeter | mm² | 0.000001 m² | Fine metric surface measurements |
Material Price per Area Unit Conversion Table
| Unit Group | Unit Name | Symbol | Equivalent in USD per Square Meter | Used For |
|---|---|---|---|---|
| Popular Units | US Dollar per Square Foot | $/ft² | 10.76391042 USD/m² | Foundation, wall, and roofing unit prices |
| Popular Units | US Dollar per Square Inch | $/in² | 1550.0031 USD/m² | Prices based on small surface units |
| Popular Units | US Dollar per Square Yard | $/yd² | 1.19599005 USD/m² | Prices based on square yards |
| Scientific Units | US Dollar per Square Meter | $/m² | 1 USD/m² | Metric material unit prices |
| Scientific Units | US Dollar per Square Centimeter | $/cm² | 10000 USD/m² | Fine metric price-per-area values |
| Scientific Units | US Dollar per Square Millimeter | $/mm² | 1000000 USD/m² | Very small metric price-area units |
Shed Cost Unit Table
| Unit Group | Unit Name | Symbol | Equivalent in USD | Used For |
|---|---|---|---|---|
| Popular Units | US Dollar | USD | 1 USD | Foundation cost, wall cost, roofing cost, and total shed cost |
Example Calculation
This shed uses a rectangular 12 ft by 16 ft footprint with a slanted roof and a 1 ft overhang. The roof rise increases both the exposed wall surface and the rafter length compared with a flat roof. Each material cost is calculated from its corresponding surface area and price per square foot. Full-precision geometry is retained during calculation, while the displayed measurements and costs are rounded only at the final presentation stage.
In this reverse-solving scenario, floor area is supplied instead of shed length, allowing the missing length to be calculated from the known width. The supplied wall area is then used with the solved length, width, and roof rise to recover the unknown wall height. Once the missing dimensions are determined, the rafter length, roof area, component costs, and total shed cost follow through the normal calculation chain. Full internal precision is retained until the final displayed results are rounded.
Results are rounded for display.
Internal calculations use full precision.
Calculations Disclaimer
How Much Does It Cost to Build a DIY Shed?
A shed budget can fail before the first board is purchased. Small size changes affect several cost layers at once. The DIY Shed Cost Calculator helps expose those changes early. The DIY Shed Cost Calculator also separates geometry from material pricing. That makes the estimate easier to understand and adjust.
The useful question is not simply, “What does a shed cost?” The better question is, “What is driving my shed cost?” Footprint, wall height, roof shape, overhang, and local prices all matter. A larger shed needs more floor material. It also creates more wall and roof surface. A taller shed can raise wall costs without changing floor space.
This is why a single price-per-square-foot figure can mislead buyers. Two sheds may share the same floor area. Their wall and roof requirements can still differ sharply. A simple rectangle with a flat roof behaves differently from a gable design.
A better estimate separates the project into clear cost layers. First, define the shed geometry. Next, review the calculated surfaces. Then apply current material prices. Finally, compare the component costs before purchasing anything.
Fast decision path:
- Measure the shed
- Select the roof type
- Enter local prices
- Review calculated areas
- Compare component costs
- Adjust the design
- Save the final estimate
This workflow gives you something more useful than one total. It shows where your money is going.
Why Can Two Sheds With the Same Footprint Cost Very Differently?
A common surprise appears when two sheds have equal floor areas. Their final budgets can still be far apart. Wall height is one reason. Roof geometry is another. Overhang can also increase roofing needs.
Imagine two designs with the same length and width. One uses shorter walls and a simple roof. The other uses taller walls and a raised roof. The floor requirement stays similar. The wall and roof requirements do not.
This matters during early design decisions. A small geometry change may look harmless on paper. Yet that change can affect several material groups together.
The safest approach is to compare designs before ordering materials. Change one dimension at a time. Watch which calculated surfaces react. This quickly reveals expensive design choices.
Which Cost Signals Should You Check Before Buying Materials?
The total cost is useful, but it should not be your only signal. Review foundation, wall, and roofing costs separately. A large jump in one component deserves attention.
If roofing dominates the estimate, inspect roof geometry first. If wall cost rises quickly, review height and perimeter. If foundation cost dominates, inspect the footprint and foundation price.
This creates a much clearer buying decision. You can reduce costs without blindly shrinking the entire shed.
A good estimate should answer three questions quickly. What does each section cost? Why did that cost change? Which design change gives the best saving?
That clarity is more valuable than a single attractive total.
How Does the DIY Shed Cost Calculator Work?
A calculator becomes frustrating when every field feels disconnected. Users often enter several numbers without knowing what matters. This tool uses a more direct workflow.
Start with the physical shape of the shed. Enter its width, length, and wall height. Then choose the roof type. Roof rise and overhang refine the roof geometry where needed. Rafter length can then participate in the same calculation system.
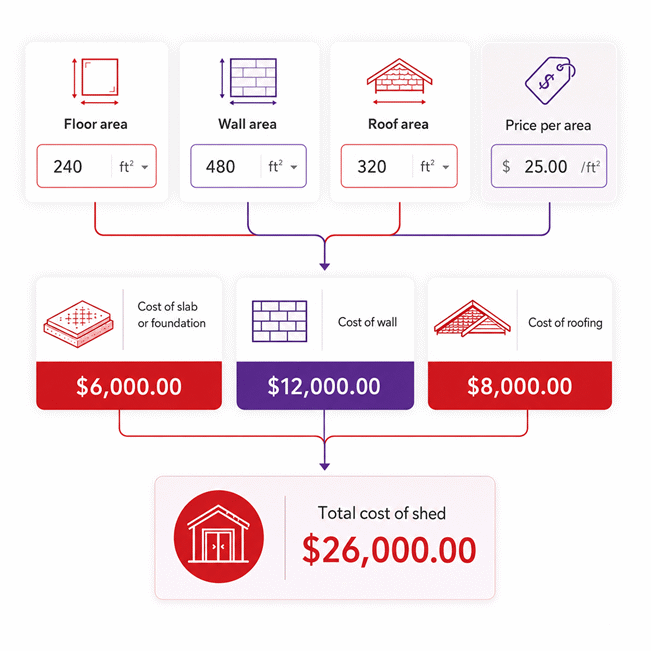
The calculated floor, wall, and roof areas become the bridge to cost estimation. Each surface can be paired with its related material price. This separates physical quantity from price.
That separation is important. Material prices can change without changing the shed. Shed dimensions can change without changing the chosen price.
The tool updates the connected results as the known values change. You can therefore compare alternatives without rebuilding the estimate from scratch.
A useful workflow looks like this:
- Geometry
- Surface requirements
- Material prices
- Component costs
- Total project estimate
This sequence keeps the logic visible. It also helps you find unusual results faster.
What Should You Enter First?
A frequent mistake is entering prices before the shed shape is clear. Start with geometry instead. Width and length define the footprint. Wall height controls vertical surface needs. Roof settings define the upper structure.
Choose measurements that reflect the actual planned structure. Avoid rough guesses when you already have drawings. A small measurement error can spread into several material groups.
Next, select the roof configuration that matches the project. Do not choose a roof type only because it looks close. A different roof shape can change rafter geometry and roof surface needs.
After the shape is stable, enter local material prices. This gives the cost section a reliable physical base.
This order also makes troubleshooting easier. If the areas look wrong, inspect dimensions first. If the areas look right but costs look wrong, inspect prices.
What Do Floor, Wall, and Roof Results Tell You?
The three main areas answer different buying questions.
Floor area represents the shed footprint. It supports foundation or slab planning. Wall area represents the exposed wall surface created by the shed geometry. Roof area represents the roofing surface created by the selected roof design.
These values should not be treated as interchangeable. A floor material price should not be applied to wall area. A roofing price should not be applied to floor area.
The calculator keeps these areas separate because real projects require separate material decisions.
Cost alert: a large floor does not always mean the roof is proportionally large. Roof rise and overhang can change that relationship.
When comparing designs, watch all three surfaces. One may change much faster than the others.
Why Do Editable Results Change the Workflow?
Most calculators force a one-way process. You enter dimensions, then accept the outputs. That can be limiting during planning.
Editable results allow the calculation process to work in reverse. A known area can help recover an unknown dimension. A known component cost can help recover a missing price.
This is useful when your project starts with constraints. You may know the available floor area before knowing the shed length. You may know a supplier budget before deciding one design dimension.
The result becomes part of the input logic. That creates a more flexible planning tool.
Which Shed Roof Type Should You Choose: Flat, Slanted, or Gable?
Roof choice often looks cosmetic at first. It is not. Roof geometry can affect wall area, rafter requirements, roof surface, and cost.
The calculator supports flat, slanted, and gable roof configurations. Each shape creates a different geometry path. This means the same footprint can produce different roof-related results.
The right choice depends on the project. Cost is only one factor. Drainage, appearance, storage goals, construction difficulty, and local requirements can also matter.
For estimating purposes, focus on one question first. How much extra surface does the roof design create?
A simple roof may reduce material needs. A more complex roof may provide other benefits. The calculator helps make that trade-off visible before materials are ordered.
Flat Roof Shed: When Simplicity Controls the Budget
A flat roof can simplify the geometry. It removes the raised roof shape used by other configurations. This can make early planning easier.
The key cost question becomes overhang. A larger overhang extends the covered roof surface. That change may look small from the ground. It can still increase roofing material needs.
Flat roofs also make comparison useful. Run the same footprint with another roof type. Then compare roof area and wall requirements.
The difference shows the cost effect of roof geometry alone. This is more informative than comparing two unrelated shed sizes.
Slanted Roof Shed: Why a Small Rise Can Change More Than Expected
A slanted roof creates a single inclined roof surface. The rise changes the rafter path. That can increase the roof surface compared with a simpler configuration.
The wall geometry also responds to the raised side. This is easy to overlook during manual budgeting.
A designer may increase roof rise for drainage or appearance. That change can affect more than roofing alone.
Decision point: change the rise while keeping the footprint fixed. Watch which areas move. This reveals the real cost effect of the design choice.
The same method works for overhang. Increase it gradually. Compare the roof result before approving the final dimensions.
Gable Roof Shed: Where Symmetry Creates Extra Roof Surface
A gable roof uses two roof faces. This creates a different relationship between rise, rafter length, and total roof surface.
Many users choose gable roofs for familiar appearance and usable internal form. Yet the roof should still be evaluated as a material surface.
The gable section also changes the upper wall geometry. That means wall material planning should not rely only on rectangular wall dimensions.
Compare the gable option against a slanted design using identical base dimensions. This isolates the effect of the roof structure.
The goal is not to find a universal winner. The goal is to understand the cost trade-off.
Which Roof Shape Creates the Biggest Cost Surprise?
The biggest surprise usually comes from ignoring combined changes. Rise and overhang can both increase roofing needs. Taller walls can increase wall requirements at the same time.
A roof that appears only slightly larger may create a noticeable material difference.
That is why visual judgment alone is risky. Use the calculator before choosing the final roof dimensions.
How Can Reverse Shed Calculation Solve Missing Dimensions?
Planning rarely begins with every dimension known. Sometimes you know the available floor area. Sometimes you know the budget. Sometimes an existing wall area is already fixed.
A reverse shed calculator turns those known results into useful inputs. It solves the missing value when enough related information is available.
This changes the planning process. You are no longer forced to guess every dimension first.
The technique is especially useful during space planning. Suppose the footprint area is fixed by the site. You may know one side length. The calculator can help recover the missing side.
The same idea can apply to wall geometry and cost relationships.
Reverse solving is not magic. The known values still need to describe one consistent project. Conflicting values can create an impossible combination.
The best workflow is simple. Enter only the values you truly know. Leave the unknown field empty. Then let the connected result become the missing value.
Can Floor Area Reveal a Missing Width or Length?
A common planning problem starts with limited space. You know the maximum floor area. You also know one side length. The other dimension remains unknown.
This is where reverse solving becomes practical.
Enter the known floor area and the known dimension. Leave the other dimension empty. The calculator can then recover the missing size.
This approach helps when fitting a shed beside a fence, wall, driveway, or garden feature.
It also makes design comparison faster. Keep the same floor area. Change one dimension. The other dimension can adjust to preserve the target footprint.
That provides more design freedom without losing the planned area.
Can Wall Area Reveal a Missing Height or Roof Rise?
Wall planning can begin from a known surface requirement. A project may already have a target wall area. Other dimensions may be fixed.
If enough connected geometry is known, an unknown wall height can be recovered. Roof rise may also be solved in supported configurations.
This is useful when you are checking an existing plan. It can also help when material coverage is already known.
However, the known values must agree with each other. A wall area that conflicts with the shed dimensions should not be forced into the calculation.
Treat a conflict as a useful warning. It often reveals a copied dimension, wrong measurement, or design change.
Can Cost Data Reveal a Missing Price or Component Cost?
Price information is often incomplete during early budgeting. You may know a component cost from a supplier quote. Yet the price per area may be missing.
The reverse workflow can help connect those values.
You can also work from a target total when enough component costs are known. A missing component can then become easier to identify.
This is useful for quote checking. It helps you understand what price level a supplier estimate implies.
It also makes the tool useful after receiving new quotations. You can replace one known value and review the effect immediately.
When Should You Leave One Field Unknown?
Leave a field unknown when it is genuinely the value you want to discover.
Do not fill every box simply because it is available. Too many manually entered values can create unnecessary conflicts.
Start with the facts you trust most. Dimensions taken from drawings usually deserve priority. Confirmed supplier prices should also be treated as known values.
Then leave the uncertain value open.
This creates a cleaner calculation path and reduces guesswork.
Why Does Shed Cost Per Square Foot Change So Much?
Buyers often expect one stable cost per square foot. Real shed budgets rarely behave that simply.
Floor area measures only one part of the project. Wall height can rise without changing the footprint. Roof geometry can expand without changing floor area. Material prices can vary between project components.
This means two sheds with identical footprints can have different effective costs.
A better buying strategy is to separate the three major material groups. Review the foundation or slab layer. Review wall materials. Then review roofing.
This gives you three cost signals instead of one blended number.
Cost pressure map:
- Foundation cost grows with footprint
- Wall cost responds to wall surface
- Roofing cost responds to roof geometry
- Total cost combines all three
This map helps you understand which design decision deserves attention.
What Drives Foundation or Slab Cost?
A foundation budget often reacts directly to footprint size. A wider or longer shed creates more floor area.
The entered foundation price then controls the cost intensity. This price should reflect your planned foundation material or system.
Do not change the foundation price to make the total look right. Enter the best local price you have.
If the foundation cost appears too high, inspect the footprint first. Ask whether the shed needs that much floor area.
Reducing unnecessary floor space can lower several project costs at once.
What Drives Wall Material Cost?
Wall cost can surprise users because height matters strongly. A taller shed increases wall surface even when the footprint remains fixed.
Roof geometry can also affect the upper wall area. This becomes important with raised roof designs.
Before buying cladding or wall materials, review the calculated wall surface. Then compare it with your planned openings and construction method.
This gives you a cleaner starting point for supplier discussions.
What Drives Roofing Cost?
Roofing cost responds to the actual roof surface, not only floor area.
Rise can increase the sloping path. Overhang can extend the roof beyond the walls. A gable design creates two roof faces.
This means footprint alone cannot describe roofing demand.
If roofing becomes the dominant cost, test smaller overhangs or different roof geometry. Keep practical design needs in mind.
The calculator makes these changes visible before purchase.
Which Hidden Shed Costs Can Break a Good Budget?
A neat calculator total can still feel wrong at checkout. That usually happens when the project scope changes.
The core estimate focuses on the main calculated material areas and entered prices. Real buying decisions can involve additional project expenses.
These extra costs vary widely. They should therefore be reviewed separately.
The important step is not adding random percentages. The better step is identifying which extra items actually apply.
Hidden costs often appear late because they are not part of the shed geometry. They come from the site, purchasing process, tools, or finishing choices.
Site Preparation, Delivery, and Permit Costs
A level drawing does not guarantee a level building site. Ground preparation can add work before construction begins.
Vegetation may need removal. Drainage may need attention. A sloped area may require more preparation.
Delivery can also change the purchase total. Large sheets, lumber, roofing, or foundation materials can create transport charges.
Local project requirements may add another layer. Permit or approval rules can depend on location and shed characteristics.
These items should remain separate from geometry-based material costs. Combining everything into one guessed rate hides useful information.
Waste, Tools, Openings, and Finishing Choices
Materials do not always arrive in perfect project-sized pieces. Cutting plans can create offcuts. Some products are sold only in fixed lengths or packs.
Tool needs can also change the project budget. A DIY builder may already own key tools. Another builder may need to rent them.
Doors and windows create another planning issue. They change real material needs and purchasing choices.
Finishing can add further cost. Paint, protective coatings, trim, hardware, and interior work can all matter.
The safest approach is to separate structural estimation from optional finishing decisions.
This keeps the main calculation clean while preserving a realistic buying plan.
Common Shed Calculation Mistakes: How to Protect Your Budget
A calculation can look precise while starting from a bad measurement. That is the most dangerous kind of error.
The first common mistake is mixing planned dimensions with rough visual estimates. Measure the design consistently. Confirm dimensions before pricing materials.
The second mistake is choosing the wrong roof type. A flat, slanted, and gable roof should not share identical roof assumptions.
The third mistake is ignoring overhang. Overhang changes the actual roof coverage beyond the wall line.
Another frequent mistake is treating floor area as total material area. Floor, wall, and roof surfaces serve different purposes.
Users also create problems by manually filling every editable field. Reverse solving works best when one genuine unknown remains open.
Watch this: if several manually entered values describe an impossible shape, do not force the answer. Recheck the measurements instead.
Another budgeting mistake is using one broad material rate for every component. Foundation, wall, and roofing products often have different prices.
Users can also react too quickly to the final total. A high total does not always mean the whole design is expensive. One component may be driving most of the increase.
Review the cost breakdown before changing the shed size.
A useful final check asks four questions. Does the footprint match the plan? Does the roof type match the design? Do the surface results look reasonable? Do the entered prices match the materials being purchased?
The calculator is most valuable before money is committed. Use it while design changes are still easy.
AxiCalculator can also support comparison work. Run one design, then adjust only one feature. Compare the change in areas and costs. This creates a cleaner decision than comparing unrelated plans.
If you are choosing between building and buying, use the same principle. Compare like with like. Match size, roof form, foundation scope, and finish level.
Do not let a cheap headline price decide the project. A lower purchase price may exclude work you still need. A higher price may include parts your DIY estimate treats separately.
The best estimate is not the one with the lowest number. It is the one you can explain.
Before ordering materials, review the calculation once more. Check the dimensions against the final shed plan. Review each component cost separately. Then share the calculation with the supplier or project team.
That final review can prevent the most expensive mistake: buying for the wrong design.
Frequently Asked Questions
What should I verify before trusting the final shed budget?
How should I update my estimate when a supplier changes material prices?
Why can a smaller shed still cost more than a larger shed?
How do I turn calculated shed areas into actual material purchase quantities?
Why can reverse solving return a negative or physically impossible shed dimension?
How should an engineer independently verify a gable roof area result?
How should field measurements be reconciled with calculator results for an existing shed?
Engineering Resources
Our engineers are here to help you get it right.