Cell Dilution Calculator
- Last formula update:
Decimal & Rounding Policy
- The Cell Dilution Calculator keeps full numerical precision throughout calculations based on C1 × V1 = C2 × V2.
- Intermediate values are not rounded, helping preserve accuracy in forward and reverse dilution calculations.
- Final displayed results use practical decimal precision and remove unnecessary trailing zeros for easier reading.
- Very large or very small concentrations and volumes may be displayed in scientific notation when it improves readability.
- Use a period as the decimal separator, and always use the unrounded internal value for subsequent calculations.
Valid range
- Initial concentration (C1): Enter a positive, finite cell concentration greater than zero.
- Volume for suspension (V1): Enter a positive, finite volume greater than zero.
- Final concentration (C2): Enter a positive value not greater than the initial concentration for a true dilution.
- Final volume (V2): Enter a positive value equal to or greater than the suspension volume.
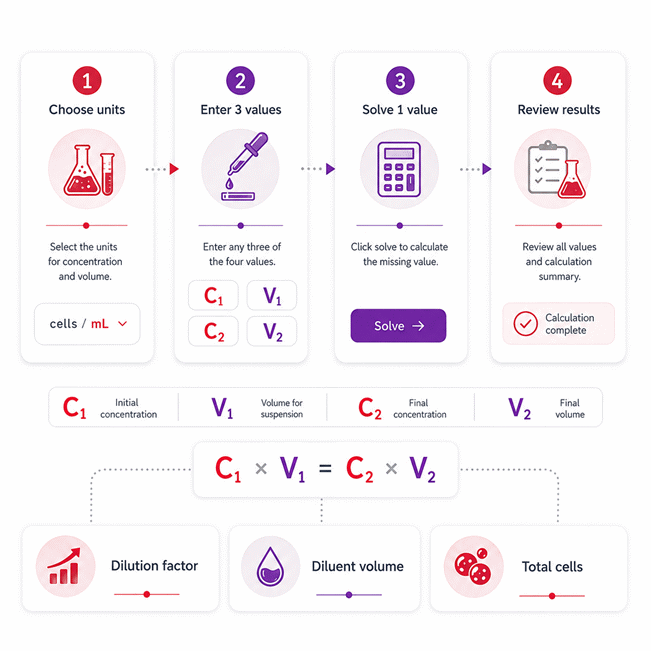
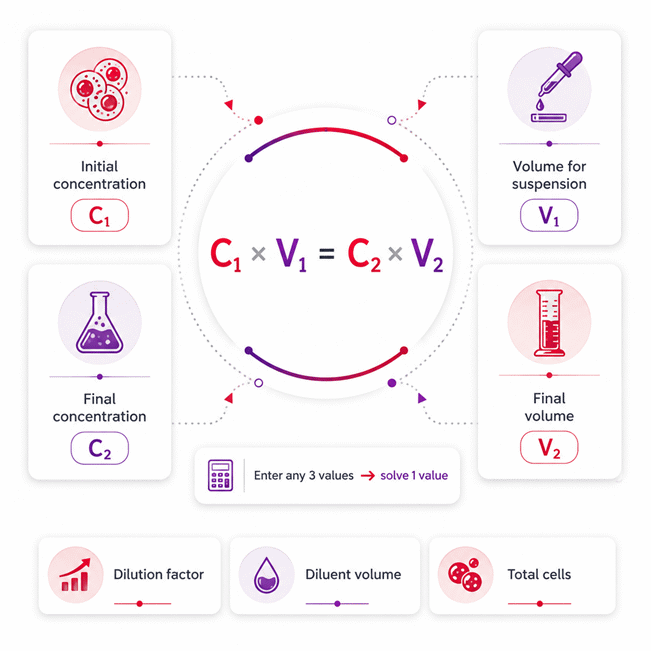
- Any three valid parameters can be entered to calculate the fourth using C1 × V1 = C2 × V2.
- Zero, negative, non-numeric, infinite, or dimensionally incompatible values are outside the valid range.

Olivara Dremmont
Reviewers:
Urellyn Vexmere
Ralven Pexthorne
Check our editorial policy
August 29, 2026
1.0.0
Initial calculator and formula release.
Our engineers are here to help you get it right.
How Does a Cell Dilution Calculator Simplify Laboratory Dilution Planning?
Cell Dilution Calculator helps you plan cell suspension dilutions quickly when three core values are known and one value is missing. It supports forward and reverse solving, making it useful when laboratory conditions change during planning. The calculator follows the standard relationship between initial concentration, transferred suspension volume, final concentration, and final volume. A Cell Dilution Calculator is especially useful when you need to review an existing preparation, adjust a planned transfer, or find a missing concentration or volume without restarting the calculation.
- Enter the three values you know and calculate the remaining value.
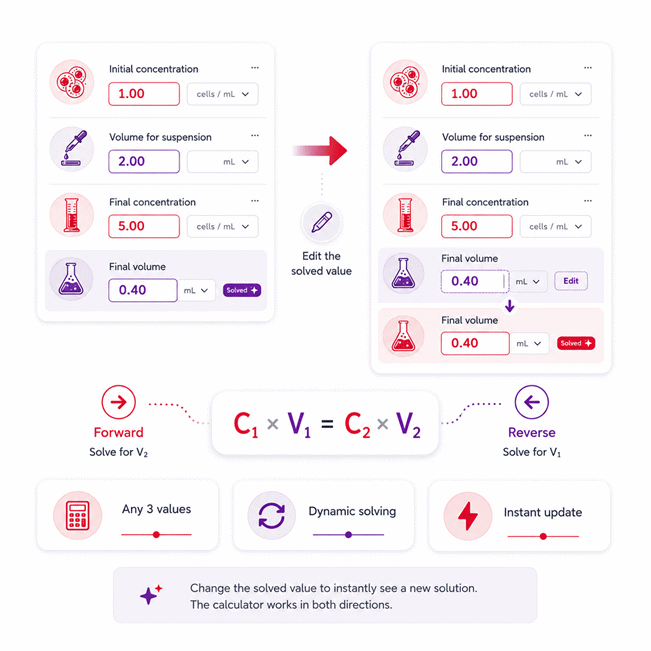
- Reverse solving lets an edited result become a new independent value.
- Check whether the target represents a true dilution before pipetting.
- Mix cell suspensions well before sampling to reduce concentration variation.
- Consider cell settling, clumping, viability, and counting quality during planning.
- Review very small transfer volumes before performing the laboratory procedure.
- Use an intermediate dilution when a direct transfer is difficult to handle reliably.
- Match every entered value to the same preparation stage and sample condition.
- Record the final preparation clearly so the dilution workflow can be reproduced.
The calculator provides a clear mathematical plan, while reliable laboratory handling determines how closely the prepared suspension follows that plan.
Assumptions used in this calculator
- All concentrations are positive, finite values representing uniformly mixed cell suspensions.
- All volumes are positive, finite, and measured with compatible laboratory units.
- Calculations assume cell number is conserved during the dilution process.
- The core relationship is C1 times V1 equals C2 times V2.
- Any three core variables are assumed sufficient to determine the fourth.
- Final concentration is assumed not to exceed the initial concentration.
- Final volume is assumed not to be less than suspension volume.
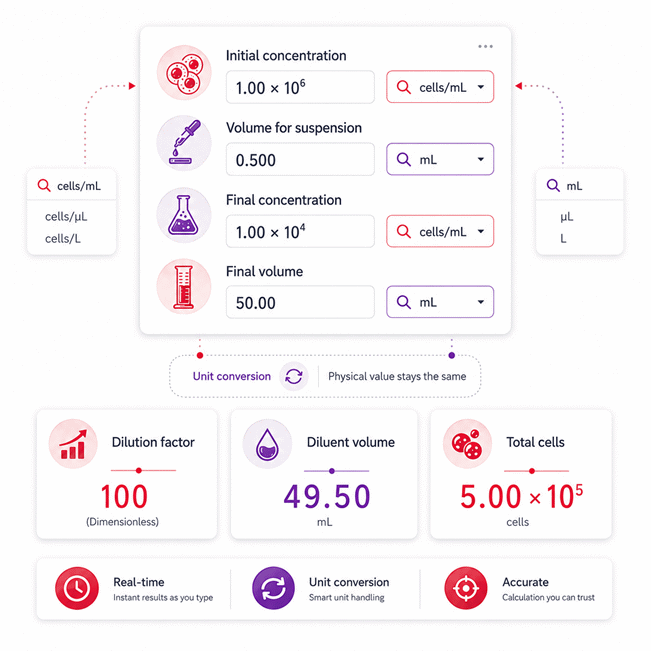
- Unit conversions preserve the same physical concentration or volume.
- Intermediate calculations retain full precision before final result formatting.
- Calculated diluent volume assumes simple addition without significant volume contraction.
- Cells are assumed evenly distributed, without settling, clumping, or sampling bias.
- Pipetting accuracy and instrument calibration are assumed adequate for entered values.
- Laboratory users should verify practical limits before applying calculated dilution volumes.
Results are rounded for display.
Internal calculations use full precision.
Formulas Used in Cell Dilution Calculator :
1. Unit Normalization
Concentrations are normalized to cells/mL and volumes are normalized to mL before calculation. The selected unit factor preserves the same physical quantity when units change.
2. Cell Dilution Equation
Any three of the four core variables determine the remaining variable. Reverse calculations use this same equation algebraically, so separate rearranged duplicates are not required.
3. Dilution Factor
The dilution factor expresses how many times the initial cell concentration is reduced to reach the final concentration.
4. Diluent Volume
Diluent volume is the additional liquid required to increase the suspension volume from the transferred volume to the final volume.
5. Total Cell Count
Total cell count is calculated from the normalized final cell concentration and final suspension volume.
Variable Definitions
- C1 = initial cell concentration.
- V1 = volume transferred from the initial cell suspension.
- C2 = final cell concentration.
- V2 = final suspension volume.
- DF = dilution factor.
- Vdiluent = volume of diluent added.
- N = total number of cells.
- xdisplay = value shown in the selected unit.
- xbase = value converted to the calculator base unit.
- funit = conversion factor from the selected unit to the base unit.
Variables & Definitions
View a complete list of all variables used in this calculator, including definitions and units
Cell Dilution Calculator Variables and Units
| Symbol | Variable | Description | Base Unit | Calculation Role |
|---|---|---|---|---|
| C1 | Initial concentration | Cell concentration of the initial suspension before dilution. | cells/mL | Core dilution variable |
| V1 | Volume for suspension | Volume transferred from the initial cell suspension for dilution. | mL | Core dilution variable |
| C2 | Final concentration | Target cell concentration of the suspension after dilution. | cells/mL | Core dilution variable |
| V2 | Final volume | Total suspension volume after the dilution is completed. | mL | Core dilution variable |
| DF | Dilution factor | Ratio describing the reduction from initial to final cell concentration. | Dimensionless | Derived result |
| Vdiluent | Diluent volume | Additional liquid required to reach the final suspension volume. | mL | Derived result |
| N | Total cell count | Total number of cells represented by concentration multiplied by compatible volume. | cells | Derived result |
| xdisplay | Displayed value | Numeric value shown to the user in the currently selected unit. | Selected unit | Unit conversion |
| xbase | Base value | Physical value normalized to the calculator base unit before calculation. | Base unit | Unit conversion |
| funit | Unit conversion factor | Factor used to convert a displayed value to its corresponding base-unit value. | Conversion factor | Unit conversion |
Unit Conversion Table
Cell Concentration Unit Conversion Table
| Unit Group | Unit Name | Symbol | Equivalent in cells/mL | Used For |
|---|---|---|---|---|
| Popular Units | Cells per milliliter | cells/mL | 1 cells/mL | Standard cell concentration input and calculation |
| Popular Units | Cells per microliter | cells/µL | 1,000 cells/mL | Small-volume cell suspension measurements |
| Scientific Units | Cells per liter | cells/L | 0.001 cells/mL | Large-volume concentration reporting |
| Scientific Units | Cells per nanoliter | cells/nL | 1,000,000 cells/mL | Microscale and high-density cell measurements |
Cell Volume Unit Conversion Table
| Unit Group | Unit Name | Symbol | Equivalent in mL | Used For |
|---|---|---|---|---|
| Popular Units | Milliliter | mL | 1 mL | Standard suspension and final volume calculations |
| Popular Units | Microliter | µL | 0.001 mL | Pipetting and small-volume dilution procedures |
| Scientific Units | Liter | L | 1,000 mL | Large-volume suspension preparation |
| Scientific Units | Nanoliter | nL | 0.000001 mL | Microscale liquid handling and dilution calculations |
Example Calculation
A cell suspension starts at 2,400,000 cells/mL and must be diluted to 300,000 cells/mL.
For a final volume of 12 mL, the required initial suspension volume is 1.5 mL.
The remaining 10.5 mL is diluent, producing an eight-fold dilution.
The final suspension contains 3,600,000 cells under ideal dilution assumptions.
The first calculation finds a 2 mL suspension volume from the original three known values.
When the calculated suspension volume is manually changed to 4 mL, it becomes an independent value.
The calculator then reverse-solves the initial concentration while preserving the other selected values.
The updated values remain consistent with the same cell dilution equation and unit system.
Results are rounded for display.
Internal calculations use full precision.
Calculations Disclaimer
Cell Dilution Calculator for Fast, Practical Laboratory Planning
A rushed dilution can waste cells, media, and valuable laboratory time. The Cell Dilution Calculator gives you a faster way to plan the next step. The Cell Dilution Calculator also supports reverse solving when one value is unknown. You can start with the information already available in your workflow. This keeps the process simple and reduces unnecessary manual work. The tool is useful before pipetting, plating, passaging, or preparing working suspensions. It also helps when you need to review an earlier calculation. The goal is not only speed. The goal is a clear plan that makes sense before laboratory work begins.
Why Cell Dilution Problems Become Hard in Real Laboratories
A simple dilution can become confusing once real laboratory conditions enter the process. Cells can settle while you prepare tubes or plates. Clumps can make a sample look more concentrated than expected. A count may also represent total cells instead of viable cells. Small transfer volumes create another problem. They may be mathematically possible but difficult to pipette well. These issues can turn a simple calculation into a practical decision. A useful calculator should support that decision without creating more confusion. It should help the user identify what is known, what is missing, and what must be checked before starting.
When a Correct Calculation Still Gives a Poor Laboratory Result
A correct calculation does not guarantee a correct biological result. The starting concentration may already contain measurement error. Cells may also settle between counting and pipetting. Poor mixing can change the concentration of the sampled portion. Cell loss may occur during washing, centrifugation, or transfer. The final suspension can therefore differ from the calculated plan. This is why the calculation should be treated as a controlled starting point. The laboratory process must still support that calculation. Good technique, careful mixing, reliable counting, and suitable pipetting remain important. When the observed result looks unusual, review both the calculation and the handling process.
Why Mixing the Cell Suspension at the Right Time Matters
A well-prepared calculation can fail when the sample is not mixed before transfer. Many cells slowly move toward the bottom of a container. This changes the local concentration within the suspension. A sample taken from the top may contain fewer cells. A sample taken near the bottom may contain more. Gentle mixing helps restore a more even distribution. The timing matters too. Mixing too early may not help if the sample sits afterward. Mix close to the moment of sampling when your protocol allows it. This small habit can improve consistency between the calculated plan and the actual suspension.
How Cell Settling and Clumping Create Hidden Errors
A calculated dilution may look perfect while the cell suspension behaves differently. Settling changes where cells are located inside the vessel. Clumping changes how cells are counted and transferred. A cluster may behave like one particle during counting. It may later separate into several cells during handling. The opposite can also happen. Cells may form larger aggregates after the count. These changes affect how well the starting concentration represents the real sample. When clumping is visible, correct the suspension first when possible. When settling is rapid, shorten the delay between mixing, sampling, and transfer.
How Reverse Solving Changes the Cell Dilution Workflow
A common problem starts when the laboratory note contains the result but misses an input. Traditional calculators often force the user into one fixed direction. Reverse solving removes that limitation. You can work from the values you actually have. The missing quantity becomes the calculated value. This is useful during planning, troubleshooting, and record review. It also reduces repeated manual rearrangement. The same scientific relationship remains in use throughout the process. Only the unknown value changes. That makes the workflow easier to understand. It also helps users focus on the biological task instead of rearranging equations by hand.
Start with the Three Values You Actually Know
A fixed calculator becomes frustrating when your known values do not match its input order. A reverse-solving tool avoids that problem. Start with the three physical quantities already known from your experiment. Leave the missing quantity for the calculator to determine. This approach matches real laboratory work more closely. Sometimes the stock concentration is known. Sometimes the target concentration is fixed by a protocol. In other cases, the available volume is the main constraint. Reverse solving adapts to those different starting points. It also reduces transcription steps. Fewer manual steps can mean fewer opportunities for simple calculation mistakes.
Edit a Calculated Result Without Restarting the Process
A laboratory plan often changes after the first calculation. You may decide that the calculated transfer is inconvenient. You may also need a different working volume. Starting over wastes time and increases mental load. An editable result makes the process faster. Change the value that no longer fits your workflow. The calculator can then solve another quantity. This creates a more natural planning process. You can explore several valid setups without rebuilding the calculation. The feature is especially useful when practical handling matters. It helps bridge the gap between a mathematical result and a laboratory plan you can actually perform.
Use Reverse Solving to Check Existing Laboratory Notes
An old laboratory note can contain an unexplained value or missing calculation step. Reverse solving can help reconstruct that decision. Enter the values that were recorded and solve for the missing quantity. Then compare the result with the written procedure. This can reveal a transcription error or an inconsistent plan. It can also confirm that an earlier calculation was reasonable. The method is useful during protocol review, training, and repeat experiments. It does not replace proper documentation. Instead, it gives you another way to inspect existing work. That added check can be valuable before repeating an important experiment.
How to Plan a Cell Dilution Before Touching a Pipette
A common mistake is beginning the physical procedure before the target is clear. Planning first reduces unnecessary transfers and wasted material. Start by identifying the starting suspension and the desired working condition. Then determine which quantities are already known. Check whether the planned change is actually a dilution. Next, consider whether the required transfer will be practical. A calculation can be valid while the transfer is inconvenient. This matters most when the required volume is very small. A short planning step can prevent a long troubleshooting session later. The calculator should support that planning process before the first liquid is moved.
Confirm the Experimental Goal Before Preparing the Suspension
A dilution becomes difficult when the target condition is poorly defined. Decide what the final suspension must accomplish first. The target may support plating, passaging, imaging, stimulation, or another downstream task. That purpose determines whether the planned concentration is appropriate. It also affects how much final material is needed. Planning the target first prevents unnecessary recalculation. It also avoids preparing too much or too little suspension. When several downstream steps are planned, consider the full demand before preparing the dilution. A clear target gives the calculation meaning. Without that target, even a mathematically correct result may be unhelpful.
Check Whether the Target Is Truly a Dilution
A surprising result often appears when the desired concentration exceeds the starting concentration. Adding diluent cannot create a more concentrated cell suspension. In that case, the laboratory task is not a normal dilution. The sample may need concentration, centrifugation, resuspension, or another preparation step. Recognizing this early saves time. It also prevents users from forcing an impossible setup into a dilution workflow. Before accepting the result, compare the starting condition with the intended target. If the target is denser, review the protocol. The correct solution may involve changing the sample rather than adding more liquid.
Use an Intermediate Step When Direct Transfer Is Too Small
A direct calculation may produce a transfer that is difficult to pipette reliably. The mathematics can still be correct. The practical problem is the handling step. An intermediate dilution can make the transfer larger and easier to control. First prepare a more convenient working suspension. Then use that suspension for the final preparation. This approach adds one step, so it should be planned carefully. Each extra transfer can introduce variation. However, an intermediate step may still be better than attempting an extremely small direct transfer. Choose the workflow that gives the most reliable handling under your laboratory conditions.
How to Reduce Cell Dilution Errors Before They Happen
A dilution error is easier to prevent than to diagnose afterward. Many problems begin before the calculator is opened. The starting cell count may be unreliable. The suspension may not be homogeneous. The wrong concentration type may be used. The physical sample may also change during handling. A good workflow checks these risks early. Review the count, sample condition, and experimental goal before preparing the dilution. Confirm that the values belong to the same sample state. Then perform the calculation. This sequence reduces confusion. It also makes troubleshooting easier because each important step has already been considered.
Use a Reliable Cell Count Before Planning the Dilution
A precise dilution cannot repair an inaccurate starting concentration. The quality of the initial count matters immediately. Count a representative sample from a well-mixed suspension. Repeat the count when the values show unusual variation. Follow the counting method used by your laboratory. Different counting systems can produce slightly different results. The important point is consistency. Record the method used and the condition of the sample. If the starting value looks unexpected, investigate it before continuing. A few minutes spent checking the count can prevent a failed preparation. Good input data gives the dilution plan a stronger foundation.
Account for Cell Viability When It Matters
A suspension can contain many cells but fewer usable cells than expected. This happens when some cells are not viable. The correct concentration depends on the goal of the experiment. A protocol may require total cells in one case. Another may require viable cells only. Mixing these definitions can create a large planning error. Decide which population the target describes. Then use a starting concentration measured in the same way. This keeps the calculation aligned with the biological goal. When viability changes quickly, use a recent measurement. A stale value may no longer represent the current suspension.
Match the Calculator to the Actual Laboratory Workflow
A calculation becomes risky when it describes a different process than the laboratory procedure. The values should represent the same stage of the workflow. A concentration measured before washing may not describe the sample after washing. A volume measured before centrifugation may not describe the resuspended sample. These differences can be easy to miss. Map the calculation to the exact preparation step. Confirm that every entered value belongs to that same state. This simple check can prevent major mistakes. The calculator is most useful when the mathematical model and the physical workflow describe the same suspension.
Common Cell Dilution Mistakes That Waste Time
A failed dilution often comes from a small misunderstanding rather than complex science. One value may describe the wrong suspension. The user may confuse transferred suspension with the full prepared volume. The sample may also lose cells during handling. These errors can produce results that still look reasonable. That makes them harder to notice. A better approach is to inspect the meaning of each value before using it. Ask where the value came from. Ask when it was measured. Ask what sample state it represents. These questions take seconds. They can prevent hours of troubleshooting later.
Entering a Concentration from the Wrong Preparation Stage
A cell count can become outdated after a major preparation step. Washing, pelleting, resuspension, or enrichment may change the sample. Using an earlier concentration can therefore misrepresent the current suspension. This mistake is easy to make when several values appear in a laboratory notebook. Label counts clearly with their preparation stage. Use the value that matches the material being diluted now. When uncertain, recount the current suspension. A fresh measurement can be more useful than relying on an older number. This is especially important when the sample has undergone steps that may cause cell loss.
Confusing the Final Suspension with the Added Liquid
A common planning error comes from treating added liquid as the complete final suspension. These are not the same thing. The final preparation includes both the transferred cell suspension and the added diluent. Confusing these quantities can lead to an incorrect final condition. Think about the physical tube or vessel after mixing. Everything inside it contributes to the final suspension. This mental picture makes the workflow easier to understand. It also helps when reviewing laboratory notes. If a recorded preparation seems inconsistent, check whether the written liquid amount describes added diluent or the complete prepared volume.
Ignoring Cell Loss During Handling
A theoretical plan assumes the cells you intend to transfer remain available. Real workflows may lose some cells. Cells can remain attached to plastic surfaces. Some may be lost during aspiration or washing. Others may remain in a pellet that is not fully resuspended. These losses can reduce the final concentration. The calculator cannot observe these events. The laboratory process must manage them. Use consistent handling and suitable techniques for the cell type. When recovery is poor, investigate the workflow before changing the calculation. Adjusting numbers cannot solve a physical loss problem that remains uncontrolled.
Direct Dilution Versus Serial Dilution in Practical Cell Work
A direct dilution looks simpler, but it is not always the best choice. The required transfer may be too small for reliable handling. A large concentration change can also make the direct workflow awkward. Serial dilution divides the change into several controlled steps. This can create more practical transfer volumes. However, each added step introduces another opportunity for variation. The best approach depends on the required change and available equipment. Use direct dilution when the transfer is practical and controlled. Consider serial dilution when the direct transfer would be difficult to perform reliably.
When an Intermediate Suspension Is the Safer Choice
An uncomfortable transfer volume is a warning sign worth investigating. Do not assume the smallest possible transfer is the best plan. An intermediate suspension may create a more manageable workflow. This can be helpful when the starting suspension is very concentrated. It can also support repeated downstream preparations. Prepare the intermediate suspension carefully and mix it well. Then use it consistently for the next step. The added preparation should have a clear purpose. Avoid unnecessary steps. Every transfer should improve practical control. The goal is not a more complicated process. The goal is a more reliable one.
How to Build a Repeatable Cell Dilution Workflow
A calculation is more useful when another person can understand and repeat it. Keep the planning process connected to the laboratory record. Record the starting sample, intended target, and preparation step. Note any intermediate suspension used. Keep the calculation close to the experimental notes. This makes review easier when results differ from expectations. It also supports training and repeated work. A repeatable workflow reduces dependence on memory. AxiCalculator can support this process with fast interactive solving and reusable calculation states. The laboratory record should still capture the final procedure that was actually performed.
Use AxiCalculator for Faster Decisions Without Adding Extra Steps
A laboratory calculator should reduce friction, not create another task. AxiCalculator is built around quick interaction and reverse solving. You can work from the values already available. You can also change a result when the first plan is impractical. This makes the tool useful during routine preparation and troubleshooting. It can support students, technicians, researchers, and laboratory teams. The most valuable result is not simply a number. It is a clearer decision before the experiment continues. Use the calculator as part of a careful workflow, then confirm the plan against the actual sample and laboratory procedure.
Frequently Asked Questions
Can I use a cell concentration measured by an automated counter instead of a hemocytometer?
What should I do if the required final volume changes after I already selected an aliquot?
How should I handle a cell sample that was diluted before counting?
Can I prepare one calculated cell suspension for multiple wells or culture vessels?
How should I account for measurement uncertainty in a critical cell dilution experiment?
How do I decide whether a one-step or two-step dilution will produce better accuracy?
How can I validate a cell dilution workflow before scaling it to larger batches?
Engineering Resources
Our engineers are here to help you get it right.