Drywall Calculator
- Last formula update:
Decimal & Rounding Policy
- Keep full decimal precision throughout all intermediate drywall area and cost calculations; round only the final displayed values.
- Display length and area results with up to 2 decimal places, removing unnecessary trailing zeros for cleaner results.
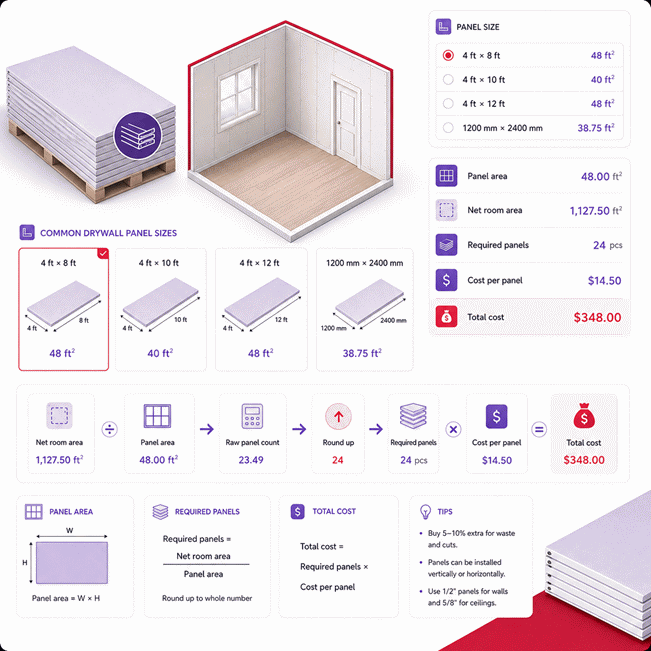
- Calculate required drywall panels from the net room area and selected panel size, then round the required quantity up to the next whole panel.
- Calculate total cost using the final whole-panel quantity multiplied by the cost per panel, and display currency values to 2 decimal places.
- Do not automatically include the recommended 10% extra material for cuts, waste, and replacements in the base panel calculation.
Valid range
- Room length, width, and height: Enter finite values greater than 0 using any supported compatible length unit.
- Triangular space base and height: Enter values greater than 0 when sloped-wall areas are included.
- Number of triangular spaces: Use a non-negative whole number; use 0 when no triangular spaces are present.
- Door and window dimensions: Enter values greater than 0 when the corresponding openings are included.
- Number of doors and windows: Use non-negative whole numbers, with 0 representing no openings.
- Gross room area: Enter a finite area greater than 0 when supplying the room surface area directly.
- Net room area: Enter a finite area greater than 0 and ensure deducted openings do not exceed the gross area.
- Drywall panel size: Select one of the supported panel dimensions available in the calculator.
- Cost per panel: Enter a finite value of 0 or greater in the selected currency.
- Number of panels: The calculated requirement must be a non-negative whole number of complete drywall panels.

Reviewers:
Elvarine Jexmont
Fenrick Zorquell
Check our editorial policy
August 17, 2026
1.0.0
Initial calculator and formula release.
Our engineers are here to help you get it right.
How Does the Drywall Calculator Estimate Sheets, Surface Area, and Cost?
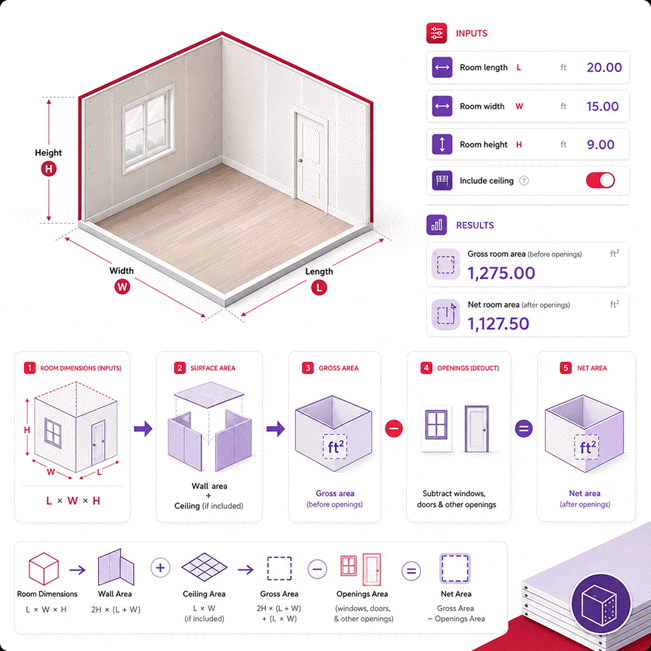
Drywall Calculator results turn room measurements into a practical material plan for walls, ceilings, openings, and sloped surfaces. The calculator uses room length, width, and height to determine the main wall surface, then adds the ceiling when selected and includes any triangular sloped-wall areas. Door and window areas are deducted to produce the net surface that requires drywall. The Drywall Calculator then compares this net area with the selected panel size to estimate the number of complete sheets required.
- Measure room length, width, and height accurately before calculating.
- Include the ceiling only when it is part of the drywall project.
- Measure triangular sloped-wall sections separately for more accurate coverage.
- Subtract door and window openings from the gross room surface area.
- Use net room area as the main surface for drywall quantity planning.
- Select the actual drywall panel size you plan to purchase.
- Required panel quantity is rounded upward to complete purchasable sheets.
- Enter cost per panel to estimate the total drywall panel cost.
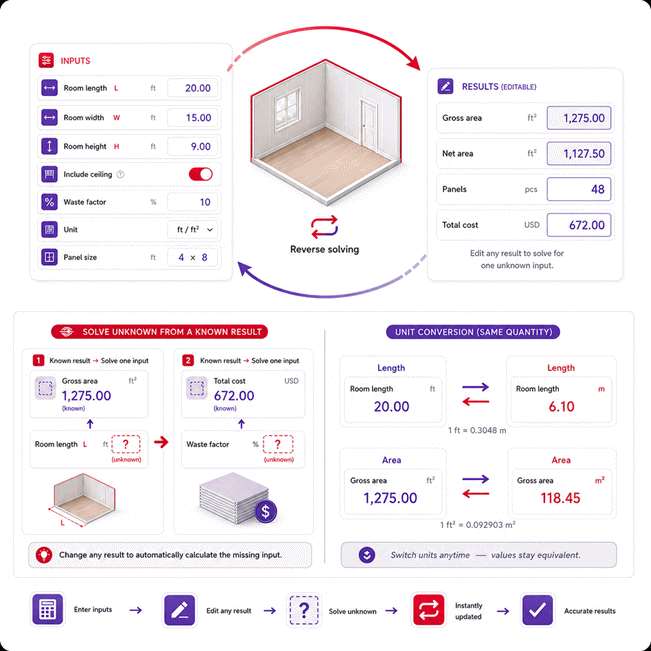
- Reverse solving can recover one missing value when enough related values are known.
- Direct-area mode is useful when reliable surface measurements already exist.
- Compare panel sizes with room access, handling, seams, and installation needs.
- Review measurements and project scope before placing the final material order.
Assumptions used in this calculator
- Room dimensions are assumed rectangular unless separate sloped-wall areas are entered.
- Ceiling area is treated as a flat rectangle when included.
- Sloped-wall additions are modeled as triangular spaces using entered dimensions.
- Door openings are treated as rectangular areas with uniform entered dimensions.
- Window openings are treated as rectangular areas with uniform entered dimensions.
- Door and window areas are subtracted from gross drywall surface area.
- All entered measurements are assumed accurate and dimensionally compatible.
- Unit conversions preserve the same physical measurement before calculations are performed.
- Intermediate calculations retain full precision before final display rounding.
- Required panel quantities are rounded upward to complete purchasable panels.
- No automatic waste allowance is included unless separately added by users.
- Material cost excludes labor, tax, delivery, fasteners, finishing, and disposal.
- Final quantities should be verified against drawings, specifications, and site conditions.
Results are rounded for display.
Internal calculations use full precision.
Formulas Used in Drywall Calculator :
1. Unit Normalization
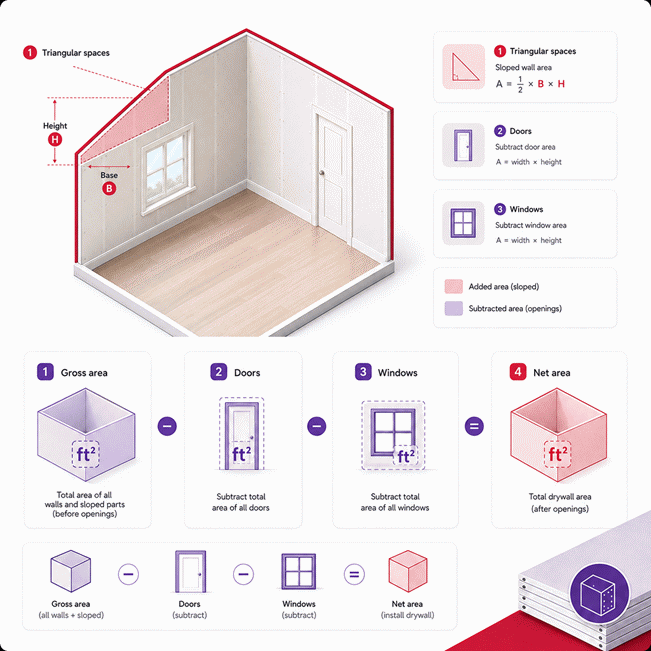
2. Total Area Under Sloped Walls
3. Gross Room Surface Area
4. Total Door Area
5. Total Window Area
6. Net Room Area
7. Drywall Panel Area
8. Required Number of Drywall Panels
9. Total Drywall Cost
- Xb = value converted to the calculator base unit.
- Xu = value displayed in the user-selected compatible unit.
- fu = conversion factor for the selected length or area unit.
- L = room length.
- W = room width.
- H = room height measured to the base of any triangular sloped-wall space.
- As = total area of identical triangular spaces under sloped walls.
- ns = number of triangular spaces.
- bs = base of one triangular space.
- hs = height of one triangular space.
- c = ceiling indicator, equal to 1 when the ceiling is included and 0 when excluded.
- Ag = gross room surface area before subtracting doors and windows.
- Ad = total door area.
- nd = number of doors.
- wd = door width.
- hd = door height.
- Aw = total window area.
- nw = number of windows.
- ww = window width.
- hw = window height.
- An = net room area that requires drywall.
- Ap = area covered by one selected drywall panel.
- lp = selected drywall panel length.
- wp = selected drywall panel width.
- N = required whole number of drywall panels.
- P = cost per drywall panel.
- C = total drywall panel cost.
- All compatible measurements are normalized before formulas are evaluated.
- Intermediate calculations retain full numerical precision and are not rounded prematurely.
- The required panel quantity is always rounded upward to a complete panel.
- Total cost uses the final whole-panel quantity and the entered cost per panel.
- No additional waste percentage is automatically included in the base panel requirement.
- Reverse calculations use the same equations by algebraically solving one missing variable when the remaining required values are known.
Variables & Definitions
View a complete list of all variables used in this calculator, including definitions and units
Drywall Calculator Variables and Measurement Reference
| Variable | Meaning | Quantity Type | Typical Unit | Role in Calculation |
|---|---|---|---|---|
| Xb | Value converted to the calculator base unit | Length or area | m or m² | Normalized value used internally for calculations |
| Xu | Value displayed in the selected unit | Length or area | Selected unit | User-facing measurement before unit normalization |
| fu | Selected unit conversion factor | Conversion factor | Dimension-dependent | Converts the displayed measurement to the base unit |
| L | Room length | Length | ft, m | Used to calculate wall and optional ceiling area |
| W | Room width | Length | ft, m | Used to calculate wall and optional ceiling area |
| H | Room height | Length | ft, m | Used to calculate the main vertical wall area |
| As | Total area under sloped walls | Area | ft², m² | Added to the gross room surface area |
| ns | Number of triangular spaces | Count | Whole number | Determines how many identical triangular areas are included |
| bs | Base of one triangular space | Length | ft, m | Used to calculate the sloped-wall triangular area |
| hs | Height of one triangular space | Length | ft, m | Used to calculate the sloped-wall triangular area |
| c | Ceiling inclusion indicator | Binary state | 0 or 1 | Equals 1 when the ceiling is included and 0 when excluded |
| Ag | Gross room surface area | Area | ft², m² | Total calculated surface before subtracting openings |
| Ad | Total door area | Area | ft², m² | Subtracted from the gross room surface area |
| nd | Number of doors | Count | Whole number | Determines the total number of door openings |
| wd | Door width | Length | ft, m | Used with door height and count to calculate door area |
| hd | Door height | Length | ft, m | Used with door width and count to calculate door area |
| Aw | Total window area | Area | ft², m² | Subtracted from the gross room surface area |
| nw | Number of windows | Count | Whole number | Determines the total number of window openings |
| ww | Window width | Length | ft, m | Used with window height and count to calculate window area |
| hw | Window height | Length | ft, m | Used with window width and count to calculate window area |
| An | Net room area requiring drywall | Area | ft², m² | Gross area remaining after door and window deductions |
| Ap | Area of one drywall panel | Area | ft², m² | Used to determine the required number of panels |
| lp | Drywall panel length | Length | ft, mm, m | One dimension of the selected drywall panel |
| wp | Drywall panel width | Length | ft, mm, m | Second dimension of the selected drywall panel |
| N | Required number of drywall panels | Count | Whole panels | Net area divided by panel area and rounded upward |
| P | Cost per drywall panel | Currency | Currency per panel | Unit price used to calculate total material cost |
| C | Total drywall panel cost | Currency | Currency | Final panel quantity multiplied by cost per panel |
Unit Conversion Table
Length Unit Conversion Table
| Unit Group | Unit Name | Symbol | Equivalent in Meters | Used For |
|---|---|---|---|---|
| Popular Units | Foot | ft | 0.3048 m | Room, sloped-wall, door, window, and panel dimensions |
| Popular Units | Inch | in | 0.0254 m | Door, window, and detailed construction measurements |
| Popular Units | Yard | yd | 0.9144 m | Large room and construction dimensions |
| Scientific Units | Meter | m | 1 m | Metric room, opening, sloped-wall, and panel dimensions |
| Scientific Units | Centimeter | cm | 0.01 m | Detailed metric construction measurements |
| Scientific Units | Millimeter | mm | 0.001 m | Drywall panel and precise construction dimensions |
Area Unit Conversion Table
| Unit Group | Unit Name | Symbol | Equivalent in Square Meters | Used For |
|---|---|---|---|---|
| Popular Units | Square Foot | ft² | 0.09290304 m² | Gross, net, sloped-wall, door, window, and panel areas |
| Popular Units | Square Inch | in² | 0.00064516 m² | Small opening and detailed construction areas |
| Popular Units | Square Yard | yd² | 0.83612736 m² | Large wall, ceiling, and room surface areas |
| Scientific Units | Square Meter | m² | 1 m² | Metric room, opening, drywall, and panel areas |
| Scientific Units | Square Centimeter | cm² | 0.0001 m² | Small metric surface and opening areas |
| Scientific Units | Square Millimeter | mm² | 0.000001 m² | Very small metric surface measurements |
Example Calculation
The room surface begins with the rectangular wall area, then adds the triangular sloped-wall spaces and ceiling area. Door and window openings are deducted to obtain the net drywall area. The net area is divided by the selected panel area, and the result is rounded upward because partial panels cannot satisfy the calculated requirement. The final material cost uses the whole-panel quantity multiplied by the entered cost per panel.
Reverse solving starts with the known gross room area, room width, room height, sloped-wall area, and ceiling state to recover the missing room length. Once the missing dimension is solved, the calculator continues through the normal dependency chain. Door and window areas are deducted from gross area, the remaining drywall area is divided by panel area, and the panel quantity is rounded upward. The final cost is based on the resulting whole-panel quantity.
Results are rounded for display.
Internal calculations use full precision.
Calculations Disclaimer
How Does a Drywall Calculator Turn Room Measurements Into a Purchase Plan?
A wrong room measurement can turn a simple order into expensive rework. A Drywall Calculator reduces that risk before materials reach the site. The Drywall Calculator links room size, openings, ceiling choice, and panel size. It then turns geometry into a clear purchase plan. The value is not speed alone. The real value is seeing which measurement changes the result. That visibility helps homeowners, installers, estimators, and contractors make calmer decisions. It also helps users compare different room layouts before ordering boards.
The tool works best when measurements follow the real room structure. Start with the main rectangular space. Then identify extra wall surfaces and large openings. Next, choose whether the ceiling needs drywall. After that, select a panel size matching your project. The tool can also work backward when one value is missing. This makes the workflow useful during planning, takeoff reviews, and site checks.
What Measurements Should You Capture Before You Calculate Drywall?
A rushed measurement creates more problems than a slow calculation. Walk through the room before entering any value. Measure the main length, width, and height first. Then note every large door and window. Check for sloped sections near roofs, stairs, or attic walls. Decide whether the ceiling belongs in the project scope. Record the selected board size before comparing quantities.
Measurement order matters because surfaces depend on each other. A missed opening can overstate material demand. A forgotten ceiling can understate the job. A sloped section can add meaningful coverage. Good data creates a useful estimate. Poor data only creates a fast mistake.
Measure room → mark openings → identify slopes → choose ceiling → select panels → review results.
How Room Length, Width, and Height Shape the Surface Estimate
A common mistake starts with measuring only the floor. Floor size does not describe wall coverage. Room length and width define the wall layout. Height determines how much vertical surface must be covered. These three values create the basic room shape.
Think about the room as connected surfaces, not empty volume. The walls wrap around the room perimeter. A wider room adds more wall length. A longer room does the same. A taller room increases every vertical wall surface. That is why small height changes can shift material needs quickly.
If the room has several heights, split the project into sections. This keeps the estimate close to the real layout. It also makes later checks much easier.
Should You Include the Ceiling in Your Drywall Plan?
A forgotten ceiling can create a large material shortage. Decide the ceiling scope before trusting the final quantity. Some projects cover walls only. Others cover every wall and the ceiling. Renovations may replace one area but keep another untouched.
The ceiling should match the actual work plan. Do not include it automatically because the room has one. Do not exclude it because the walls dominate the view. A medium room can have a large ceiling surface. That surface may change board quantity and handling needs.
Before ordering: one ceiling decision can change the entire purchase plan.
The safest choice is simple. Match the calculator setting to the surfaces receiving new drywall.
How Gross Room Surface Area Is Built Without Missing Hidden Surfaces
A room can look simple while hiding more surface than expected. Gross surface area represents the room before major openings are removed. It combines the main wall surfaces with selected extra surfaces. A ceiling can also join that total when required.
This stage is useful because it shows the room’s full coverage demand. It creates a clear checkpoint before deductions begin. If the gross result feels wrong, review geometry before checking panel count. That catches mistakes earlier.
Keep added surfaces separate during measurement. This is especially useful for sloped walls. Clear inputs make later review easier. They also help another estimator reproduce the same result.
How Sloped Walls Change the Drywall Surface You Must Cover
A sloped wall can make a rectangular-room estimate look correct but incomplete. Attics, lofts, and roof spaces often include triangular wall sections. These surfaces need separate attention. Their shape differs from the main rectangular walls.
Measure the base of each triangular section. Then measure its vertical height. Count how many matching sections exist. This keeps the sloped area connected to visible site geometry. It also reduces guesswork when roof lines repeat.
Do not estimate the slope from floor area. That shortcut can miss useful surface. Instead, measure the actual wall face receiving drywall. This keeps the material plan tied to installation work.
Why Door Openings Can Distort a Fast Drywall Estimate
A door looks small beside a wall, yet several doors can matter. Door openings reduce the surface receiving drywall. This means their size should not stay hidden inside rough estimates.
Measure the framed opening relevant to your planning method. Keep repeated doors grouped only when their sizes match. Separate unusual doors, double doors, and tall openings. This avoids treating every opening as identical.
Door deductions should support a clearer net area. They should not become a reason for false confidence. Cut pieces may still have limited reuse. The calculator improves planning, but layout still affects purchasing.
Watch this closely: a deducted opening does not guarantee equal material savings.
Why Window Openings Need Their Own Measurement Check
Windows create the same planning challenge as doors. A wall with several windows may have much less covered surface. Yet the remaining pieces can be fragmented. That difference matters during installation.
Record window width, height, and count carefully. Group only identical openings. Treat large feature windows separately. Small errors become larger when several openings repeat.
Window measurements also help review unusual wall layouts. A result may look too low when large openings dominate one wall. That can be correct. It can also reveal a measurement mistake. The best response is verification, not guessing.
Accurate opening data makes the next stage more meaningful.
How Net Drywall Area Creates a More Useful Material Estimate
Gross area can sound impressive, but net area drives material planning. Net drywall area represents the surface left after major openings are removed. It creates a cleaner link between room geometry and panel coverage.
This value is useful for standard rooms and direct-area workflows. It also gives users a strong checkpoint. If the net area seems unexpectedly low, inspect openings. If it seems too high, review the ceiling and extra surfaces.
The goal is not to chase the smallest number. The goal is to match the surfaces receiving boards. That mindset prevents under-ordering and unnecessary over-ordering.
Full surfaces → remove openings → net coverage → choose board size → review quantity → plan purchase.
Which Drywall Panel Size Best Fits Your Room and Work Style?
The wrong panel size can make a correct area estimate harder to install. Drywall sheets vary in size. Larger panels can reduce seams. Smaller panels can be easier to move and position.
Choose panel size after considering the room, access, and crew. A large board may look efficient on paper. It may be difficult in narrow stairs or tight rooms. A smaller board may increase seams. Yet it may reduce handling problems.
The calculator helps compare coverage. The buyer still needs to consider physical access. This is where math and jobsite reality meet.
A purchase plan should support installation, not just minimize board count.
4×8 vs 4×10 vs 4×12 Drywall: What Changes in Practice?
A buyer often asks whether 4×8, 4×10, or 4×12 boards are best. There is no single winner for every project. Each size changes coverage and handling.
The 4×8 format is common and manageable. Longer sheets cover more surface per board. They can reduce horizontal or vertical seams. They also need more space for transport and lifting.
Room height matters when comparing sizes. So does wall length. Access can matter even more. Before choosing, picture the path from delivery point to final wall.
Use quantity as one decision factor. Do not let it replace handling and layout planning.
How Panel Size Changes Seams, Handling, and Installation Effort
Fewer sheets can look cheaper while creating harder installation work. Panel size changes seam count, carrying effort, cutting strategy, and storage needs.
Longer panels may reduce joints across long walls. That can lower finishing work in suitable spaces. However, larger boards can be heavier and harder to maneuver. Tight hallways can make them impractical.
Smaller sheets can create more seams. They may still be better for small teams. They can also suit rooms with restricted access.
The best size balances coverage with site movement. This balance matters more than chasing the lowest board count.
How to Plan Drywall Cost Before You Place an Order
A correct quantity can still produce a poor budget. Material planning needs both coverage and price awareness. Enter a realistic panel price for the board you expect to purchase.
Price comparison should use the same board type and size. A cheaper board may differ in thickness or performance. Delivery can also change the final order cost. So can taxes and handling.
Use the calculated material need as a stable starting point. Then compare purchase conditions separately. This keeps technical planning separate from buying decisions.
Check twice: the lowest sheet price can still create higher project costs.
Why Cost per Panel Never Tells the Whole Purchase Story
A single price tag rarely explains the full drywall purchase. Cost per panel is only one part. Board size changes how many panels are needed. Product type can change unit price. Delivery can add more cost.
Keep these choices visible. Do not mix them into the room measurements. Geometry should answer how much surface needs coverage. Purchase data should answer what that material may cost.
This separation makes comparison easier. It also lets users test different purchase options without remeasuring the room.
A clean estimate becomes more useful when technical data and buying data stay distinct.
How Reverse Solving Helps When One Room Measurement Is Missing
A missing room dimension can stop a normal estimate. Reverse solving changes that situation. It uses known results and known inputs to recover one missing value.
This is useful during plan reviews. It also helps when old takeoff notes are incomplete. The method works only when enough related values remain known. One missing value is much easier to solve than several.
Reverse solving should not feel mysterious. It uses the same room relationship in the opposite direction. The benefit is practical. Users can test whether a known result agrees with site measurements.
That creates a powerful verification path before buying materials.
When a Known Result Can Reveal a Missing Room Dimension
A known area can expose a missing length, width, or height. This becomes useful during design checks. It can also help review an older estimate.
Start with the values you trust. Leave one room dimension unknown. Use the known surface result and remaining geometry. The tool can then solve the missing value.
After solving, compare the result with the physical room. A surprising value deserves a field check. Do not force the number to fit expectations.
Reverse mode is strongest as a verification tool. It can reveal inconsistent notes before material is ordered.
How Reverse Solving Helps With Openings and Sloped Sections
Sloped sections and openings can also contain missing information. A known surface result can help recover one unknown dimension. This is useful when one measurement was omitted.
The same idea applies to doors and windows. Known counts and known sizes can support a missing value. Cost relationships can also work backward when enough information exists.
However, reverse solving needs a clear data path. Too many unknowns create ambiguity. The tool should solve only one clear missing value.
This keeps reverse results useful, readable, and easy to verify.
When Direct-Area Mode Is Better Than Rebuilding Every Room Dimension
Some rooms are too irregular for a clean length-width-height model. Renovations often include partial walls, offsets, niches, and mixed surfaces. In these cases, direct-area mode can save time.
Use direct area when the surface has already been measured reliably. This may come from drawings, a takeoff, or a detailed site survey. The calculator can then focus on board coverage and purchase planning.
This mode avoids rebuilding geometry that is already known. It also keeps irregular projects from becoming artificial rectangles.
The key requirement is simple. The entered area must represent the real drywall surface.
Why Irregular Rooms Often Benefit From a Surface-First Workflow
An irregular room creates friction when every wall needs separate modeling. A surface-first workflow can reduce that burden. Measure each relevant face. Add the coverage areas before entering the final surface.
This approach works well for remodels and segmented spaces. It also supports projects with partial drywall replacement. The room shape becomes less important than the verified surface.
Direct-area planning is not a shortcut for poor measurement. It is a different workflow for better source data.
Use it when surface measurements are already trustworthy.
What Common Drywall Planning Mistakes Cause Expensive Rework?
A small planning mistake can become a large site delay. Most drywall errors start before installation. Common causes include missed ceilings, repeated openings, wrong room height, and unsuitable panel choices.
The first defense is a simple review sequence. Check room geometry. Check added surfaces. Check openings. Check panel selection. Then review the final quantity.
Do not change several inputs at once during troubleshooting. Change one item and watch the result. This reveals which value caused the shift.
A calm review often catches errors faster than another full measurement.
How Double Counting Ceilings or Openings Changes the Material Plan
Double counting can quietly inflate a material plan. This happens when the same surface enters twice. A ceiling might be added manually and selected again. An opening can also be removed twice.
Keep each surface in one place. Main walls belong to room geometry. Extra sloped sections belong to their own inputs. Doors and windows belong to opening deductions.
A clean structure makes review easier. It also reduces disputes between estimators.
If a result changes sharply, trace each surface once. That simple habit prevents many avoidable ordering mistakes.
Why Reused Measurements Can Create Hidden Errors
Old measurements can create hidden errors when reused without context. A number may come from finished dimensions. Another may come from framing dimensions. The difference can matter.
Label measurements when collecting them. Note which surface they describe. Avoid copying values between unrelated rooms. Recheck dimensions after major framing changes.
This discipline matters in renovation work. Existing walls can move during project changes. Openings can also change.
A measurement is useful only when its meaning remains clear. Clean notes support cleaner calculations.
How to Choose Drywall for Contractor and DIY Planning Needs
A homeowner and a contractor often want different outcomes. Homeowners usually need clarity and confidence. Contractors may need faster comparison across rooms.
The same calculator can support both. Homeowners can focus on room measurements and purchase quantity. Contractors can use direct-area input and reverse checks. Both groups benefit from clear opening data and panel choices.
The tool should reduce mental load. It should not hide important decisions. That is why AxiCalculator keeps the workflow visible.
Use the path that matches your project. Then verify the final plan before ordering materials.
What Buyers Should Compare Beyond Sheet Price
A buyer can lose money by comparing only sheet price. Product type, board size, access, delivery, return terms, and seller support also matter.
Check whether the board suits the intended wall or ceiling use. Review storage conditions before delivery. Confirm that the delivery path can handle chosen sheet lengths. Ask about damaged-board returns. Check seller warranty terms when relevant.
Contractors should also consider crew handling. DIY buyers should consider lifting capacity and room access.
Buying decisions work best after the technical estimate is stable. First solve quantity. Then compare purchase conditions.
What Should You Check Before Finalizing a Drywall Order?
The final order can still fail even after careful planning. A short pre-purchase check reduces that risk.
Confirm the room scope one last time. Verify ceiling inclusion. Review doors, windows, and sloped wall sections. Confirm the panel size matches access and installation plans. Check that the selected price matches the actual board.
Save or export the result when possible. A stored estimate is easier to review later. Share it with the installer or project lead.
AxiCalculator is most useful before materials are committed. Use the estimate to make the next decision clearer, not faster.
Frequently Asked Questions
Can I use the calculator when a project combines full-wall replacement with small drywall repairs?
What should I do if the drywall sheet size I planned to buy is unavailable?
Can usable drywall offcuts from one wall reduce the number of sheets needed elsewhere?
How should I estimate drywall when only part of a ceiling or wall will be replaced?
Why can a calculator result differ from a contractor’s manual drywall takeoff?
How should an engineer handle incomplete drawings when a drywall quantity is needed?
What is the best way to combine drywall quantities across many rooms without losing traceability?
Our engineers are here to help you get it right.