Sealant Calculator
- Last formula update:
Decimal & Rounding Policy
- All sealant volume calculations use full-precision values without intermediate rounding.
- Length, width, depth, volume, and wastage results display up to three decimal places.
- Actual sealant volume is calculated as required volume divided by one minus the wastage rate.
- Package quantities are always rounded up to the next whole package.
- Estimated costs are rounded to two decimal places in the selected currency.
- Minor differences may occur when displayed values are converted between measurement units.
Valid range
- Length: Greater than 0 and up to 100,000,000 meters.
- Joint width: Greater than 0 and up to 10 meters.
- Joint depth: Greater than 0 and up to 10 meters.
- Volume needed: Greater than 0 and up to 1,000,000,000,000 milliliters.
- Wastage: From 0% to less than 100% to keep the adjusted-volume calculation valid.
- Actual volume needed: Greater than 0 and up to 1,000,000,000,000 milliliters.
- Package size: Any supported container volume greater than 0 milliliters.
- Number of packages: A positive whole number from 1 to 1,000,000,000.
- Price per piece: An optional value from 0 to 1,000,000,000,000,000.
- Total sealant cost: An optional value from 0 to 1,000,000,000,000,000.

Reviewers:
Elvarine Jexmont
Fenrick Zorquell
Check our editorial policy
August 15, 2026
1.0.0
Initial calculator and formula release.
Our engineers are here to help you get it right.
How Does a Sealant Calculator Estimate Material, Packages, Coverage, and Cost?
Sealant Calculator results turn measured joint dimensions into a practical material and purchasing estimate. The tool uses total length, average width, finished depth, expected wastage, package capacity, and package price to show required volume, adjusted purchase volume, whole packages, coverage, and estimated cost.
- Measure every joint run and group sections with matching width and depth.
- Required sealant volume equals total length multiplied by joint width and finished depth.
- Adjusted volume equals required volume divided by one minus the wastage rate.
- Package quantity equals adjusted volume divided by package capacity, rounded upward.
- Total material cost equals the whole package quantity multiplied by package price.
- Reverse solving finds maximum joint length from available sealant and known joint dimensions.
- Unit conversion changes displayed measurements without changing the physical material quantity.
The Sealant Calculator assumes a consistent rectangular joint profile. Irregular beads, rough surfaces, package residue, tooling technique, and changing dimensions can affect field consumption. Measure finished depth above the backer rod, verify package capacity, and check product compatibility before purchasing. Structural glazing, firestopping, movement joints, and other critical applications require qualified technical review.
Assumptions used in this calculator
- Joint cross-sections are assumed rectangular and uniform throughout the measured length.
- Length, width, and depth measurements are assumed accurate and consistently converted.
- Sealant volume excludes irregular voids unless included in the entered dimensions.
- Wastage represents expected spillage, residue, overfilling, and application losses.
- Wastage must remain below 100 percent for mathematical validity.
- Package volume represents the usable quantity stated by the manufacturer.
- Package quantities are always rounded upward to ensure sufficient material.
- Price per package excludes taxes, delivery charges, and installation costs.
- Sealant shrinkage after curing is not included in the calculation.
- Joint movement and expansion requirements require separate engineering evaluation.
- Surface porosity, temperature, humidity, and workmanship may affect actual consumption.
- Product compatibility must follow current manufacturer specifications and safety documentation.
- Final quantities should be verified through site measurements and professional judgment.
Results are rounded for display.
Internal calculations use full precision.
Formulas Used in Sealant Calculator :
Unit Conversion
Required Sealant Volume
Actual Volume Including Wastage
Whole Packages Required
Total Sealant Cost
Variable Definitions
- Xb — value converted to the calculator base unit.
- Xi — value entered in the selected unit.
- k — conversion factor from the selected unit to the base unit.
- Vn — sealant volume required before wastage.
- L — total joint length.
- w — joint width.
- d — joint depth.
- Va — actual sealant volume required after wastage.
- c — expected wastage percentage, from 0 to less than 100.
- Vt — usable sealant volume in one package.
- N — number of packages, rounded upward to a whole package.
- p — price per package in the selected currency.
- C — total estimated sealant cost in the selected currency.
Variables & Definitions
View a complete list of all variables used in this calculator, including definitions and units
Sealant Calculator Variables and Measurement Guide
| Variable | Meaning | Unit or Type | Calculation Role |
|---|---|---|---|
Xb |
Value converted to the calculator base unit | Base measurement unit | Provides a consistent value for calculation |
Xi |
Value entered in the selected unit | Selected measurement unit | Stores the original user input |
k |
Conversion factor for the selected unit | Unit-dependent factor | Converts input values into base units |
Vn |
Required sealant volume before wastage | mL or another volume unit | Equals joint length multiplied by width and depth |
L |
Total length of all joints being sealed | m, ft, in, cm, mm, or yd | Defines the total linear coverage |
w |
Average width of the sealant joint | mm, cm, in, m, or mil | Defines one cross-sectional dimension |
d |
Average depth of the sealant joint | mm, cm, in, m, or mil | Defines the second cross-sectional dimension |
Va |
Actual sealant volume required after wastage | mL or another volume unit | Adjusts the required volume for expected material loss |
c |
Expected sealant wastage percentage | Percent | Accounts for spillage, residue, and application loss |
Vt |
Usable sealant volume in one package | mL or L | Determines how many packages are required |
N |
Whole number of sealant packages required | Packages | Rounds the volume-to-package ratio upward |
p |
Price of one sealant package | Selected currency per package | Provides the unit price for cost estimation |
C |
Total estimated sealant cost | Selected currency | Equals the package quantity multiplied by unit price |
Unit Conversion Table
Length, Joint Width, and Depth Unit Conversion Table
| Unit Group | Unit Name | Symbol | Equivalent in Meters | Used For |
|---|---|---|---|---|
| Length | Meter | m | 1 m | Total joint length |
| Length | Foot | ft | 0.3048 m | Total joint length |
| Length | Inch | in | 0.0254 m | Short joint length |
| Length | Centimeter | cm | 0.01 m | Short joint length |
| Length | Millimeter | mm | 0.001 m | Precision joint length |
| Length | Yard | yd | 0.9144 m | Long joint runs |
| Width and Depth | Millimeter | mm | 0.001 m | Joint width and finished depth |
| Width and Depth | Centimeter | cm | 0.01 m | Large joint dimensions |
| Width and Depth | Inch | in | 0.0254 m | Imperial joint dimensions |
| Width and Depth | Meter | m | 1 m | Very large joint dimensions |
| Width and Depth | Mil | mil | 0.0000254 m | Thin sealant applications |
Sealant Volume Unit Conversion Table
| Unit Group | Unit Name | Symbol | Equivalent in Milliliters | Used For |
|---|---|---|---|---|
| Popular Units | Milliliter | mL | 1 mL | Sealant and package volume |
| Popular Units | Liter | L | 1,000 mL | Bulk sealant volume |
| Popular Units | US Fluid Ounce | US fl oz | 29.5735295625 mL | Cartridge and tube volume |
| Popular Units | US Gallon | US gal | 3,785.411784 mL | Pail and bulk volume |
| Scientific Units | Cubic Centimeter | cm³ | 1 mL | Metric joint volume |
| Scientific Units | Cubic Meter | m³ | 1,000,000 mL | Large industrial volume |
| Scientific Units | Cubic Inch | in³ | 16.387064 mL | Imperial joint volume |
Example Calculation
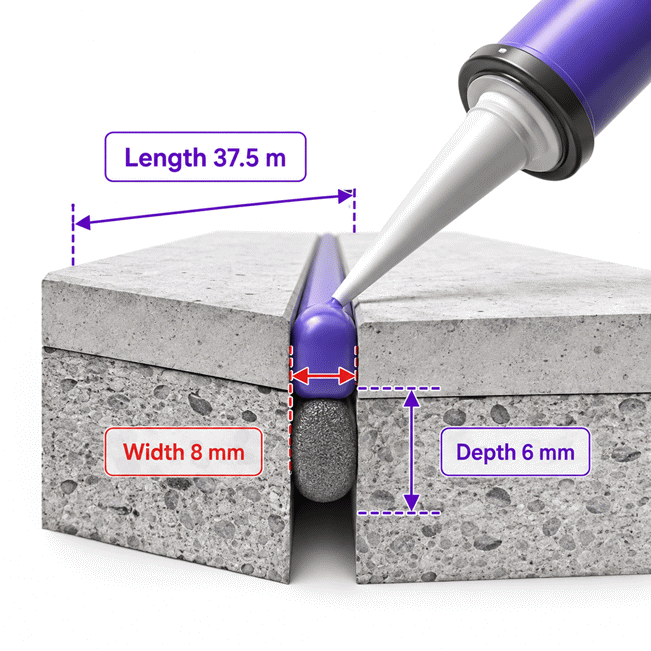
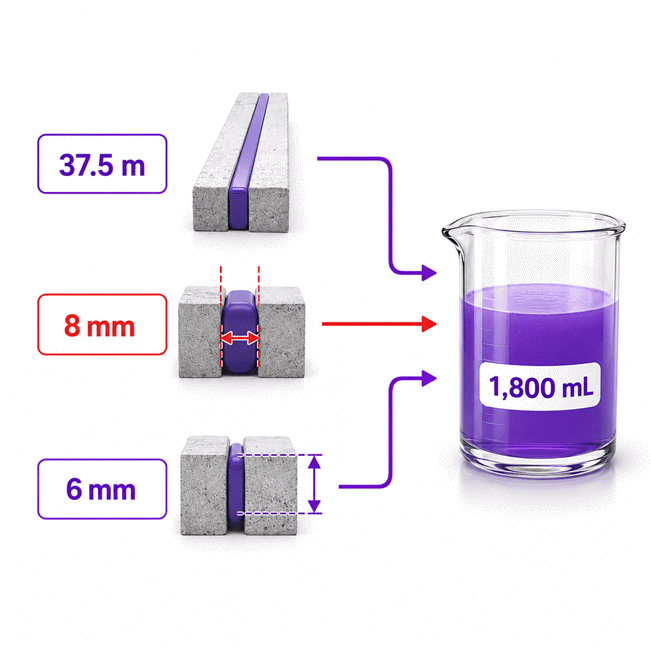
- Total joint length: 37.5 m
- Joint width: 8 mm
- Joint depth: 6 mm
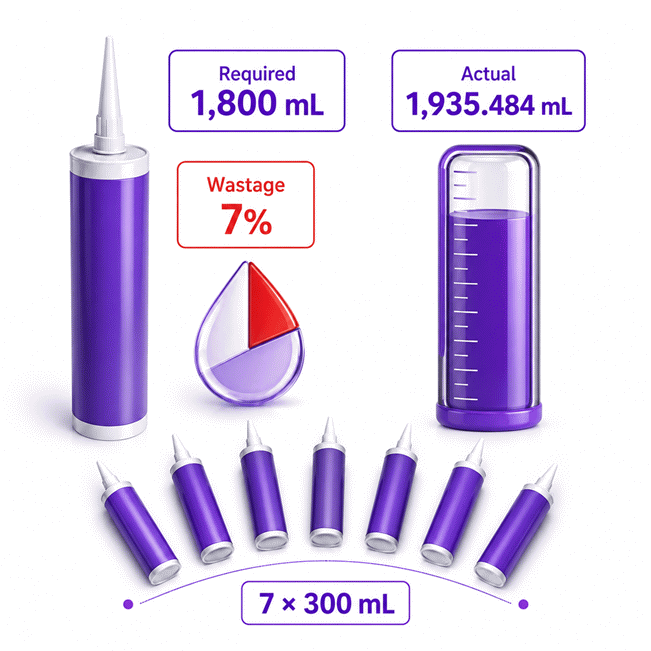
- Expected wastage: 7%
- Package size: 300 mL
- Price per package: 12.75 USD
The joint dimensions produce a theoretical sealant requirement of 1,800 mL.
A 7% expected loss increases the purchase requirement to 1,935.484 mL.
Dividing by the package volume gives 6.452 packages, rounded upward to seven.
The estimate excludes taxes, delivery charges, installation labor, and curing shrinkage.
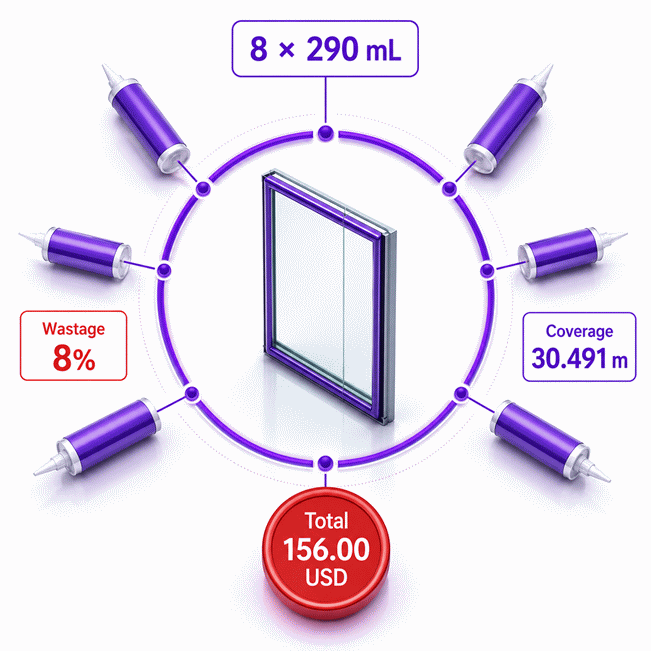
- Available packages: 8
- Package size: 290 mL
- Expected wastage: 8%
- Joint width: 10 mm
- Joint depth: 7 mm
- Total sealant budget: 156.00 USD
Eight packages provide a total purchased volume of 2,320 mL.
After allowing for 8% wastage, 2,134.4 mL remains for joint filling.
At 10 mm wide and 7 mm deep, this volume covers 30.491 meters.
The specified budget allows a maximum package price of 19.50 USD.
Results are rounded for display.
Internal calculations use full precision.
Calculations Disclaimer
How a Sealant Calculator Prevents Costly Material Shortages
A project can stop when one missing cartridge delays the final sealing work. The crew waits, equipment remains idle, and another delivery becomes necessary. A Sealant Calculator helps prevent this avoidable problem before purchasing begins. It turns measured joint dimensions into a clear material estimate. It also connects that estimate with available package sizes and project costs.
The Sealant Calculator needs three practical measurements from the jobsite. These are total joint length, joint width, and finished sealant depth. Finished depth means the applied sealant thickness, not the cavity’s full depth. This difference matters when a backer rod controls the bead profile.
Small measurement errors can create large purchasing errors across long joint runs. A wider joint needs more material for every meter or foot. Greater depth increases consumption in the same way. When both dimensions increase, the required volume rises much faster than expected.
This is why guessing from project area often fails. Sealant covers a three-dimensional space, not a flat surface. Window quantity alone does not reveal the required amount. Door count also provides little value without perimeter and joint measurements.
The fastest workflow is simple and easy to audit.
Measure the joints → group matching sizes → estimate volume → select packages → review cost
Start by measuring every joint run that will receive sealant. Add matching runs together, but keep different joint sizes separate. This prevents one average dimension from hiding larger sections. Wider or deeper sections can then receive the correct material allowance.
Next, choose the package sold by the supplier. Common options include cartridges, tubes, sausage packs, pails, and bulk containers. The best package is not always the largest one. It should fit the applicator, crew, joint size, and working conditions.
The result supports purchasing, but it also supports better project communication. Estimators can explain how the quantity was reached. Buyers can compare package options without relying on guesswork. Installers can check whether delivered stock matches the planned work.
A clear estimate also reduces two opposite risks. Buying too little creates downtime and urgent purchasing. Buying too much creates unused stock, storage pressure, and unnecessary spending. Good planning places the order between those costly extremes.
Measure the Joint Before Choosing the Sealant Package
An installer may see a narrow gap and assume one cartridge will be enough. That visual guess can fail across a long perimeter. The first purchasing decision should therefore begin with measurement, not package selection.
Total length includes every section that will receive the finished bead. Measure straight runs, corners, frames, penetrations, and repeated elements. Five identical windows require five complete perimeters. Measuring only one window creates a serious shortage.
Joint width should describe the actual gap receiving the material. Some joints remain consistent along their full length. Others become wider near corners, transitions, or damaged edges. Divide variable joints into practical groups when possible.
Finished depth requires equal care. A deep cavity does not always need full sealant filling. Backer rod often limits depth and supports the desired bead shape. Measure from the backer rod surface to the finished sealant face.
Do not measure the empty cavity when only its upper section receives sealant.
Irregular surfaces can consume more product than smooth, controlled joints. Rough concrete contains small voids and changing edges. Porous masonry can also make application less predictable. These conditions may increase tooling loss and practical consumption.
Measure after the joint has been cleaned enough to expose its real edges. Dust, failed material, loose mortar, and old sealant can hide usable dimensions. Removing them may reveal a wider or deeper joint than expected.
Temperature and structural movement can also change joint width. Record the conditions present during measurement. Large movement joints need project-specific design review before material ordering. A quantity tool cannot select movement capacity or confirm product compatibility.
Once the dimensions are known, group identical joints together. A useful group shares the same width, depth, and application profile. Calculate each group independently, then combine its purchasing needs.
This grouped approach is easier to check. It also shows which joint type consumes the most material. A short but wide joint may use more sealant than a longer narrow joint.
Photos can support the measurement record. Place a ruler or gauge beside the visible joint. Record the location and joint group with each image. This creates useful evidence when quantities change during procurement.
Reliable dimensions save more money than aggressive package discounts. A low price cannot correct an incorrect quantity. Measure first, then compare available packages using the same project requirement.
Why Joint Shape, Backer Rod, and Surface Condition Change Consumption
A rectangular estimate can look precise while the real bead has another shape. This becomes important in fillets, corners, glazing beads, and irregular repairs. The tool must be used with the actual applied profile in mind.
A rectangular joint has a consistent width and finished depth. This profile provides the clearest planning basis. Many construction joints can be estimated this way after correct backer rod placement.
A triangular bead occupies less space than a matching rectangle. Treating it as fully rectangular may increase the purchase estimate. However, an uneven triangular bead can still consume extra material during tooling.
A concave bead also differs from a full rectangular section. Tooling removes material from the center and shapes the exposed face. The final amount depends on the installed profile and the crew’s technique.
Backer rod controls depth and prevents sealant from filling unnecessary cavity space. It can reduce consumption and improve bead geometry. It also helps prevent adhesion against three joint surfaces.
Three-sided adhesion restricts normal movement within the bead. The sealant may experience stress in the wrong areas. Correct backing allows the material to move between the intended bonding surfaces.
Backer rod size must match the joint and product guidance. A loose rod may move during installation. An oversized rod can become difficult to place and may affect the joint.
Surface texture changes practical usage without changing the measured length. Smooth glass and metal usually offer controlled edges. Rough concrete, stone, and masonry create more small spaces and uneven contact areas.
The same measured joint can consume differently on smooth and rough surfaces.
Tooling method also affects consumption. Excess pressure can push material beyond the intended section. Poor nozzle sizing may create overfill. Frequent starts and stops can leave more material in tips and tools.
Package residue matters during real work. Some material remains inside cartridges, nozzles, sausages, pumps, and transfer equipment. The amount varies with package design and application method.
Do not compensate for every uncertainty by entering extreme values. Separate measurable geometry from practical installation loss. This keeps the estimate understandable and easier to review.
The tool supports material planning, not sealant selection. Product chemistry must suit the substrate, movement, exposure, and service environment. Check the current technical data before placing the order.
Structural glazing, firestopping, traffic joints, and submerged service need specialist review. Their performance depends on more than material volume. Joint design, adhesion, cure, movement, and testing can control the final decision.
Choose Sealant Packages Without Paying for Avoidable Surplus
A buyer can receive an accurate volume estimate and still choose poorly. Package selection determines handling, waste, labor, applicator needs, and surplus. The cheapest unit price may not produce the lowest project cost.
Small tubes suit repairs and short, detailed joints. They are easy to handle and limit opened-product surplus. Their unit cost may be higher on large projects.
Standard cartridges offer familiar handling and broad product availability. Many crews already own compatible applicators. Cartridge capacity varies, so confirm the printed net volume before ordering.
Sausage packs can suit larger, repeated applications. They often reduce rigid packaging and may leave less container residue. They require a compatible barrel gun and trained handling.
Pails and bulk systems can support large industrial work. They reduce frequent package changes during long runs. They also require suitable pumping, transfer, cleaning, and storage practices.
Compare packages using usable volume, not appearance. Two cartridges with similar dimensions may contain different amounts. Product labels can show milliliters, fluid ounces, liters, or gallons.
The right package combination slightly exceeds the planned purchase volume. It should also match actual supplier stock. A mathematically efficient combination has little value when unavailable locally.
Required amount → available sizes → practical combination → lowest usable surplus
Whole-package purchasing creates unavoidable surplus in many projects. A partial package result cannot always become a partial order. The final plan should therefore show both material need and purchased capacity.
Opened products require special attention. Some sealants begin curing after exposure to air or moisture. An opened package may not remain usable for another project. Follow its storage and reuse instructions.
Large packages can save money during continuous application. They may waste more material during small or interrupted jobs. Crew speed and joint access should influence the choice.
Check the applicator before confirming the order. Cartridge length, diameter, nozzle connection, and mixing requirements may differ. Two-component products may need dedicated equipment and mixing controls.
For procurement, record product name, package capacity, quantity, and batch information. Include color, cure type, and required accessories. This prevents a correct quantity from becoming an incorrect purchase.
AxiCalculator makes package comparisons easier by separating physical need from commercial packaging. The user can test several package sizes before ordering. This reveals surplus before money leaves the budget.
Separate Technical Selection from the Buying Decision
A low-priced sealant can become expensive when it fails in service. Quantity planning and product selection must remain separate decisions. One determines how much is needed. The other determines which product can perform safely.
Begin technical selection with the bonded materials. Glass, aluminum, concrete, stone, timber, and plastics behave differently. A product suitable for one surface may stain or release from another.
Next, check exposure conditions. Exterior joints face rain, sunlight, temperature changes, and movement. Interior joints may face cleaning chemicals, humidity, food areas, or limited ventilation.
Movement capacity matters in expansion and facade joints. A rigid filler cannot replace a flexible movement sealant. The selected product must match expected joint movement and design conditions.
Cure method also affects the project. Some products cure through moisture exposure. Others need mixing between two components. Thick sections may cure more slowly than thin exposed beads.
Color can affect approval, appearance, and replacement work. Confirm the exact color code before ordering. Product names such as white, gray, or bronze can vary between brands.
Check the package label and current product documents. Confirm net volume, batch identity, storage requirements, and shelf life. Damaged seals, unclear labels, or missing traceability deserve investigation.
Authenticity should rely on evidence, not packaging appearance alone. Buy through a traceable supplier and retain the invoice. Compare batch details with the supplier’s records when necessary.
Warranty terms require careful reading. A product warranty may cover manufacturing defects only. It may exclude poor preparation, wrong joint design, contamination, or incompatible substrates.
Technical support has real value on complex jobs. A responsive supplier can clarify primers, preparation, cure, and compatibility. Written guidance is more useful than an unsupported sales promise.
Compare total project cost instead of cartridge price alone. Include applicators, primers, backer rod, labor, delivery, waste, and surplus. A cheaper package can cost more after these factors are included.
Keep the buying record linked to the measurement record. This connection helps explain why each quantity was ordered. It also simplifies later checks during installation.
AxiCalculator supports the quantity and cost review. It does not replace product approval or project specifications. Use its result to prepare a better supplier conversation and a clearer order.
Common Sealant Planning Mistakes That Increase Waste and Delay Work
A crew often discovers shortages only after most joints are complete. The cause usually began before installation. It may involve measurement, package assumptions, or poor separation between joint groups.
The first common mistake is using surface area instead of joint volume. Sealant fills a three-dimensional section. Wall or floor area does not describe that space.
The second mistake is measuring one repeated element incorrectly. One window perimeter cannot represent five windows without multiplication. Every repeated run must be included.
The third mistake is entering the full cavity depth. Backer rod may limit the finished sealant depth. Using full depth can create a large overestimate.
The fourth mistake is averaging very different joint sizes. Averages can hide wide sections that consume much more material. Group similar joints and review them separately.
The fifth mistake is confusing package capacity with usable coverage. Coverage changes with width and depth. A cartridge has no single universal coverage distance.
The sixth mistake is ignoring material left in nozzles and equipment. Frequent interruptions can increase this loss. Complex access can also slow tooling and increase waste.
The seventh mistake is selecting packages before measuring the project. This reverses the correct decision process. Determine need first, then compare commercial options.
The eighth mistake is buying by price alone. An incompatible product can fail despite a perfect quantity estimate. Check service conditions and technical approval first.
The ninth mistake is assuming every currency label performs an exchange conversion. A cost estimate uses the entered package price. Confirm that every price uses the same currency.
The tenth mistake is treating an exported estimate as a supplier quotation. Availability, freight, tax, discount, and contract terms can change the final order.
The eleventh mistake is failing to inspect delivered packages. Verify capacity, quantity, color, batch, and visible condition. Resolve differences before application begins.
The twelfth mistake is discarding measurement records. Keep notes, photographs, and quantity calculations with the purchase file. Good records make later changes easier to explain.
Better planning does not require complicated language or hidden assumptions. It requires clear dimensions, suitable packages, and a traceable buying decision. Use AxiCalculator before ordering, then confirm the selected product with qualified technical support.
Frequently Asked Questions
Can I save and share a sealant estimate with my project team?
How should I plan sealant when the work will continue across several days?
Does changing the sealant color or chemistry change the calculated quantity?
Can the calculator estimate sealant around pipes and circular penetrations?
How should procurement reconcile the calculated quantity with a supplier submittal?
How can an engineer validate the estimate with a field yield test?
How should dimensional tolerances and joint movement be included in material planning?
Engineering Resources
Our engineers are here to help you get it right.