Rebar Calculator
- Last formula update:

Decimal & Rounding Policy
- All rebar calculations use full internal precision, with no rounding during intermediate calculation steps.
- Grid length, grid width, and total rebar length are calculated from unrounded values to reduce cumulative rounding errors.
- Displayed decimal results are rounded only for readability and do not change the underlying calculation value.
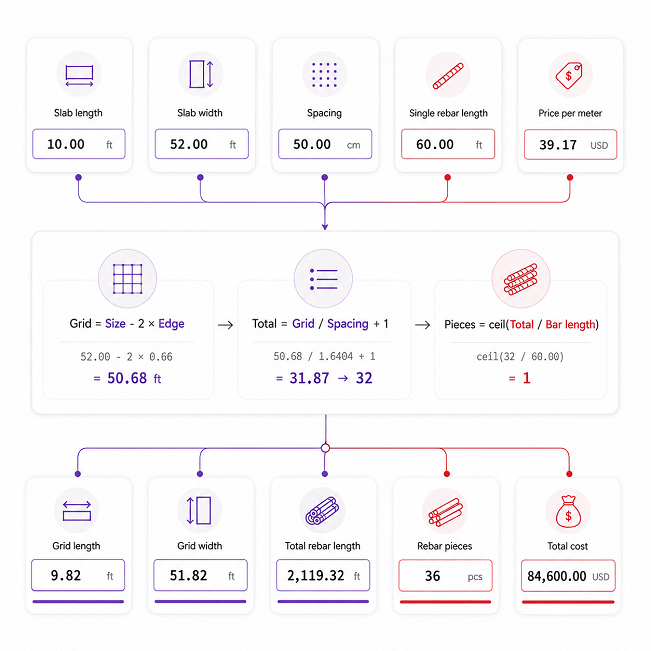
- The required number of rebar pieces is always rounded up to the next whole piece: pieces = ceil(total rebar length / single rebar length).
- Total rebar cost is calculated using the whole number of purchasable rebar pieces and the applicable single-piece price.
Valid range
- Slab length: greater than 0 and up to 1,000,000 m, and always greater than twice the edge clearance.
- Slab width: greater than 0 and up to 1,000,000 m, and always greater than twice the edge clearance.
- Rebar spacing: greater than 0 and up to 1,000,000 m; the selected unit is converted internally before calculation.
- Edge-grid clearance: greater than 0 and up to 1,000,000 m, but less than half of both slab dimensions.
- Single rebar length: greater than 0 and up to 1,000,000 m for calculating the required number of whole pieces.
- Rebar price and single-piece price: from 0 up to 1,000,000,000,000,000 in the selected currency.
- Grid length and grid width: greater than 0 and up to 1,000,000,000,000 m after applying the edge clearance.
- Total rebar length: greater than 0 and up to 1,000,000,000,000 m before conversion into purchasable rebar pieces.
- Number of rebar pieces: whole numbers from 1 to 1,000,000,000,000, always rounded upward when calculated.
- Total rebar cost: from 0 up to 1,000,000,000,000,000 in the selected currency.

Reviewers:
Elvarine Jexmont
Fenrick Zorquell
Check our editorial policy
August 13, 2026
1.0.0
Initial calculator and formula release.
Our engineers are here to help you get it right.
How Does a Rebar Calculator Estimate the Rebar You Need?
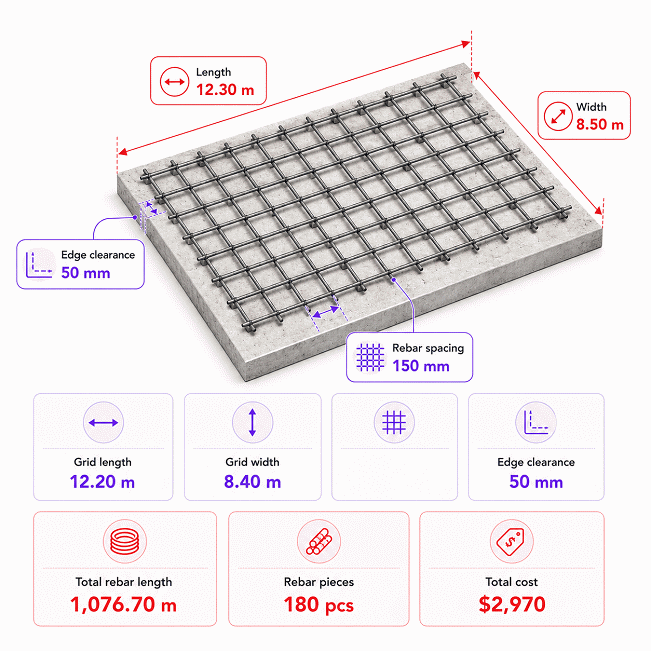
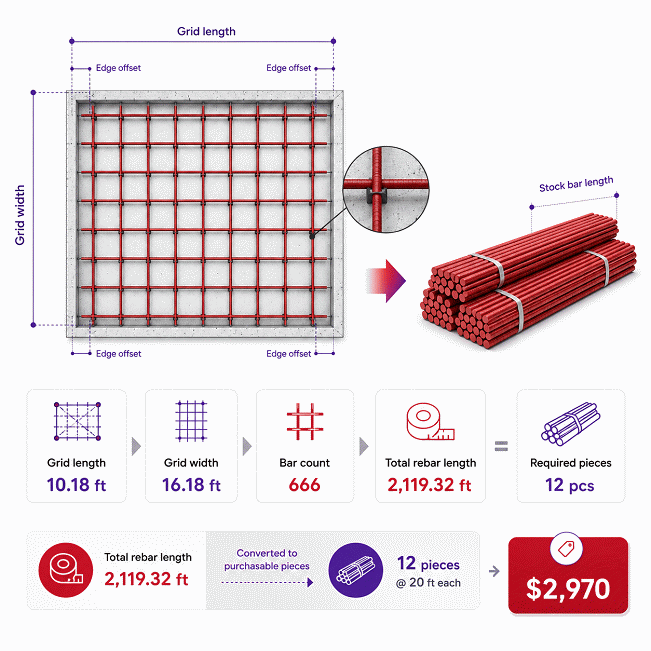
Rebar Calculator results turn slab dimensions, bar spacing, edge clearance, stock length, and price into a clear material estimate. The calculation first finds the usable reinforcement grid, then counts bars in both directions, combines their lengths, and converts the total into whole purchasable rebar pieces.
- Slab length and width define the overall rectangular reinforcement area.
- Edge clearance reduces both slab dimensions to create the usable rebar grid.
- Rebar spacing controls how many parallel bars are required across each direction.
- Total rebar length combines every lengthwise and widthwise bar run.
- Stock rebar length converts the required steel length into whole purchasable pieces.
- Rebar cost is based on the calculated piece quantity and applicable material price.
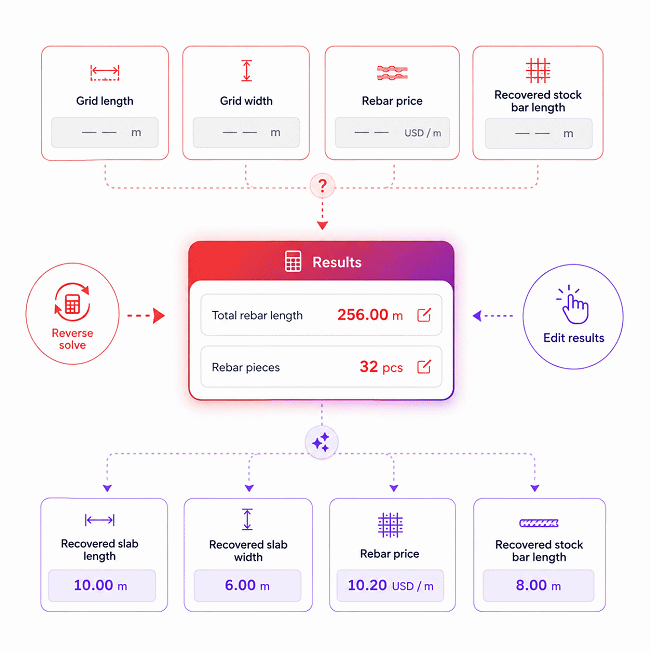
- Editable results support reverse solving for related slab, stock, and pricing values.
- Changing stock length affects purchasing quantity but does not change grid geometry.
- The Rebar Calculator is designed for a single rectangular two-direction reinforcement grid.
- Actual project demand may increase because of laps, bends, openings, waste, or additional reinforcement.
Use the estimate to plan materials and compare supplier options, then verify the final order against approved structural drawings and project-specific reinforcement details.
Assumptions used in this calculator
- The slab is rectangular with uniform reinforcement spacing in both directions.
- Rebar spacing is measured center-to-center between adjacent parallel bars.
- Edge clearance is applied equally along all four slab edges.
- Grid dimensions exclude twice the specified edge clearance.
- Bars extend continuously across the calculated reinforcement grid dimensions.
- Rebar quantities are calculated independently for both perpendicular grid directions.
- Required stock pieces are always rounded upward to whole bars.
- Stock rebar length remains constant for the entire calculation.
- Entered rebar prices represent the selected length unit or stock piece.
- Intermediate calculations retain full precision before final display rounding.
- Lap splices, hooks, bends, and cutting waste are not included.
- Openings, multiple reinforcement layers, and local strengthening are excluded.
- Final reinforcement requirements must follow approved structural drawings and applicable codes.
Results are rounded for display.
Internal calculations use full precision.
Formulas Used in Rebar Calculator :
xu = any length expressed in the selected unit.
xm = the same physical length expressed in meters.
ku = meters contained in one selected length unit.
pu = rebar price per selected length unit.
pm = normalized rebar price per meter.
L = slab length.
W = slab width.
E = edge-to-grid clearance.
S = rebar-to-rebar grid spacing.
GL = usable grid length.
GW = usable grid width.
NL = number of bars running parallel to the grid length.
NW = number of bars running parallel to the grid width.
T = total required rebar length.
B = length of one stock rebar piece.
NP = required whole stock pieces.
PB = price of one stock rebar piece.
C = total rebar cost.
Length Unit Normalization
Rebar Price Unit Normalization
Grid Length
Grid Width
Bars Running Along the Grid Length
Bars Running Along the Grid Width
Total Rebar Length
Required Rebar Pieces
The result is rounded upward to the next whole purchasable rebar piece.
Price of One Rebar Piece
Total Rebar Cost
All intermediate calculations retain full precision. Rounding is applied only where a whole rebar piece is required and when values are formatted for display.
Variables & Definitions
View a complete list of all variables used in this calculator, including definitions and units
Rebar Calculator Variables and Calculation Parameters
| Symbol | Variable | Type | Unit | Purpose |
|---|---|---|---|---|
| xu | Length in selected unit | Conversion value | Selected length unit | Represents any entered or displayed length before base-unit normalization. |
| xm | Length in meters | Normalized value | m | Stores the same physical length in the calculator base unit. |
| ku | Unit conversion factor | Conversion factor | m per selected unit | Converts a selected length unit into meters. |
| pu | Rebar price per selected length | Input | Currency per selected length unit | Represents the supplier price entered for one unit of rebar length. |
| pm | Rebar price per meter | Calculated | Currency/m | Normalizes the entered rebar price to the base length unit. |
| L | Slab length | Input | Length | Defines the overall length of the rectangular slab. |
| W | Slab width | Input | Length | Defines the overall width of the rectangular slab. |
| E | Edge-grid clearance | Input | Length | Sets the clearance between each slab edge and the reinforcement grid. |
| S | Rebar-rebar spacing | Input | Length | Sets the target spacing between adjacent parallel rebars. |
| GL | Grid length | Calculated | Length | Represents the usable reinforcement grid length after edge clearance. |
| GW | Grid width | Calculated | Length | Represents the usable reinforcement grid width after edge clearance. |
| NL | Bars running along grid length | Calculated | pcs | Counts the bars extending parallel to the grid length. |
| NW | Bars running along grid width | Calculated | pcs | Counts the bars extending parallel to the grid width. |
| T | Total rebar length | Calculated | Length | Combines the required rebar length from both grid directions. |
| B | Single rebar length | Input | Length | Defines the purchasable stock length of one rebar piece. |
| NP | Required rebar pieces | Calculated | pcs | Gives the whole number of stock rebars required for the calculated length. |
| PB | Price of one rebar piece | Calculated | Currency | Calculates the cost of one stock rebar from its length and unit price. |
| C | Total rebar cost | Calculated | Currency | Estimates the purchase cost of all required whole rebar pieces. |
Unit Conversion Table
Rebar Length Unit Conversion Table
| Unit Group | Unit Name | Symbol | Equivalent in Meters | Used For |
|---|---|---|---|---|
| Popular Units | Meter | m | 1 m | Base length unit, slab dimensions, grid dimensions, rebar length |
| Popular Units | Foot | ft | 0.3048 m | Slab dimensions, grid dimensions, spacing, stock rebar length |
| Popular Units | Centimeter | cm | 0.01 m | Rebar spacing, edge clearance, dimensions, length conversion |
| Popular Units | Inch | in | 0.0254 m | Spacing, edge clearance, slab dimensions, stock rebar length |
| SI Units | Millimeter | mm | 0.001 m | Precise rebar spacing, edge clearance, and dimensional entry |
| SI Units | Kilometer | km | 1000 m | Large total-length values and supported length conversion |
| Imperial / US Units | Yard | yd | 0.9144 m | Slab dimensions, grid dimensions, and total rebar length |
Rebar Price Basis Unit Conversion Table
| Unit Group | Unit Name | Symbol | Equivalent in Currency per Meter | Used For |
|---|---|---|---|---|
| Popular Units | Currency per Meter | currency/m | 1 currency/m | Base rebar price per unit length |
| Popular Units | Currency per Foot | currency/ft | 3.280839895 currency/m | Rebar pricing entered per foot |
| Popular Units | Currency per Centimeter | currency/cm | 100 currency/m | Rebar pricing entered per centimeter |
| Popular Units | Currency per Inch | currency/in | 39.37007874 currency/m | Rebar pricing entered per inch |
| SI Units | Currency per Millimeter | currency/mm | 1000 currency/m | Rebar pricing entered per millimeter |
| SI Units | Currency per Kilometer | currency/km | 0.001 currency/m | Large-scale price basis conversion |
| Imperial / US Units | Currency per Yard | currency/yd | 1.093613298 currency/m | Rebar pricing entered per yard |
Example Calculation
The edge clearance reduces both reinforcement grid dimensions before bar quantities are calculated.
Bar counts are rounded upward so the selected spacing is not exceeded across the grid.
The total rebar length combines all bars running in both perpendicular directions.
Stock pieces are also rounded upward because partial rebar pieces cannot be purchased separately.
Editable grid dimensions can be used to recover the corresponding slab dimensions.
The same spacing rules are then applied to determine both grid bar counts.
A selected whole-piece quantity can reverse-solve the corresponding stock rebar length.
A known total cost can also recover the piece price and price per unit length.
Results are rounded for display.
Internal calculations use full precision.
Calculations Disclaimer
How Much Rebar Do You Need for a Concrete Slab?
A Rebar Calculator should answer one urgent question: how much steel should you plan? A Rebar Calculator turns slab geometry into a clear material estimate. It connects slab size, bar spacing, grid size, stock length, and cost. This removes much of the guesswork before ordering materials.
The first problem is usually simple but expensive. A slab looks easy to measure. Yet small layout changes can affect the final steel quantity. A tighter grid needs more parallel bars. A larger slab also adds steel in both directions. Edge clearance changes the usable reinforcement area too.
The calculator treats the reinforcement as a rectangular grid. Bars run in two perpendicular directions. Each direction needs its own bar count. Those bars also have different run lengths. The combined runs create the total steel length.
This distinction matters during material planning. Slab area alone cannot describe the required rebar quantity. Two slabs can have the same area. Their dimensions can still produce different grid layouts. Their material needs can therefore differ.
Quick visual path: slab size → usable grid → bar runs → total steel → stock pieces → cost.
That sequence gives the estimate a clear structure. It also makes the result easier to inspect. You can see which input caused a quantity change. This is useful before requesting a supplier quote.
How Slab Length and Width Define the Reinforcement Layout
A common problem starts with using slab area alone. Area does not show how the grid actually fits. The calculator therefore uses slab length and slab width separately.
Each dimension controls one side of the reinforcement layout. The usable grid sits inside the concrete boundary. Bars then cross that grid in two directions. One group follows the grid length. The second group follows the grid width.
This approach matters on long or narrow slabs. A shape change can alter bar counts significantly. The total concrete area may remain unchanged. Yet the reinforcement layout can still need more individual runs.
The safest workflow starts with measured slab dimensions. Use design dimensions when available. Do not replace drawing dimensions with rough site estimates. A small dimensional error can change the final stock requirement.
Eye check: compare both slab dimensions before reviewing the total steel quantity. One incorrect side can distort every later result.
How Rebar Spacing Changes Bar Count and Total Material
Spacing mistakes can increase the estimate very quickly. Smaller spacing places more bars across the same grid. Larger spacing places fewer bars across that distance.
The effect is easy to understand visually. Imagine adding more lines inside the same rectangle. Each new line adds another complete bar run. That extra run also adds material length and purchase cost.
The calculator applies one spacing value across both grid directions. This creates a regular rectangular reinforcement pattern. It does not design different spacing for each direction.
Spacing should come from the project design. It should not be selected only to reduce cost. Structural loads can change reinforcement requirements. Bar size, concrete strength, exposure, and detailing can also matter.
A lower material result is not automatically a better result. The correct result must follow the approved reinforcement plan. The calculator helps quantify that plan after spacing is known.
Why Edge Clearance Changes the Effective Rebar Grid Size
Another common mistake is placing the grid at the concrete boundary. The reinforcement grid normally sits inside that boundary. The calculator therefore separates slab dimensions from grid dimensions.
Edge clearance reduces the working grid on opposite sides. This changes both the bar run lengths and grid width. The result then affects the complete material estimate.
Edge clearance should not be confused with every structural cover requirement. The calculator uses it as a geometric grid offset. Actual concrete cover can depend on project conditions and reinforcement details.
Site exposure can also affect required cover. Ground contact may need different detailing from an interior slab. Fire resistance can affect design requirements too. Those choices belong in the structural design process.
For estimating, the key idea stays simple. The reinforcement grid is smaller than the full slab footprint. That smaller grid becomes the basis for bar placement.
How Does the Rebar Calculator Work?
The hardest problem is not entering dimensions. It is understanding how those dimensions become an order quantity. The calculator solves this through a fixed sequence.
First, it establishes the usable reinforcement grid. Next, it determines bar runs across both directions. Then it combines those runs into total required steel length. Finally, stock length converts that requirement into purchasable pieces.
The cost section works after the material quantity is known. This separation matters. Geometry decides how much steel is needed. Supplier pricing decides how much that steel may cost.
The tool also supports editable results. This lets a user work backward from selected outputs. That can help during planning or quote comparison. It is especially useful when some project values are already known.
However, reverse solving should follow the same physical logic. An edited result must still describe a possible reinforcement layout. The calculator should not turn an impossible combination into a credible estimate.
This workflow keeps the calculation transparent. A user can trace the result without hidden steps. That is useful for estimators, contractors, buyers, and project engineers.
How Grid Length Is Determined
A frequent site problem comes from measuring the full slab run. That length is not always the working reinforcement length. The usable grid stops inside the slab edges.
The calculator starts with the slab length. It then accounts for the selected edge clearance. The remaining distance becomes the grid length.
This grid length represents the working distance inside the slab. Bars running parallel to this direction use that distance as their run length.
Changing the grid length can also support reverse solving. The slab length can be recovered when edge clearance is already known. This is useful when a drawing shows the reinforcement grid clearly.
The relationship is direct and easy to inspect. That makes grid length a useful checkpoint. If it looks wrong, inspect slab length and edge clearance first.
How Grid Width Is Determined
Width errors often hide inside otherwise correct estimates. The calculator treats width independently from length. This prevents one dimension from silently controlling the entire grid.
The full slab width is reduced by the edge offsets. The remaining distance becomes the usable grid width. Bars running across the opposite direction depend on this value.
A narrow grid may need fewer bar lines. A wider grid may require more lines. That effect becomes stronger when spacing is small.
Grid width can also work backward. An editable grid width can recover the slab width. Edge clearance must already be known for that relationship.
Quick check: inspect grid width whenever the bar count seems unusual. One wrong dimension can create a large quantity difference.
How Bar Count Is Built in Both Directions
The most common quantity mistake is counting bars in only one direction. A rectangular slab normally needs two perpendicular bar groups. Both groups contribute to total steel length.
The first bar group runs along the grid length. Its quantity depends on the grid width. The second group runs along the grid width. Its quantity depends on the grid length.
This crossing pattern creates the reinforcement mesh. Each new line adds another full bar run. The total therefore depends on both count and run length.
Visual guide: grid width → lengthwise bars; grid length → widthwise bars.
This simple relationship prevents a frequent estimating error. The direction of a bar is not its counting direction. A lengthwise bar is counted across the width.
That detail is easy to miss during manual takeoff. The calculator handles both directions automatically.
How Total Rebar Length Is Built
A project buyer needs more than a bar count. Different bars can have different run lengths. The calculator therefore combines quantity and run length.
Lengthwise bars contribute one part of the total. Widthwise bars contribute the second part. Their combined material creates the total rebar length.
This value is useful for early material planning. It also helps compare stock length choices. However, total length is not the same as a cutting schedule.
A cutting schedule tracks individual bar lengths. It may also track bends, marks, shapes, and splice positions. This calculator does not create that fabrication schedule.
The total length is a pooled material requirement. It is designed for fast estimating. It should remain easy to trace back to the grid.
How Total Rebar Length Becomes Stock Pieces
The purchasing problem begins when total length meets real stock bars. Suppliers sell rebar in physical pieces. Those pieces have defined stock lengths.
The calculator uses the selected single-bar length for purchasing. A longer stock bar may reduce the required piece count. A shorter stock bar may increase that count.
This does not change the reinforcement grid itself. Stock length belongs to the purchasing stage. Grid geometry belongs to the layout stage.
This separation helps when comparing supplier options. Two suppliers may offer different stock lengths. The grid requirement can remain identical. The order quantity can still change.
Before ordering, also consider practical cutting needs. Offcuts may be reusable on some projects. Other projects may need specific continuous runs. Those details should be checked before issuing a purchase order.
How Rebar Quantity and Cost Planning Work Together
A cheap quote can still become an expensive order. Price only makes sense after material quantity is understood. The calculator keeps these two decisions connected but separate.
Geometry establishes the steel requirement first. Stock length then establishes the piece quantity. Pricing can then estimate the material budget.
This order prevents a common buying error. Buyers sometimes compare only the price per bar. That comparison can fail when stock lengths differ.
A longer bar may cost more per piece. It may also reduce the number of pieces needed. A shorter bar may look cheaper. Yet the total order may still cost more.
Before comparing quotes, check stock length and price basis. Also check the quoted steel grade and size. Delivery terms can affect the real project cost too.
The best purchase decision is not always the lowest unit price. It is the lowest suitable delivered cost for the required material.
How Single Rebar Price Affects the Budget
Supplier quotations often use different pricing methods. One quote may show a price per length. Another may show a price for each stock bar.
The calculator can connect these two views. Stock length links the bar to its piece price. That gives the buyer a useful comparison point.
This is valuable when reviewing multiple quotations. Always compare equivalent material before selecting the lowest price. Check bar grade, size, coating, and stock length.
Also review any cutting charges. Some suppliers include cutting in the quoted price. Others charge it separately. Delivery and unloading can add further costs.
A clear piece price makes the final budget easier to explain. It also helps purchasing teams check invoices against expected quantities.
How Total Material Cost Helps Before Ordering
Budget surprises often appear after the quantity is already approved. An early cost estimate can expose those risks sooner. The calculator connects stock pieces with supplier pricing.
The result gives a direct material cost estimate. It can support quote reviews and early procurement planning. It can also show how stock choices affect the budget.
Watch this: geometry change → material change → piece change → budget change.
That chain helps users find the source of a cost increase. A price rise may not be the only reason. Tighter spacing can also increase total steel demand.
Cost planning should also include supplier terms. Check freight, handling, minimum order rules, and cutting services. Tax treatment may also differ between quotations.
A calculator estimate becomes more useful when paired with a complete supplier quote. That combination gives procurement teams a clearer decision.
Reverse Rebar Calculator: Solve Missing Inputs from Editable Results
Sometimes the known value is not an input. A drawing may show grid dimensions. A quote may show total cost. A takeoff may already show stock pieces.
Reverse solving helps in these situations. The user can work backward from selected results. Related values then update around that choice.
This approach can save time during estimate checks. It can also help compare an existing takeoff with measured slab dimensions.
The important point is physical meaning. A reverse result should still describe a practical project condition. The tool should support planning, not replace design judgment.
Reverse solving is especially useful during quote review. It can reveal the implied stock length or piece price. It can also recover slab dimensions from a known grid.
This makes the calculator more than a one-way estimator. It becomes a planning tool for checking related project values.
Recovering Slab Length and Width from Grid Dimensions
A common review problem starts with reinforcement drawings. The grid dimensions may be clear. The original slab dimensions may not be nearby.
If edge clearance is known, the calculator can recover the corresponding slab dimensions. This works because the grid sits inside the slab boundary.
The recovered values can help during drawing checks. They can also support coordination between structural and quantity documents.
However, always compare the recovered dimensions with approved project information. A drafting offset can look like a real design value. That mistake can affect the entire material estimate.
Reverse geometry is most useful as a cross-check. It can quickly expose mismatched dimensions between documents.
Solving Stock Bar Length from Piece Count
A buyer may already know the desired piece quantity. The total steel requirement may also be known. Reverse solving can connect those values.
The result provides a stock-length target linked to the selected quantity. This can help compare available supplier lengths.
However, purchasing still needs a practical check. Commercial stock lengths may follow regional market standards. A calculated target may not match available inventory.
Cutting efficiency matters too. A longer stock bar can create reusable offcuts. It can also create waste when the run lengths fit poorly.
Use the recovered stock length as a planning signal. Then compare it with actual supplier availability. This keeps the calculation connected to real procurement conditions.
Real-World Rebar Planning Checks Before You Order
A correct calculator result can still become a poor purchase order. Real projects include details beyond a simple rectangular grid. Those details can increase actual steel demand.
Openings may interrupt bar runs. Thickened areas may need extra reinforcement. Construction joints can change bar placement. Local reinforcement can also appear around columns or edges.
Long runs may require splice detailing. Bent bars and hooks can add length. Multiple reinforcement layers can multiply material demand. The current grid estimate does not design those details.
Site handling also matters. Bars can be cut incorrectly. Material can be damaged or misplaced. Some offcuts may not fit later work.
Before you order, compare the calculator result with the structural bar schedule. Review plan notes and typical details too. Confirm stock availability with the supplier.
This final check protects both schedule and budget. It can prevent emergency deliveries during concrete preparation.
Common Rebar Calculation Mistakes That Inflate or Understate Quantity
A surprisingly high result usually has a simple cause. Spacing may be entered too small. A dimension may also use the wrong scale.
A surprisingly low result needs the same attention. Edge clearance may be too large. One slab dimension may be missing or incorrect.
Another mistake involves bar direction. Lengthwise bars are counted across the width. Widthwise bars are counted across the length.
Stock length causes another frequent error. It should describe a purchasable bar. It should not be confused with one grid run.
Users can also confuse required steel with fabricated steel. A pooled length does not include every cutting detail. It also does not create a bar bending schedule.
Quick check before ordering: dimensions, spacing, clearance, stock length, price, and drawing revision.
What the Material Estimate Does Not Design
Construction risk appears when an estimator is mistaken for a structural designer. This tool measures a defined reinforcement grid. It does not determine structural capacity.
It does not choose the required bar diameter. It does not select the steel grade. It does not design development length or anchorage.
It also does not design lap locations. It does not calculate hooks or bends. It does not determine reinforcement around openings.
Top and bottom reinforcement mats need separate project review. Extra bars around supports also need separate review. Local strengthening cannot be inferred from slab dimensions alone.
This boundary makes the result more useful. The calculator focuses on a clear task. Structural decisions remain connected to approved engineering information.
Buying Rebar with a Calculator Estimate
The final buying problem is not finding the cheapest bar. It is buying the correct steel in a usable form. A clean estimate gives purchasing teams a starting quantity.
Next, compare supplier details carefully. Check the stated grade and bar designation. Check stock length and coating requirements. Confirm the quantity included in the quote.
Ask for material traceability when the project requires it. Mill certificates can support grade verification. Heat or batch identification may also be required.
Check delivery conditions before accepting the quote. Long bars need suitable transport and unloading access. Site storage space can affect the delivery plan.
Service terms also matter. Review cutting options, return rules, claim procedures, and delivery support. Do not assume every supplier offers the same coverage.
Price is important, but mismatched material can cost far more. A clear calculator estimate helps keep the buying discussion focused.
How to Compare Supplier Quotes Without Losing the Geometry
Two quotes can look similar while describing different orders. One may use longer stock bars. Another may contain more individual pieces.
Start with the required reinforcement geometry. Keep that requirement fixed during the comparison. Then compare how each supplier satisfies it.
Review the stock length behind every piece price. Check delivered quantity, not only the unit price. Also inspect freight and cutting charges.
If a quote seems unusually cheap, inspect the specification. Confirm grade, size, coating, and certification. A price comparison only works between equivalent materials.
This approach removes a common buying trap. The lowest line-item price is not always the lowest project cost.
What to Check Before Rebar Arrives on Site
A purchase error becomes harder to fix after delivery. Check the order while changes are still easy.
Confirm the purchase order matches the latest project revision. Compare bar designation and stock length. Check required quantity and delivery date.
Verify any requested certificates before shipment. Confirm cutting instructions when cutting services are included. Review unloading requirements with the site team.
Storage planning also deserves attention. Rebar should remain organized by size and use. Clear identification reduces picking errors during installation.
Keep the calculator export with the purchasing record. Share the same estimate with relevant team members. This creates one clear quantity reference.
Turn the Rebar Estimate into a Purchase-Ready Workflow
A calculated number has little value when the team cannot use it. The next step is turning the estimate into a clear workflow.
Start by reviewing the slab dimensions and reinforcement layout. Then review the required stock quantity. Add project-specific steel details from the drawings.
Next, compare available stock lengths with the planned runs. Review likely cutting needs. Then request supplier pricing for the same material basis.
Text infographic: project geometry → calculator estimate → drawing check → supplier quote → purchase review → site delivery.
The PDF export can support a clean project record. The Excel export can support further commercial review. The share link can send the same calculator state to another user.
This avoids repeated manual entry. It also reduces confusion between team members. Everyone can review the same calculation state.
AxiCalculator is most useful at this decision point. It turns scattered project numbers into one readable estimate. That makes supplier discussions faster and more focused.
Before placing the order, compare the estimate with approved project documents. Then confirm the commercial details with the selected supplier. The result is a clearer path from slab dimensions to material planning.
Frequently Asked Questions
Can the calculator help me choose between different stock rebar lengths before ordering?
What should I check if the calculator result looks reasonable but the supplier quote is much higher?
Can I use the shared calculation link as a record for my project team?
What is the best way to use the calculator when only part of the project data is known?
How should an engineer handle a slab that has openings, thickened zones, or local reinforcement?
If one required bar run is longer than the available stock length, how should the quantity be checked?
Why can reverse solving from a selected piece count produce more than one practical stock-length option?
Engineering Resources
Our engineers are here to help you get it right.